Browsing Tag

A Way With Words – Big Balloon

A Way With Words Cardmaking Inspiration from the Design Team

Gel Print Birthday Card

May 22, 2021

Hey friends! It’s EK, and today I am popping in with a super easy, super quick birthday card using both my gel press plate and Suzanne Cannon’s A Way With Words dies. I just love how simple this card was to make, but yet how impactful the look of it is!

Step One: Die cut the A Way With Words Big Balloon out of Watercolor paper.

Step Two: Ink up a gel plate with ink and blend with a brayer. I used Crackling Fire, Ripe Persimmon, and Wild Honey Distress Oxides. Press the die cut balloon onto the gel plate.

Step Three: Die cut the A Way With Words Happy Birthday 3 die set out of Watercolor Paper.

Step Four: Ink up the gel plate and blend with a brayer. I used Scattered Straw and Mustard Seed Distress Oxides.

Step Five: Splatter an A2 card frame with liquid ink. I used Fossilized Amber Distress Oxide Spray and Rusty Hinge Distress Ink Spray.

Step Six: Splattered the Big Balloon inked die cut with liquid ink. I used Fossilized Amber Distress Oxide Spray. Let dry. Ink the round edges with a black ink pad.

Step Seven: Using some 6mm Clear Double Sided Adhesive, adhere the Big Balloon onto the A2 card frame. Let the straight edges hang off the edge of the card frame.

Step Eight: Using a craft knife or scissors, trim the excess balloon off the card frame.

Step Nine: Using a liquid adhesive, adhere the birthday sentiment onto the balloon.

Step Ten: Using a black pen, add shadows and details to the die cut sentiment.

I just love how easy this card is to create. Make sure you pop over to the store and pick it up while it is still in stock and on sale!

Let us know in the comments below if you ever use a gel plate to add splashes of color to your die cuts. Until then, happy crafting.


A Way With Words Elizabeth Craft Designs General Els van de Burgt Studio Soft Finish Cardstock

You’re Invited Baby Shower Invite

March 6, 2021

Hey Crafters! Katelyn here, sharing with you my You’re Invited Baby Shower Invite.

To create my You’re Invited Baby Shower Invite, I’ve used a variety of dies and stamps from Suzanne Cannon as well as dies from Els van de Burgt Studio. You’ll want to read below as I share with you how to recreate my invite at home.

Step One. Start by choosing a couple of pieces of coordinating patterned paper. Die cut a 4 1/2″ Stitched Rectangle out of one of the patterned papers. Die cut a 4″ Stitched Rectangle out of the other patterned paper.

Step Two. From the Big Balloon Die, die cut the balloon once out of Whisper Blue Soft Finish Cardstock. Choose another piece of coordinating patterned paper and die cut the balloon out again.

Step Three. Using the balloon die, die cut the string out of a piece of White Soft Finish Cardstock.

Step Four. Die cut the You’re Invited die out of a piece of White Soft Finish Cardstock.

Step Five. From the Little Ones die, die cut the plain onesie out of a piece of White Soft Finish Cardstock. Die cut the onesie with the heart on it out of another piece of coordinating patterned paper.

Step Six. Apply Jet Black Archival Ink to the Something Special sentiment from the You’re Invited Stamp Set and stamp onto a piece of White Soft Finish Cardstock. Cut the sentiment into a strip.

Step Seven. Foam square the 4″ rectangle to the 4 1/2″ rectangle.

Step Eight. Adhere the patterned paper ballon to the plain blue ballon, making sure that you can see a bit of the blue. Adhere the string to the bottom of the balloon.

Step Nine. Adhere the balloon to the top left corner of the 4 1/2″ rectangle. Trim the string on the balloon so that it ends at the bottom of the 4 1/2″ rectangle.

Step Ten. Adhere the You’re Invited to the middle of the balloon as desired.

Step Eleven. Cut a cardbase out of White Soft Finish Cardstock that measures 5 3/4″ x 9″, score at 4 1/2″. Adhere the cardfront to the cardbase.

Step Twelve. Adhere the patterned paper onesie to the plain onesie. Adhere the onesie to the middle inside of the card.

Step Thirteen. Adhere the Something Special sentiment to the bottom portion of the onesie.

Thanks for joining me today! I hope that I’ve inspired you to create your own version of my You’re Invited Baby Shower Invite.

Katelyn

Elizabeth Craft Designs Supplies Used:

Other Supplies Used:

  • Ranger Ink: Jet Black Archival Ink
  • Echo Park Paper: Welcome Baby Boy Patterned Paper Pack
A Way With Words ModaScrap

Cheery Hello Balloon!

July 18, 2020

It’s a good time to say Hello to someone special!  It’s Suzanne here today and I’m sharing this fun technique that I’m in love with.  It seems to be called the Eclipse technique and I like it because it’s a bit subtle, but it’s a great way to help the delicate Away With Words diecuts stand out from a busy patterned paper! If you’re familiar with the technique, this is a double-decker version! Join me!

Instructions:

Cut a panel from patterned paper measuring 5-1/8” x 6”. Cut a panel from black cardstock measuring slightly larger: 5.5” x 6.25” (not shown here).

Die cut the Big Balloon from the patterned paper panel as shown and also  die cut the Big Balloon from fun foam.

Die cut Hello from the middle of the patterned paper Big Balloon diecut on a jaunty angle.  Make sure you keep all the inside counterspaces of all the letters!  Die cut Hello from a new piece of fun foam (NOT from the Big Balloon fun foam diecut!).  You don’t need the fun foam counterspaces.

Center and adhere the patterned paper panel to the black panel.

Adhere the black fun foam Balloon into the cut out patterned paper panel. Glue the patterned paper Balloon on top of the fun foam Balloon.

Adhere the black fun foam Hello into the cut out Hello on the Balloon. 

Add the patterned paper counterspaces where they came from. Tweezers are super helpful!

Then glue the patterned paper Hello on top of its fun foam version. It’s super cool that the patterned paper all lines up perfectly! Love it!

Form a 6” wide by 7” high side-fold card base from coordinating paper.

Adhere the eclipse panel on your card base. Tie a little bow of coordinating thread or ribbon and adhere it to the Balloon.

Very cool card! Aren’t they fun! Enjoy making more of these! Try changing the colour of the fun foam and see what happens.
Happy creating! Suzanne

Elizabeth Craft Designs Supplies:

Other Supplies:

Glue
Black Fun Foam
Black Cardstock
Thread

A Way With Words

Make a Wish

June 27, 2020

Hey Friends!  It’s EK Gorman back to share one of my favorite things in this world to do when making cards.  I just love to make a card that looks elegant and lovely, but in fact has an underlined teasing tone to it.  One of my favorite stamps to create this type of card is A Way With Words Happy Birthday Collection stamp set.  It has just the right amount of elegance and teasing to create the perfect birthday card for that friend who might be getting old.

IMG_0263
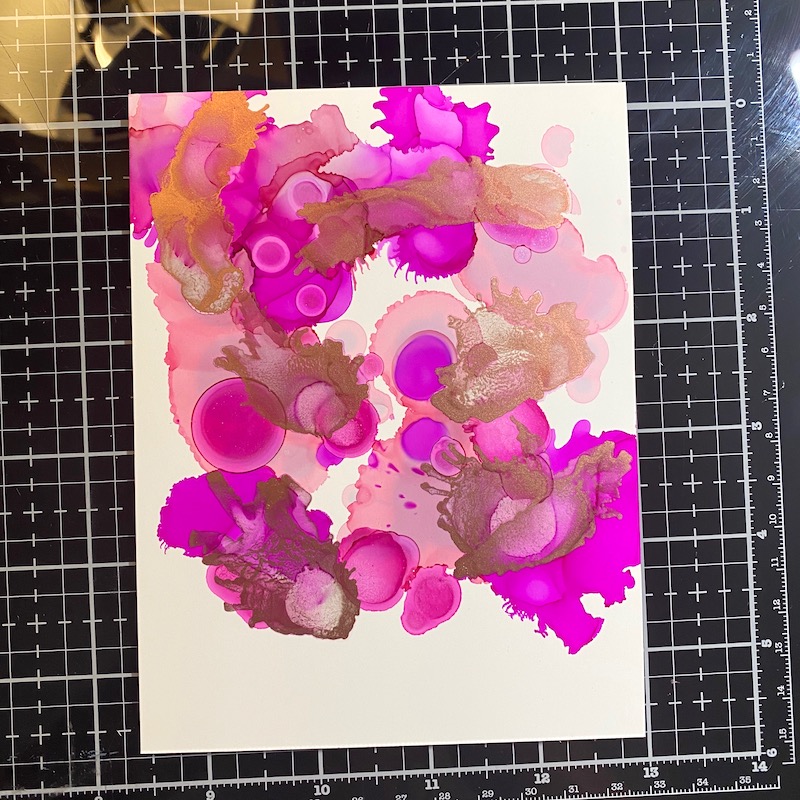
Step One:  Pull out a piece of Yupo paper and splatter on some alcohol ink to create a background.

IMG_0264Step Two:  Die cut the yupo paper with the A Way with Words Big Balloon die set.

IMG_0265Step Three:  Using a piece of 90lb Soft Finish Cardstock trimmed to 4.25×5.5 inches.  Blend a collection of coordinating ink onto the cardstock to create a soft background.

IMG_0266
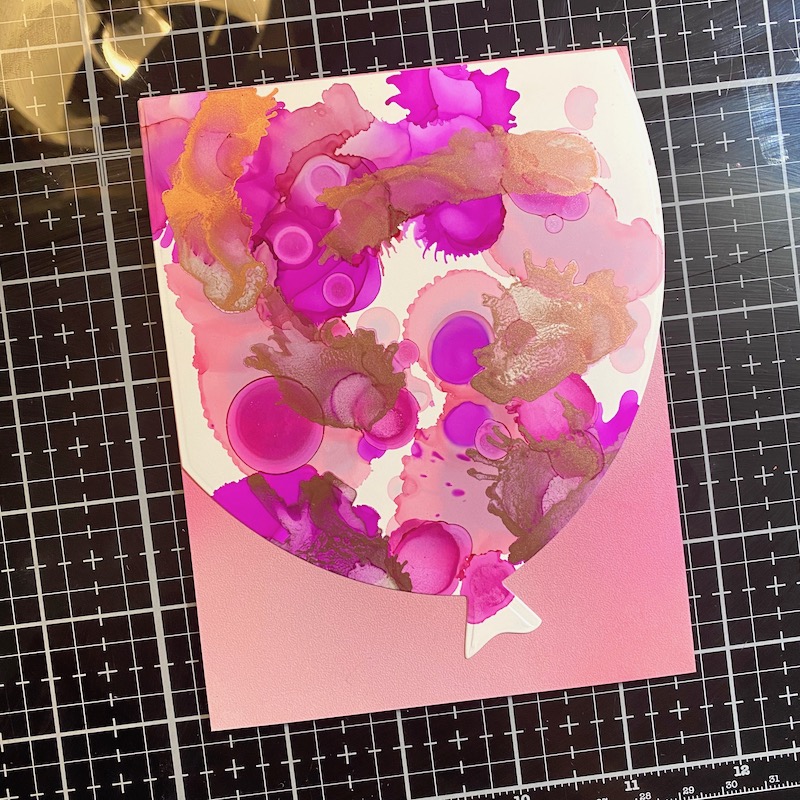
Step Four:  Adhere the balloon onto the cardstock using 10mm Clear Double Sided Adhesive.

IMG_0267Step Five:  Die cut and adhere the bow to the balloon from the Big Balloon die set.  I used Kids Choice Glue to adhere the bow.

IMG_0268Step Six:  Using a permanent black ink and a stamping platform, stamp the sentiment onto the balloon from the Happy Birthday Collection stamp set.

IMG_0329Step Seven:  Adhere the card front to an A2 card frame using 10mm Clear Double Sided Adhesive.  Trim any bit of the balloon that hangs off the card frame.

IMG_0330
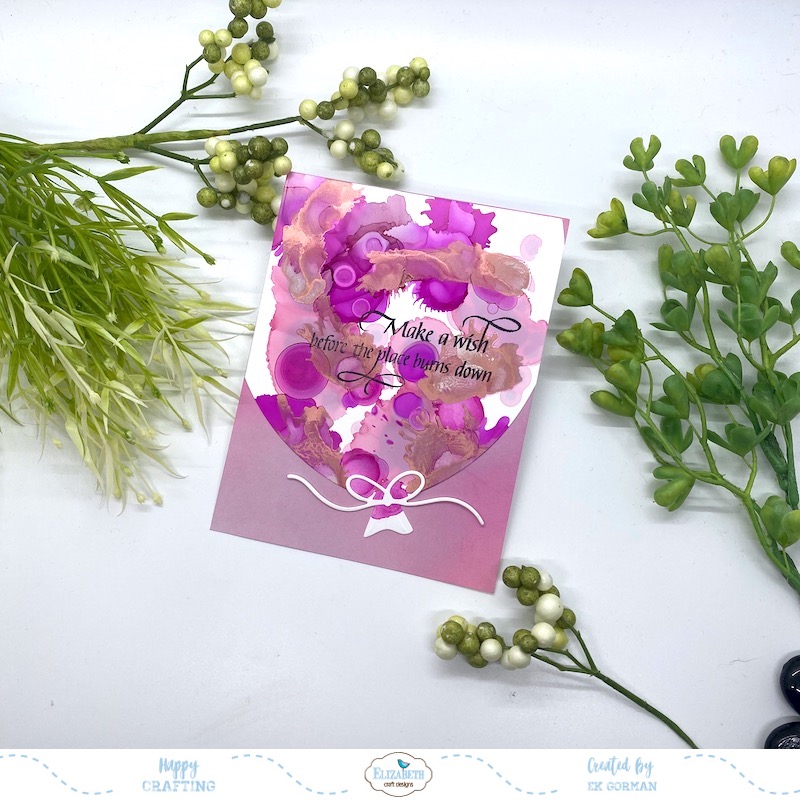
I hope my birthday card makes you smile.  Let us know in the comments below if you enjoy making cards that make people laugh.  Until then, happy crafting.


A Way With Words Inspiration from the Design Team

A ‘Masculine’ Way With Words

July 27, 2019

Hey Friends! It is EK here and I thought I would share the masculine birthday card I created with you today.

I find masculine cards really difficult to create a lot of the times, let alone masculine birthday cards. However I have found that the A Way With Words line from Suzanne Cannon really does am a great job leaning toward my masculine card making needs.

Step One: Die cut some 90lb White Soft Finish Cardstock with the Butterflies & Stars Sprays die twice with the star die. This will allow you to create your own stencil with the star cut outs.

Step Two: Using the homemade stencil, add some Fossilized Amber Distress Oxide onto a piece of 6×6 trimmed piece of White Soft Finish Cardstock.

Step Three: Die cut the inked paper with the A Way With Words Big Balloon die set.

Step Four: Ink the edges of the balloon with some Frayed Burlap Distress Ink.

Step Five: Trim a piece of Cafe au Cait Soft Finish Cardstock to 12×6 inches and score and fold the cardstock to make a 6×6 inch card frame. Spray the front of the card with some brown metallic ink so there are some splotches of reflective ink.

Step Six: Die cut a piece of Thinking About Grand Canyon paper with the Stitched Indented Square die set. Adhere the die cut onto the card frame using some 6mm Clear Double Sided Adhesive. Adhere the die cut balloon on top of the die cut square.

Step Seven: Die cut the bow from the Big Balloon die set out of the left over stenciled cardstock. Adhere to the balloon.

Step Eight: Die cut the sentiment from the A Way With Words Happy Birthday 3 die set out of both a piece of Thinking About Grand Canyon printed paper and some White Soft Finish Cardstock. Layer the printed paper over the white cardstock, letting a bit of the white show on the upper left side of the word. Using Kids Choice Glue, adhere the sentiment to the card frame.

I really love how this card can be used for any gender at any age. It is a simple message, but exactly the one you want to convey.

EK Gorman


https://linkdeli.com/widget.js?1559654439292

A Way With Words ModaScrap Planner Essentials

Planning for a Baby!

January 5, 2019

Hi there!  It’s Suzanne here today. No, I’m not the one planning for a baby, but I know people who are!  And the great thing about these planner pages is they can become part of an ongoing baby journal!

The new Elizabeth Craft Designs Planners are a great way to expand the use of dies you already have in your stash and allow you to create something completely new.

I love the blues and browns of the Moda Scrap My Little Boy papers and used it for a base for creating this baby shower planner spread. Here is how you can make your planner spread, too!

Continue Reading
%d bloggers like this: