Browsing Tag

Christmas

Joset Designs

Mr and Mrs Claus

October 17, 2022

Hello crafty friends, it’s Summer Hills-Painter here. I am so excited about the new release for Joset. I absolutely loved designing Mr. and Mrs. Claus.  

Preparation: 

Cut one standard size A2 cardbase from white cardstock. Cut one layering piece at 4” x 5 ¼” from light blue cardstock. Cut snowy hills from white soft finish cardstock measuring 5 ¼” x approximately 2 ¾”. Using the Nature Edges die, cut the soft finish cardstock layer to create hills. Cut and assemble Santa Claus and Mrs. Claus. For extra dimension, I have used Copics to color in the hair and beard.  

Instructions: 
Adhere the snowy hills to the light blue cardstock layer


Adhere the light blue cardstock layer to the card base

Adhere Mr. and Mrs. Claus to the card front  

Stamp a sentiment on the inside of the card to finish of the card. Here I have used the stamp set. 

Supplies Used:

Santa Claus – coming soon

Mrs Claus – coming soon

1625 – Adventure Edges

CS236 – Holiday Sparkle

Cardmaking Joset Designs Soft Finish Cardstock Uncategorized

Sneak Peek of Holiday Fun

October 14, 2022

Karen here. I’m jazzed today to be sharing a fun sneak peek of a amazing new collection from Joset – coming SOON to online and brick-and-mortar stores near you! It’s a fun new holiday release that’ll surely make you warm and cozy as you create holiday projects!

I absolutely love this new Fireplace set. I added a sentiment from the new set and though “believe” said it all as Santa Claus attempts to make his way into the house through the fireplace. The Fireplace and Santa Claus legs are mounted on a Rounded Stitched Rectangle.

I used 90 lb Soft Finish Cardstock to create this card. The fireplace on top cardstock was dipped in Distress Oxide Inks of Fired Brick and Worn Lipstick. Then I added 101mm Double Sided Adhesive to another piece of cardstock dipped in Fired Brick and Vintage Photo to create the brick around the fireplace. Having the adhesive on the back sure makes adding the pieces to the fireplace easy! After I started this, I re-did the mantel to be all Vintage Photo.

Eek, I love this new Cook Stove! Again, I used one of the new stamps for a sentiment. I cut the brown and black pieces from other cardstock. The doors of the stove were cut from grey cardstock with double sided adhesive. Easy to put together and warm and cozy. Perfect!

Thanks for checking out these cards. Can’t wait for you all to see the whole collection. It’s so fab!

Craftily yours, Karen

Paper Flowers

X-Mas time

October 12, 2022

Hello everyone! Today Irina here to share a blogpost with you. For this post I was inspired by the colors from a picture I saw on the internet. It’s a clean card with a lot of white. Have you already started making Christmas Cards? I do and I love making them. Let’s start my card tutorial.

Take a piece of white cardstock from 8 x 4 3/4 inch and emboss this with a Elizabeth Craft Designs stencil. I used one of the Planner Essentials Stencils 1.

Take another piece of white cardstock from 8 x 2 inch, a blue and a craft piece from 8 x 0,5 inch.

Glue them together as in the picture. ( on the picture you see te back):

Turn your piece and stamp your sentiment on it. I used X-mas from the stampset CS275.

Glue this part at the bottom of your embossing part.

Diecut and shape your flowers and branches.

Glue them on your card base.

Add a small piece of blue and white cardstock on the left side of the card. Now your card is finished.

I hope you like it. Thank you so much for reading and watching my blogpost. See you next time. Have a great day!

XOXO Irina

Elizabeth Craft Designs products:

Other products:

  • Cardstock in white, blue and craft
Cardmaking Paper flowers Planner Essentials Scrapbooking

Wonderful Time of Year

September 15, 2022

Hello creative friends welcome back to the Elizabeth Crafts Blog, it is Karan Gerber here to share a holiday card with you. Although it seems a bit early to be sharing Holiday cards, my desk is full of Christmas Projects at the moment so i wanted to get a jump start on a few more.

Using Planner Essentials 47 to cut out the tree, i cut it out 6 times, just trimming off the tree and i layered them all in the circles. I then cut the deer on a coordinating paper from the collection i was using. 

I used the stitched circles to create a winter scene, starting with the smaller circle on the inside layer, then the larger circle on the outside layer. Using foam adhesive  to pop the layers to allow me to create this lovely winter scene


The florals 12, i used and cut out on Foamiran which is a light felt paper, i shaped and added stamens, paint , then a bit of snow paste and finally glitter to the centers. They turned out so beautiful, that i know i will be doing this technique again and again.

I love how this winter scene turned out, and what a great way to get a jumpstart on my Holiday Cards. I hope you dig into your planner essentials and see which ones will work for your holiday cards

Sidekick Essentials

December Days Sidekick Class

September 13, 2022
Hello again, Annette Green here to provide all the details for our upcoming online class called December Days Sidekick Class with Annette Green. The class will be held in a private Facebook Group, Saturday October 15th, 2022 to all who purchase our special kit. We’ll have three 1-hour sessions to complete a full December daily style planner. I’ve created a special video showing all the kit contents and other supplies you’ll need, plus more details on where to get a kit, how to join the group, what you need to do to be ready for class, and what times the sessions will begin. I hope you take a moment to watch the brief video, as it covers everything you need to know. If you still have questions, feel free to ask them here on the blog or in the video comments section. Hope to see you October 15th!

Planner Essentials

Holly Jolly, here is Santa!

June 28, 2022

Hello everyone, Marjolijn here today. Immediately when I saw the retro bus from Elizabeth Craft Designs I thought of a Christmas bus. Love Peace & Christmas. And how I like him. Santa is behind the wheel but when you open the map…

Ho-Ho-Ho!!!! Look who’s there!!!

How cute is he? Below you see a working description of the card.

First I die-cut all parts from paper from Esther’s reminiscence book 1. Then all parts got an edge with frayed burlap

The card is made of white sturdy paper, I used DCP, you can also use ECD soft finish cardstock. Fold 30 x 15 cm paper in half and place the folded edge against the cutting line.

Unfold the card and punch out the windows, do not turn any further than just past the blue arrow.

Santa Claus is colored with brush markers.

Santa Claus is glued into the card so that he just barely fits behind the wheel. Then stick a piece of design paper over the reinforce holes and the steering wheel.

Stamp the text on the side. Special delivery, I cut the stamp in half for that.

I cut off the stars.

On the inside I punched out the parts of which you can see the back of the paper again and glued them over it. On the front I made the lighting with some snow stars and glued the small cut stars on it. Finally, I twisted a string around the tree.

Elizabeth craft designs products used:

Cardmaking Joset Designs Paper Flowers Paper flowers

You’re So Cute

April 22, 2022

Karen here today. I’m sharing a couple cards I made with the same sketch but different products from Elizabeth Craft Designs. Today I used the adorably cute Elephant and the Florals 12 to make two very different cards!

How cute is that Elephant! And so easy to put together. I used grayish brown and beige cardstock to cut the pieces and colored his eyes with a Copic C7. I also added a little blush for the cheeks with distress ink in Kitsch Flamingo. To create the card front, I just cut a piece of 90 lb White Soft Finish Cardstock at 4-1/4×5-1/2″ and taped a triangle of the patterned blue paper to it, and I then cut that with a stitched rectangle die. The sentiment is from the Furrever Friends set.

Love these beautiful flowers from the Florals 12 set. They were cut with the 90 lb Soft Finish Cardstock and then colored with DIstress Oxides in Salty Ocean and Scattered Straw. I colored, then dampened with water, and then shaped them.

Yes, it’s never too soon to start making Christmas Cards! I used the Cute Winter Sentiments on this one!

Thanks for stopping by today!

Craftily yours, Karen

Supplies from Elizabeth Craft Designs

Other Supplies

Patterned cardstock and inks

Joset Designs Shimmer Sheetz Silk Microfine Glitter Soft Finish Cardstock

Little Snowman

January 20, 2022

Hello everyone, Alice here. For today’s blog post I made this cute little snowman. Here in the Netherlands there is no snow yet. Hopefully it wil come.

So this time I started working with the snowman. First I made a background with WOW! embossing powder. For this I used the color Skylight (ws231x). It is a powder with some larger shimmer pieces in it. And I love glitter so really love this one! I edited the whole background with the embossing powder.

I made a frame with the Fitted Hexagons. I used the largest die in the set and cut the hexagon in the middle of the square.

I added some snowflakes around the cut out hexagon. The snowflakes are from the Classic Christmas special kit (#K007). I decided to cut them in white to keep attention in the middle. I cute off the parts of the snowflakes that were hanging over the square.

After that I made the snowman in the middle. Colored the details with distress ink. The scarf is the same color as the embossing powder in the background (Cracked Pistachio). I added some trees behind the snowman . The trees are from the Winter Scenery set (#1926)

Finally I added a sheet of kraft paper behind the card front to finish it off.

I hope I was able to give you some inspiration today. See you next time!

Alice

Elizabeth Craft Designs Supplies:

Other product:

  • embossingpowder WOW! ws231x
  • distress ink
  • kraft paper
Cardmaking Joset Designs Paper Flowers Sidekick Essentials Soft Finish Cardstock

Snow Globe Shaker Card

December 22, 2021

Hi Friends and welcome to my last blog post for the year for Elizabeth Craft Designs. It was a little over a year ago when I first began my journey with Elizabeth Crafts. Creating with their florals and A5 Planner dies this past year has been so much fun. I just couldn’t close out my year without sharing one final Christmas Card. 

At this point, I am not sure what 2022 will bring with Elizabeth Craft Designs, but I hope you love my final project. 

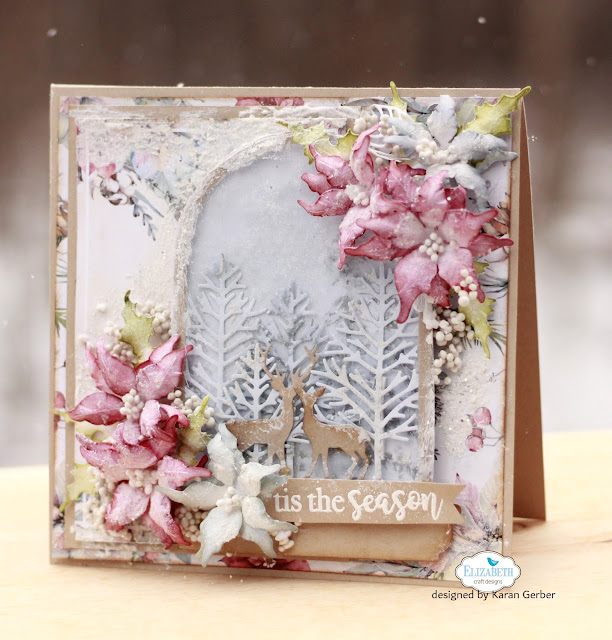
The florals were designed using Florals 12. I know I have shared a lot of projects with these florals but Christmas to me isn’t just a day, it isn’t just a month, it’s a season. And this Season my family and I have much to be thankful for!  So with Christmas season upon us, I set out to create one last Christmas Card for 2021.

Here on St Joseph Island, we see deer all the time. They are almost sighted each day we head out for errands. I couldn’t resist creating a shaker card with Joset’s Snow Globe and those deer and trees from the Winter Scenery Set.  

To begin with, I cut out the globe on pattern paper and on craft cardstock and than traced it out on acetate so I have a full size piece for the front of the globe. I fussy cut out foam tape and taped the back trim of the die to create a shaker card. I placed glitter on the inside of the shaker.

I cut four of the trees from the Winter Scenery Die Set and cut thin strips of foam tape to adhere to the back of the trees to add some dimension to the globe. I adhered the deer from the Snow Globe Sidekick Set to the front. I just love how this looks, it creates an awesome winter scene in that globe doesn’t it? 

Die cutting out 6 large and 6 medium florals along with 6 leaves I colored and shaped them (if you are a member of the Elizabeth Crafts family Group on Facebook, I did a Live on Friday, Dec 17th and you can see just how I shaped and created those gorgeous florals here: Live Facebook with Karan. If you are not a member, be sure to become one so you can view the replay)

So getting back to my card, I stamped and heat embossed my sentiment from the Classic Christmas Sentiments set using White Embossing Powder and attached that to the bottom of the card. 

My final step was to add snow paste and I thought some Art Stones would be a nice touch and look like snow balls around the florals. 

Thank you for following me along this year with my craft shares for Elizabeth Craft Designs. Have yourself a Merry Christmas and I am praying that 2022 will see us all back to normal. Blessings for a bright, prosperous and Healthy 2022!

Yes it was snowing when I took this photo, so fitting for the style of my card Happy Scrapping and I hope to be sharing more with you in 2022!

Elizabeth Craft Designs Supplies:

Home Decor Joset Designs

Whimsical Winter Ornaments

December 11, 2021

Hello there, Jackie here today with a selection of cute and simple woodland ornaments to hang on the tree or even use as gift tags. super simple to make using the gorgeous new whimsical winter dies from Joset with added brush lettering sentiments from Sue Smith’s brush lettering sentiment stamps.

Step One

Start by die cutting a four framed circles, lay two nesting circles dies together and tape the reverse side. Here I have used the stitched circles for added interest.

Step Two

Die cut or fussy cut a white circle that fits slightly smaller than the prepared frame, then use the adventure edges to create a snowy hill. Fix this to the reverse side of the frame.

Step Three

Attach another frame to the reverse side for added stability and to create some added dimension.

Step Four

Die cut of fussy cut another white circle and create another snowy hill but make sure it sits higher than the last.

Step Five

Die cut or fussy cut a further circle this time using a light blue card. Stamp out and white heat emboss the sentiment on one side and then splatter white paint all over.

Step Six

Fix the sentiment panel to the reverse side then attach a further frame over the sentiment to add a neat finish.

Step Seven

Build up the ornament using all the woodland animals and trees design a winter scene, I added a dab of white ink to the trees and a dab of brown ink to the tops of the animals.

Step Eight

Finish off by punching a hole toward the top of each ornament and adding a string to hang.

Thank you for dropping by today. I hope I have inspired you to have a go at these ornaments.

Happy crafting – Jackie

Supplies Used

%d bloggers like this: