

 Hey Friends! It’s EK Gorman, and I popping in today to share with you a new card tutorial. Have you ever found that your die is too big for the size card you want to create? I just adore Suzanne’s Cannon’s A Way With Words Wreath & Elements die, but it really is meant to adhere to a project larger than 6×6 inches. However, my favorite card size to work with is A2 (4.25×5.5 inches), so the die just doesn’t fit. But today I am sharing a cool and easily solution to make the over sized die look like it was meant to be.
 Step One: Die cut the Way With Words Wreath & Elements die set out of 90lb Soft Finish Cardstock. You do not need to die cut the full die.
 Step Two: Die cut the floral piece that is meant to be layered under the Wreath flowers. Color the piece with ink. I used Abandoned Coral. Adhere with Kids Choice Glue under the die cut wreath.
 Step Three: Trim a piece of Watercolor Paper to 4.25×5.5 inches. Spray the watercolor paper with liquid watercolor in two coordinating colors. I used both an orange and yellow spray ink from Tattered Angel. Let dry or set with a heat gun. Splash the inked cardstock with the lighter ink to create more visual interest.
 Step Four: Die cut the sprayed ink paper with the Stitched Rounded Rectangle die set.
 Step Five: Using 10mm Clear Double Sided Adhesive, adhere the watercolor paper to an A2 card frame. Using Kids Choice Glue, adhere the wreath, letting it hand off the edge. Trim off the excess.
 Step Six: Die cut from 90lb Soft Finish Cardstock the piece of the You Are Perfect die set. Leave the ‘you are’ white, but color the ‘perfect’ with an ombre effect. I used both Canddied Apple and Abandon Coral Distress Oxide to create this effect.
 Step Seven: Adhere the sentiment to the cardstock using Kids Choice Glue. Let it over lap the wreath.
 I just love how you can get a whole new look using just a section of this beautiful die. Do you ever trim your dies so they can fit smaller projects? Let us know in the comments below. Until then, Happy Crafting!
Elizabeth Craft Designs Supplies:


 Step One: Die cut the Dog die set pieces from 90lb Soft Finish Cardstock.
 Step Two: Color the die cut pieces using alcohol markers. I used Copics. Assemble the pieces using Kids Choice Glue.
 Step Three: Repeat steps one and two using this time the Cat die set.
 Step Four: Repeat steps one and two using the Dog House die set.
 Step Five: Trim two piece of 90 Soft Finish Cardstock to 6×6 inches.
 Step Six: Die cut one of the 6×6 piece of cardstock with two die from the Stitched Indented Square to make a frame.
 Step Seven: Using 3mm Clear Double Sided Adhesive adhere the die cut frame to the second piece of 6×6 trimmed cardstock. Adhere the dog house using 10mm Clear Double Sided Adhesive.
 Step Eight: Using 6mm Clear Double Sided Adhesive, adhere the Cat and Dog to the card. Using Kids Choice Glue adhere the bones and bowl to the card.


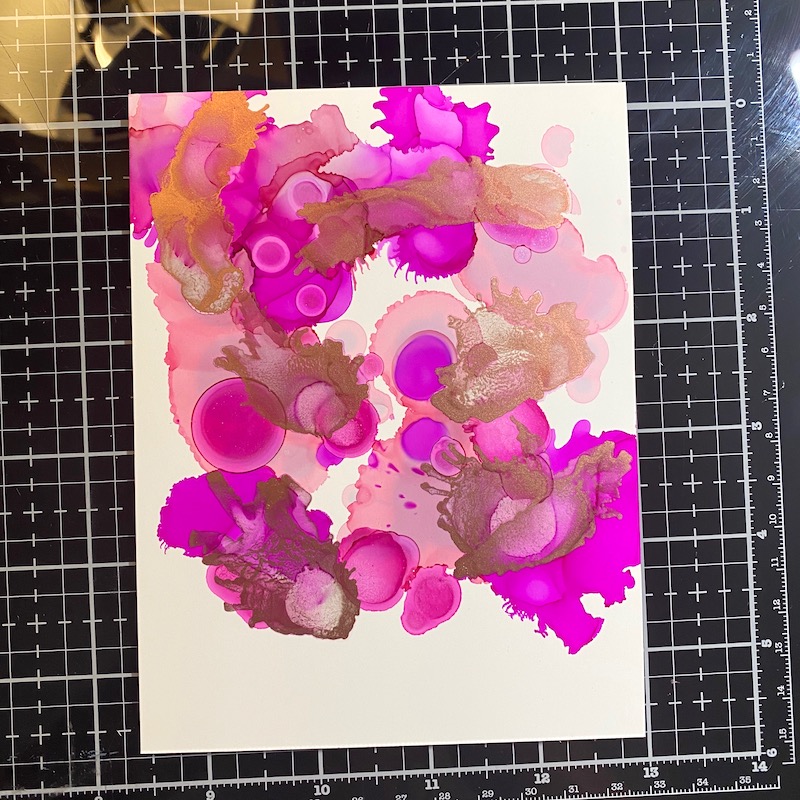 Step One: Pull out a piece of Yupo paper and splatter on some alcohol ink to create a background.
 Step Two: Die cut the yupo paper with the A Way with Words Big Balloon die set.
 Step Three: Using a piece of 90lb Soft Finish Cardstock trimmed to 4.25×5.5 inches. Blend a collection of coordinating ink onto the cardstock to create a soft background.
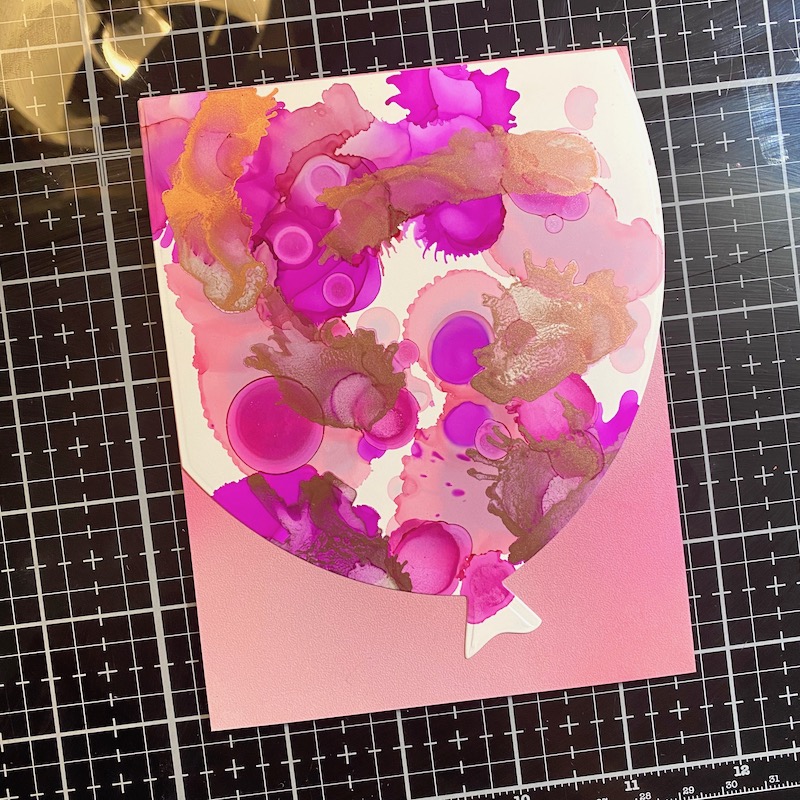 Step Four: Adhere the balloon onto the cardstock using 10mm Clear Double Sided Adhesive.
 Step Five: Die cut and adhere the bow to the balloon from the Big Balloon die set. I used Kids Choice Glue to adhere the bow.
 Step Six: Using a permanent black ink and a stamping platform, stamp the sentiment onto the balloon from the Happy Birthday Collection stamp set.
 Step Seven: Adhere the card front to an A2 card frame using 10mm Clear Double Sided Adhesive. Trim any bit of the balloon that hangs off the card frame.
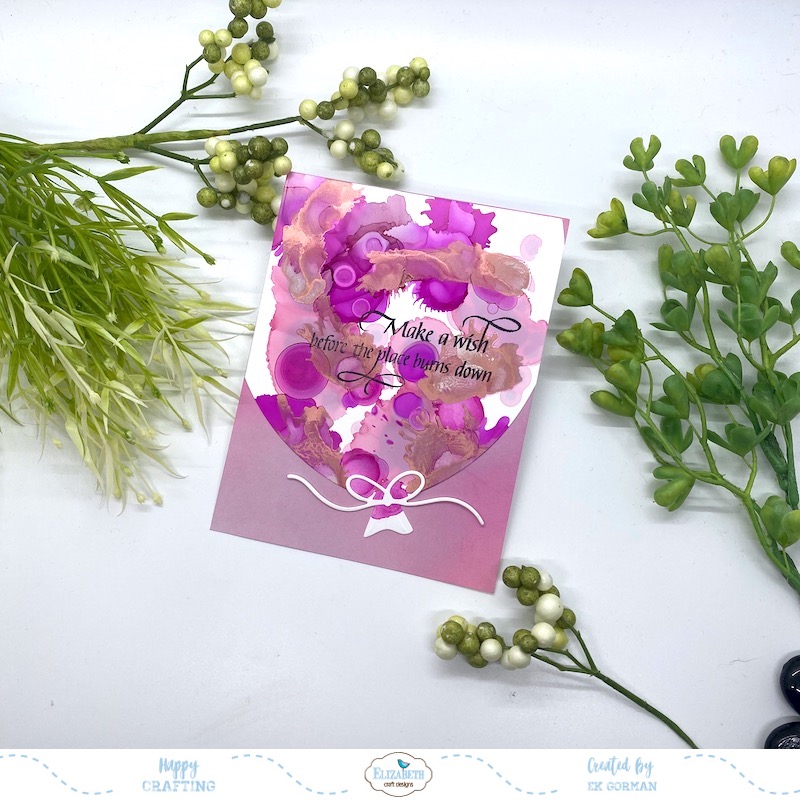 I hope my birthday card makes you smile. Let us know in the comments below if you enjoy making cards that make people laugh. Until then, happy crafting.


 Step One: Trim a piece of 90lb Soft Finish Cardstock to 4.25×5.5 inches. Secure the Oyster Shell Card frame to the cardstock.
 Step Two: Run the cardstock and the Oyster Shell Card die through a die cutting machine sandwiched with the an embossing pad, so the shell does not cut the paper and instead just embosses onto it.
 Step Three: Blend distress ink onto the Soft Finish Cardstock. I used Dried Marigold, Abandoned Coral, and Tattered Rose.
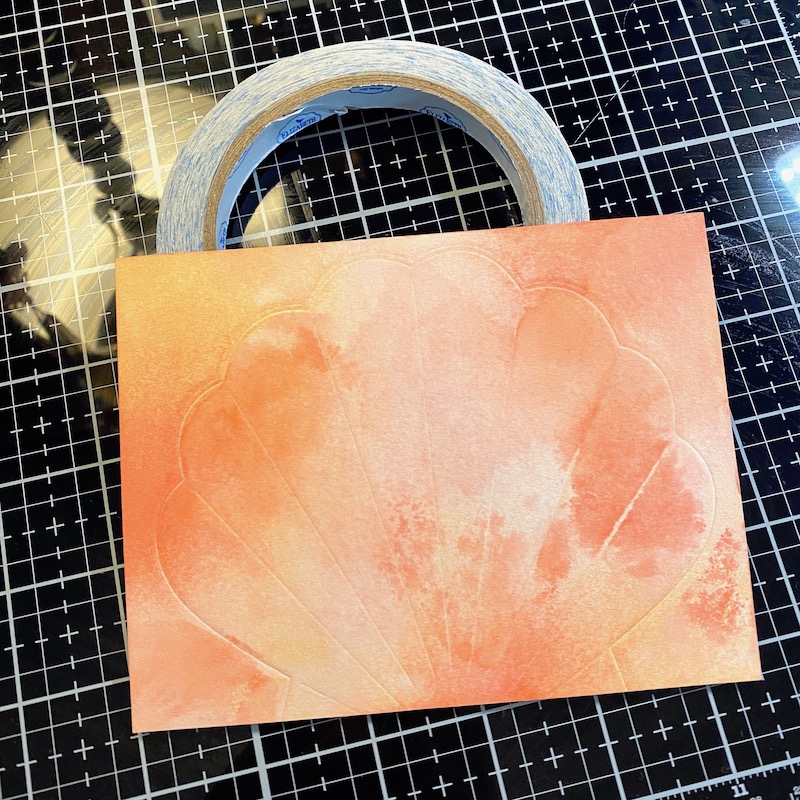 Step Four: To break up the blended ink, smooch the wet distress inks onto the card over the original blended ink and let dry. I used the same colors.
 Step Five: Die cut the pieces needed to create the treasure chest from the Sea Weed die set out of 90lb Soft Finish Cardstock.
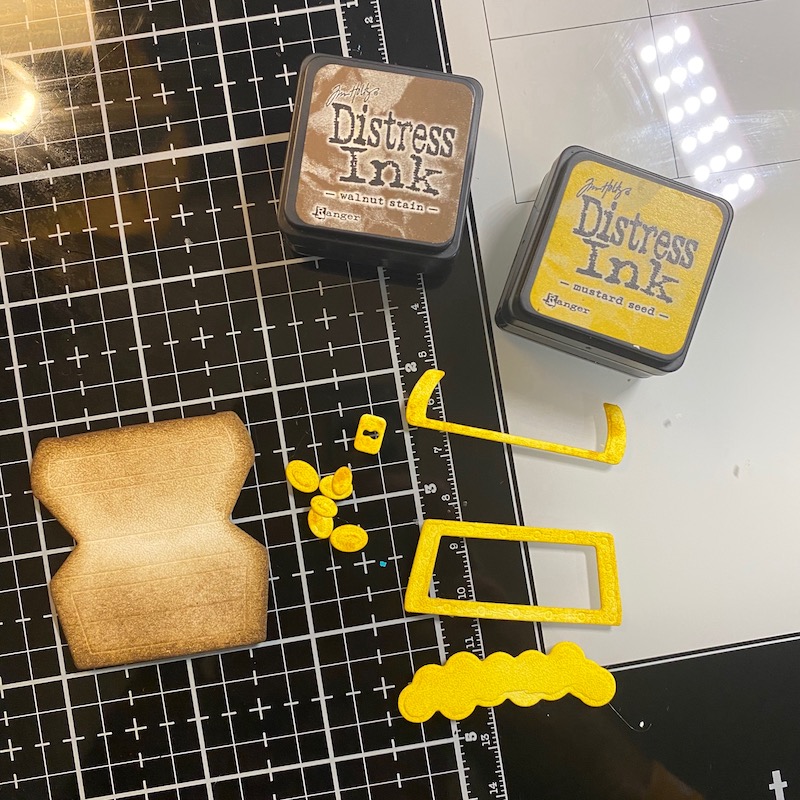 Step Six: Blend ink onto the die cut pieces. I used Distress Ink in Walnut Stain for the chest and Mustard Seed on the coins and chests details.
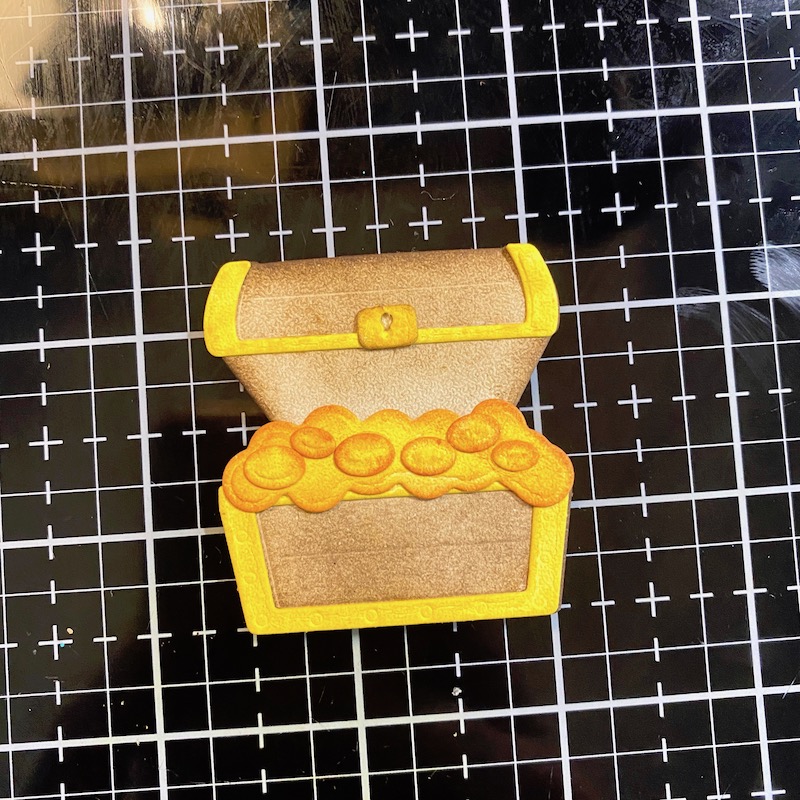 Step Seven: Using Kids Choice Glue adhere the pieces of the chest back together.
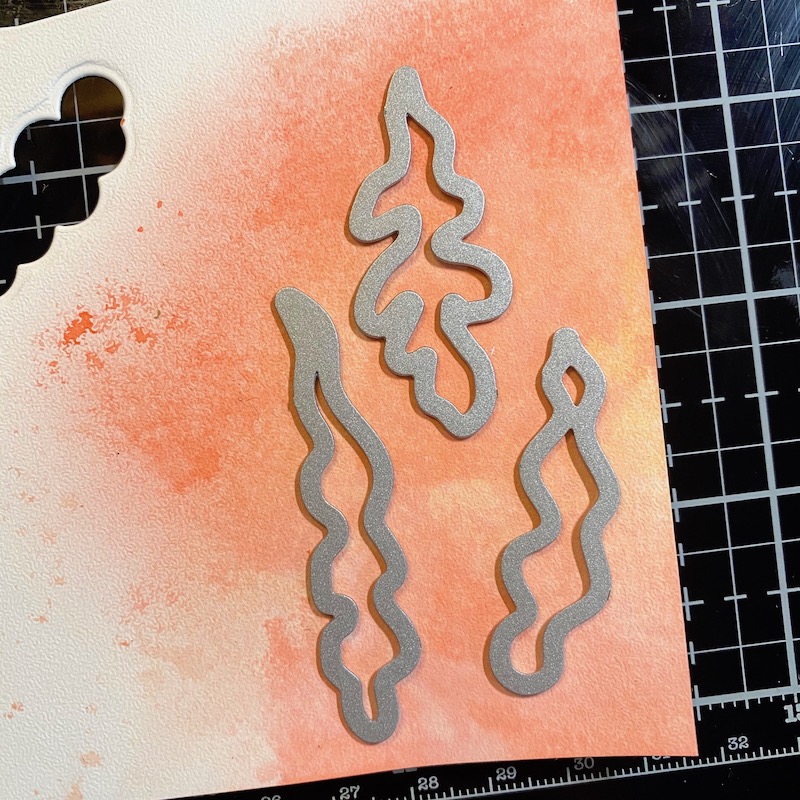 Step Eight: Die cut some ocean grass from the Sea Weed die set using a piece of 90lb Soft Finish Cardstock blended with the same colors used on the sea shell.
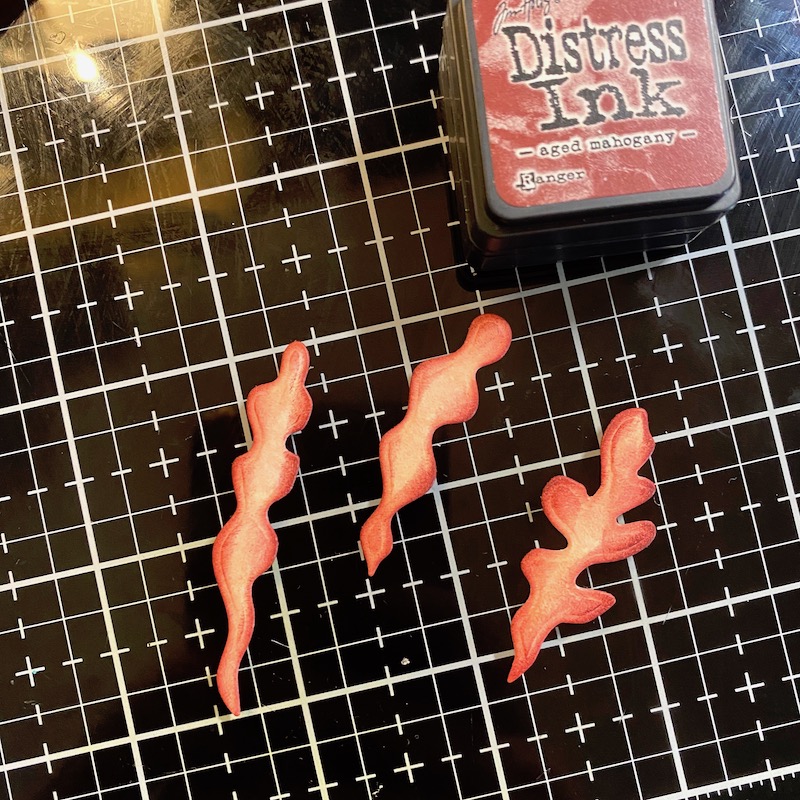 Step Nine: Darken the sea week with more ink several values deeper. I used Aged Mahogany Distress Ink.
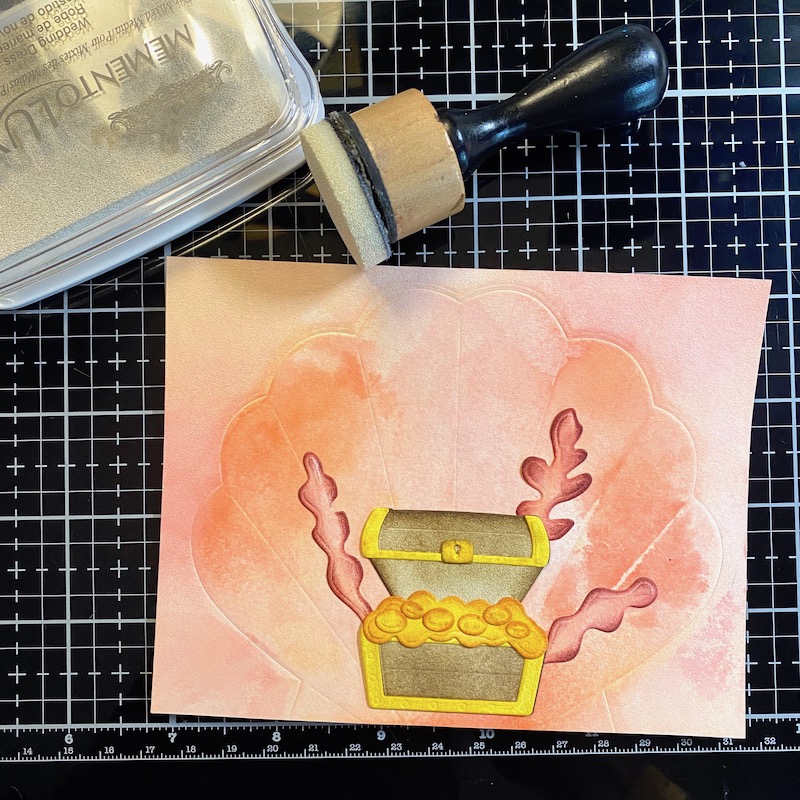 Step Ten: To help pop the inside of the shell, blend some white pigment ink around the edges. Adhere the treasure check and sea weed to the center of the shell using 3mm Clear Double Sided Adhesive.
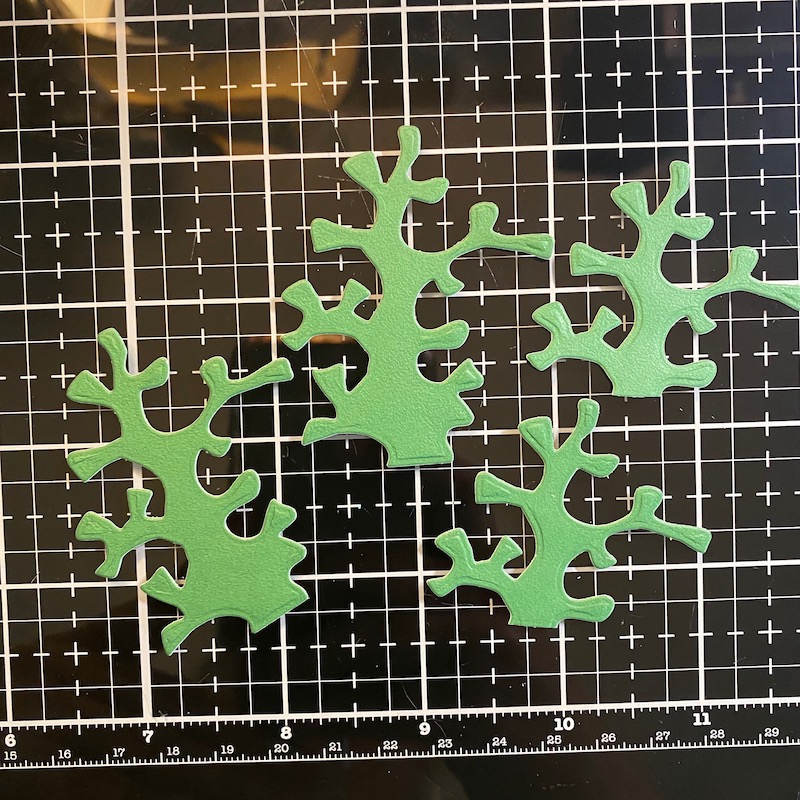 Step Eleven: Die cut the large coral die from the Sea Weed die set out of True Green Soft Finish Cardstock.
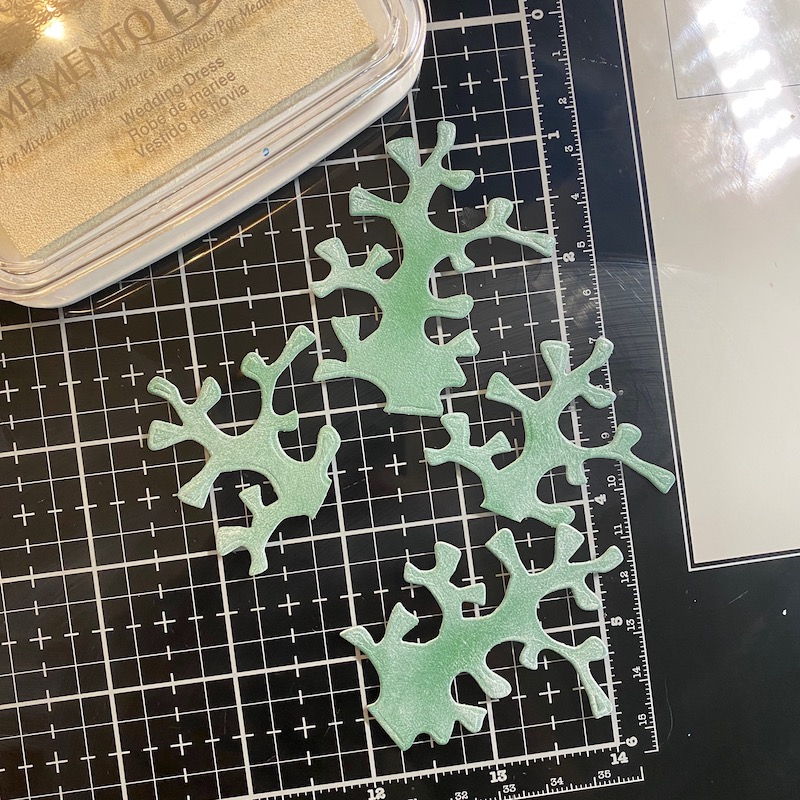 Step Twelve: Soften the color with blended white pigment ink.
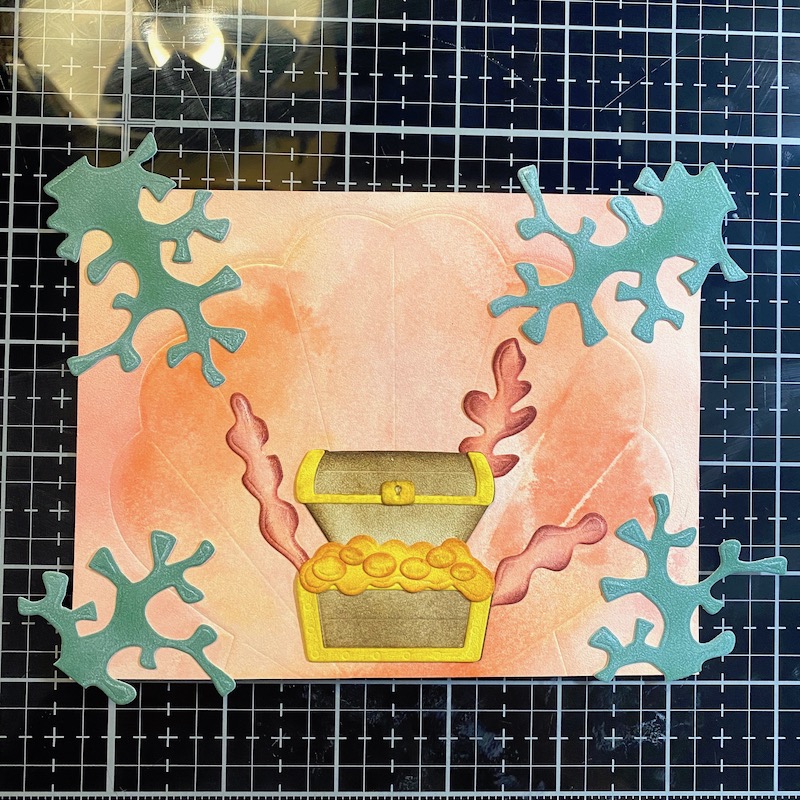 Step Thirteen: Add the coral die cuts to the corners of the shell embossed cardstock. Let it over lap the corners. Trim the excess from the cardstock.
 Step Thirteen: Stamp a sentiment in colored ink. I used a sentiment from the Zen Sentiments stamp set and stamped it using Abandoned Coral Distress Oxide.
 Step Fourteen: Adhere the embossed shelled cardstock to an A2 card frame.
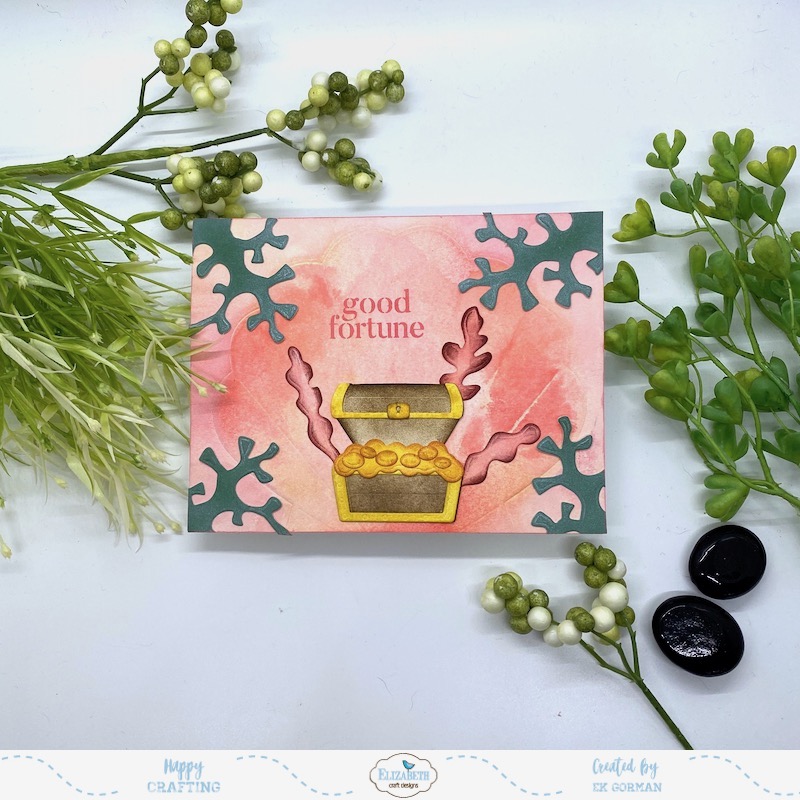 Do you emboss your die sets onto cardstocks? If so, let us know you favorite ECD dies to use to emboss. Until then, happy crafting.


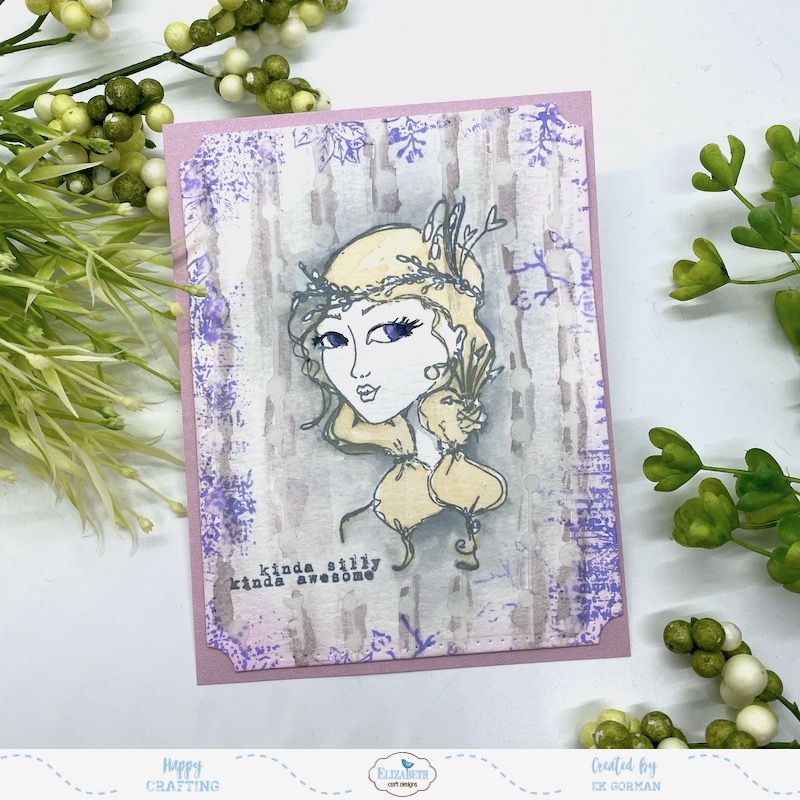 Hey Friends! It’s EK and today I thought it might be fun to try to create a modern take on a vintage look. Designer Ilse and Charlene’s new stamps and stencils make creating this look so simple with their old school flare.
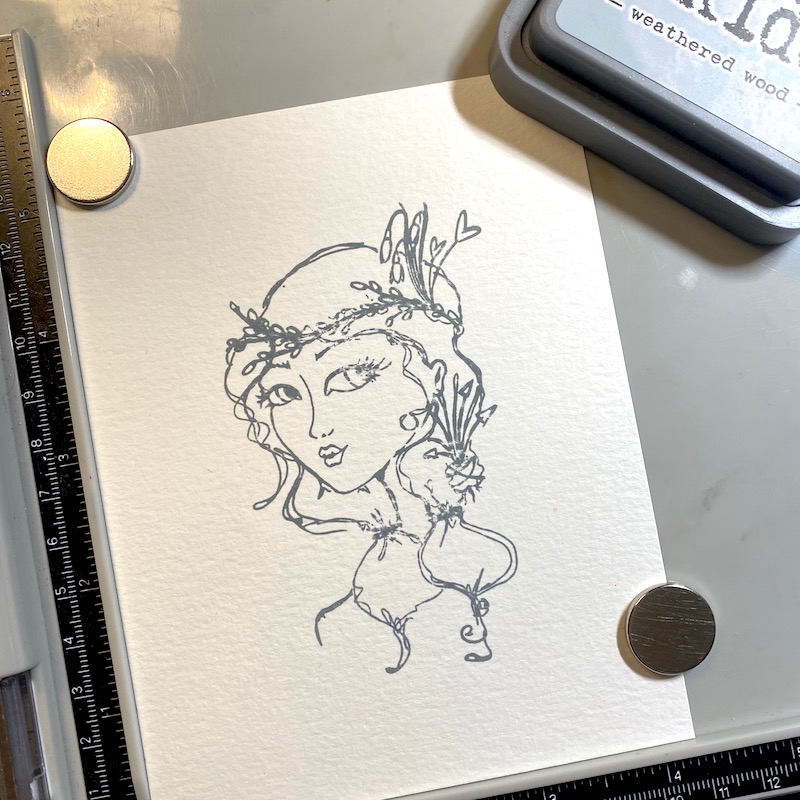 Step One: Stamp out on of the images from the Earthy Girls stamp set onto a piece of Watercolor Paper cut out to 4.25×5.5 inches using some water-soluble ink. I used Weathered Wood Distress Oxide.
 Step Two: Using clean water and watercolor paint brush, fade the ink out over the watercolor paper, making the stamped image look bright and bold.
 Step Three: Using ECD’s Watercolor Palette, add touches of color to the stamped image.
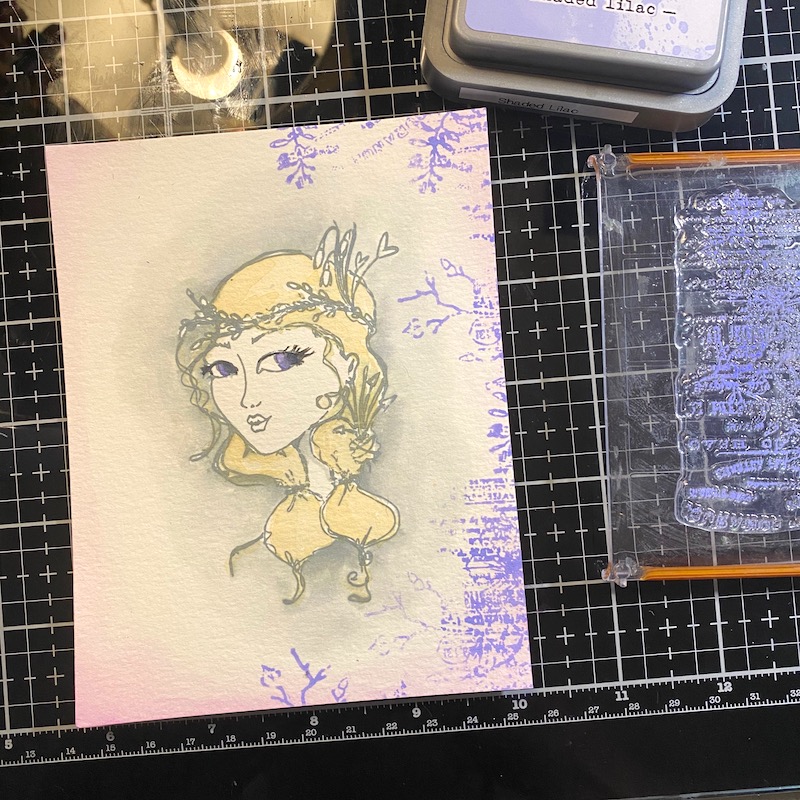 Step Four: Hand stamp around the edges of the watercolor paper background images from the Words & Layers stamp set using colored ink. I used Shaded Lilac in Distress Oxide.
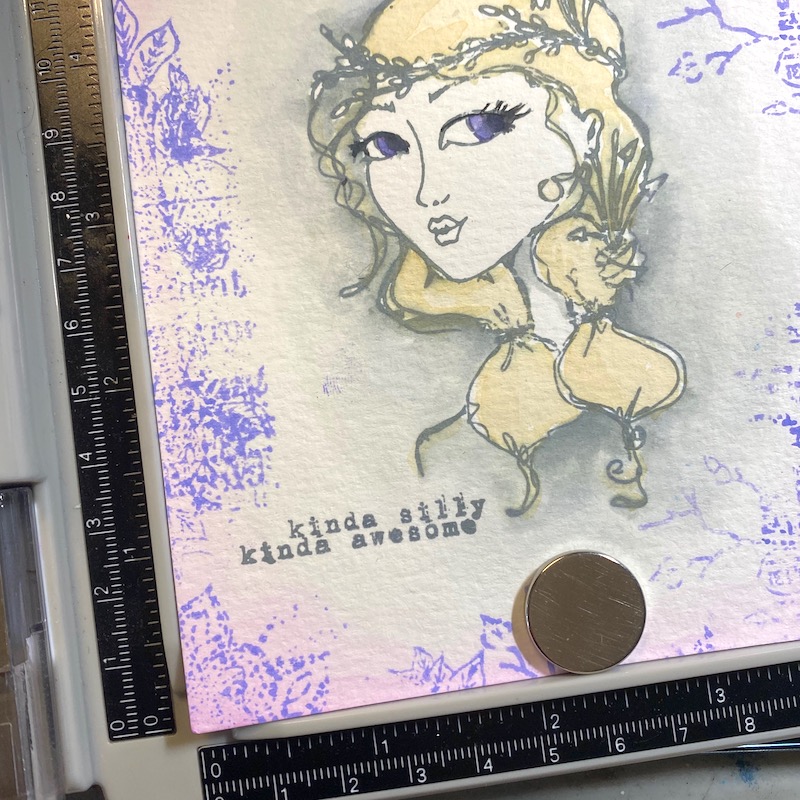 Step Five: Add a sentiment to the image from the Words & Layers stamp set. I used Weathered Wood Distress Oxide.
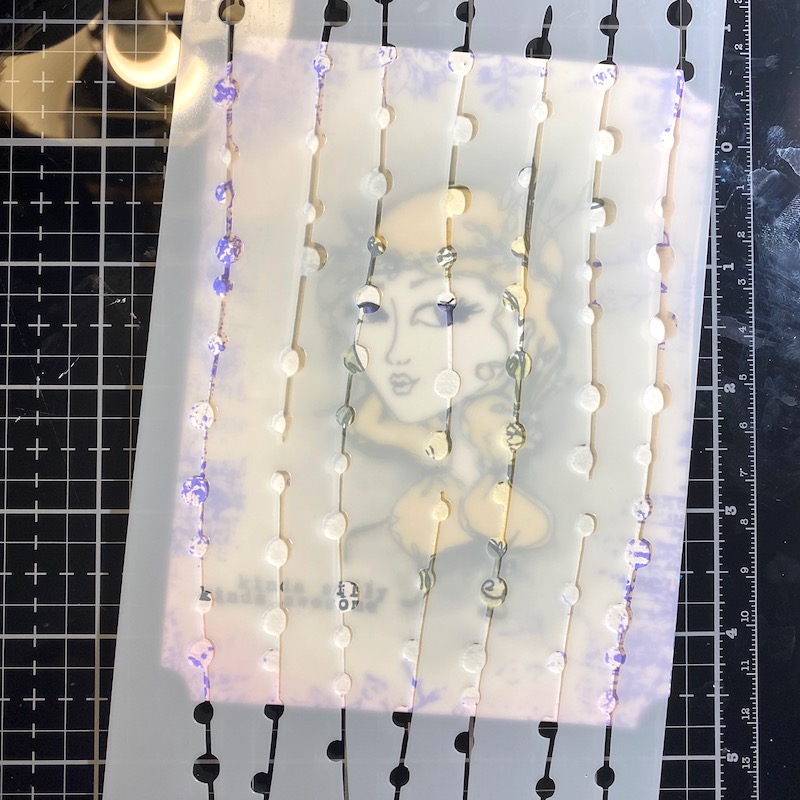 Step Six: Add texture to the card using the Dot Dot Dot… stencil and add gel medium through the openings.
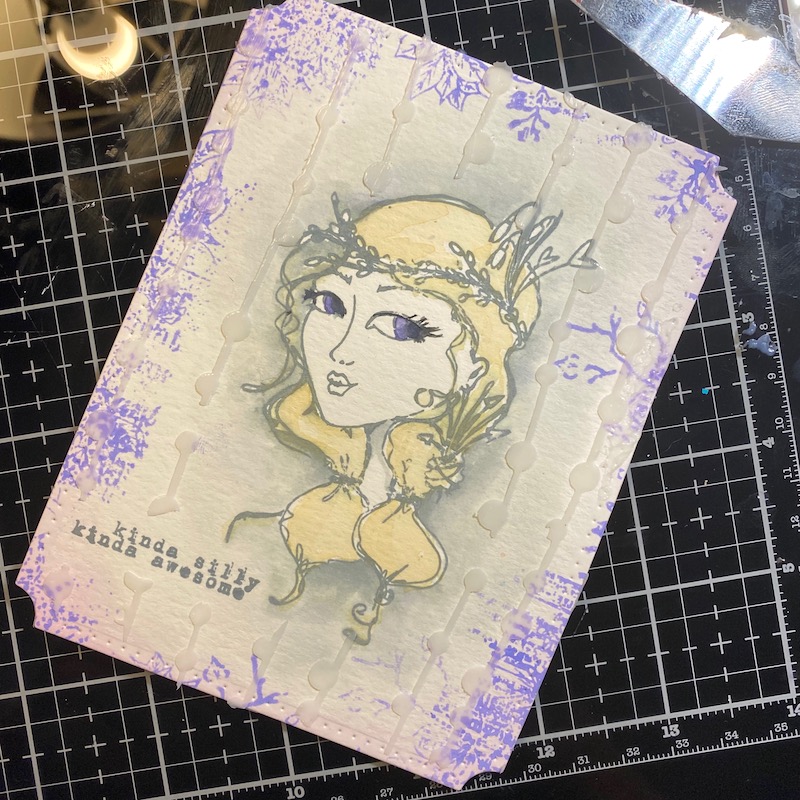 Step Seven: Let the gel medium dry.
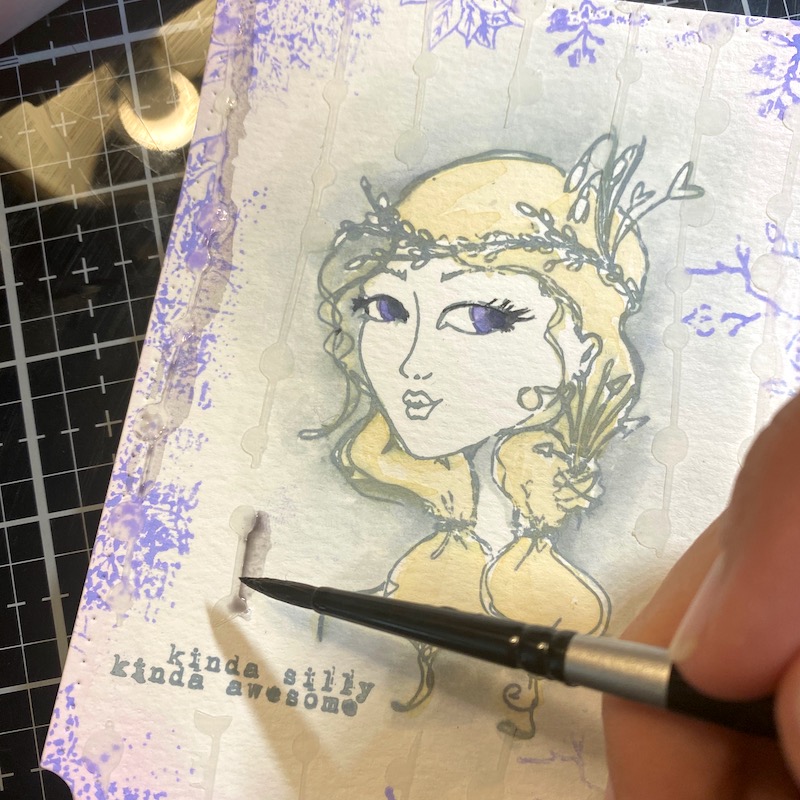 Step Eight: Highlight the stenciling by adding muted watercolor around the raised portions.
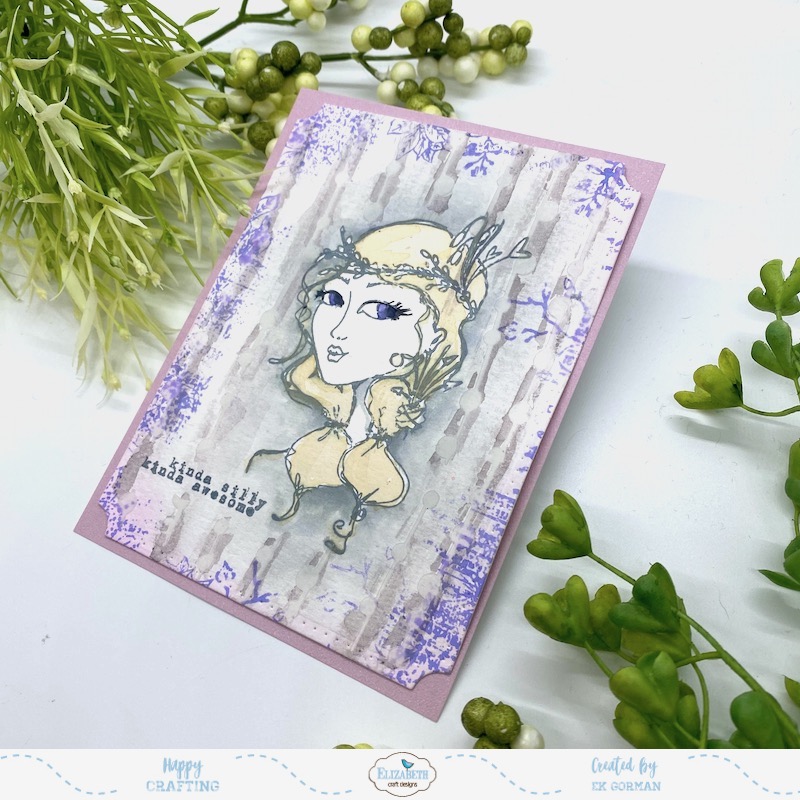 Step Nine: Die cut the watercolor paper with the Stitched Indented Rectangle die set and adhere it to a piece of trimmed Dusky Lavender Soft Finish Cardstock trimmed to 4.25×5.5 inches using 10mm Clear Doubled Sided Adhesive. Add the Soft Finish Cardstock to an A2 card frame.
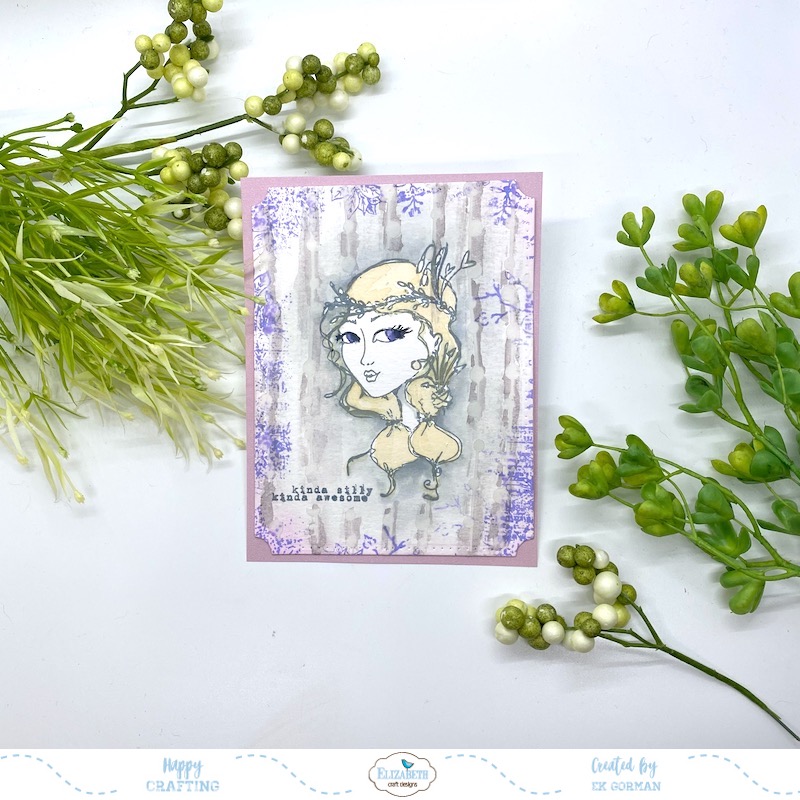 I love how the pale grey and purple tones have a vintage vibe, but in a fun colorful way.


 Hey Friends! It’s EK and I am back today with a brand new card where I not only mix coloring mediums, but also mix different releases. Today I have combine both an old stamp set and a new die set. I thought it would be really fun to take one of Joset’s recently released die sets and combined it with a separate older line stamp set. Together, the two, I think the the two make the perfect pair. I just love how fresh and fun Joset’s Mermaid die set looks with the Color My Flowers stamp set.
 Step One: Die cut the Mermaid die set from some 90lb Soft Finish Cardstock.
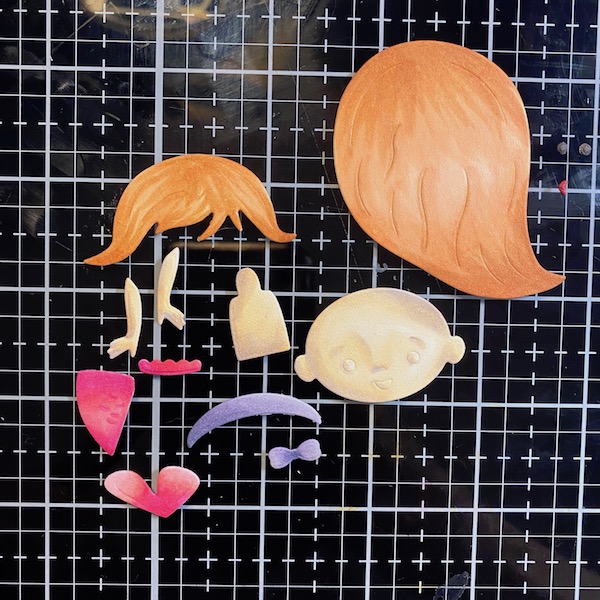 Step Two: Using alcohol markers, color the different pieces of the Mermaid. I used my copics. Using Kids Choice Glue, assemble the pieces to make the mermaid.
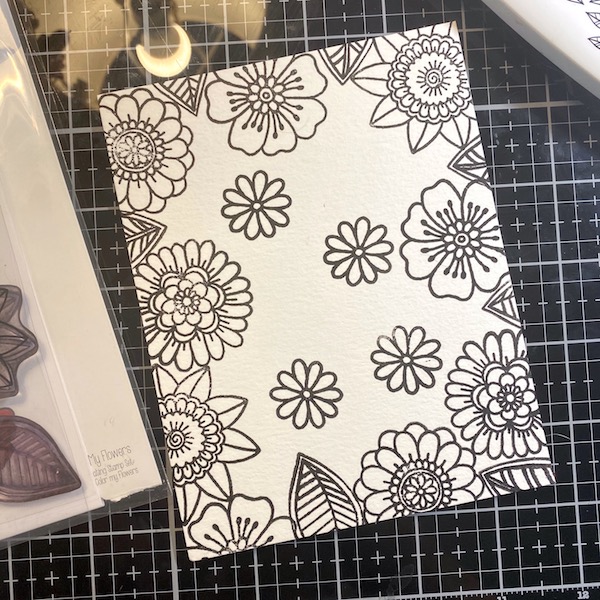 Step Three: On a piece of watercolor paper, stamp the flowers and leaves from the Color My Flower stamp set around the edges using a watercolor safe ink. Float a few time the smallest flower in the middle of the cardstock.
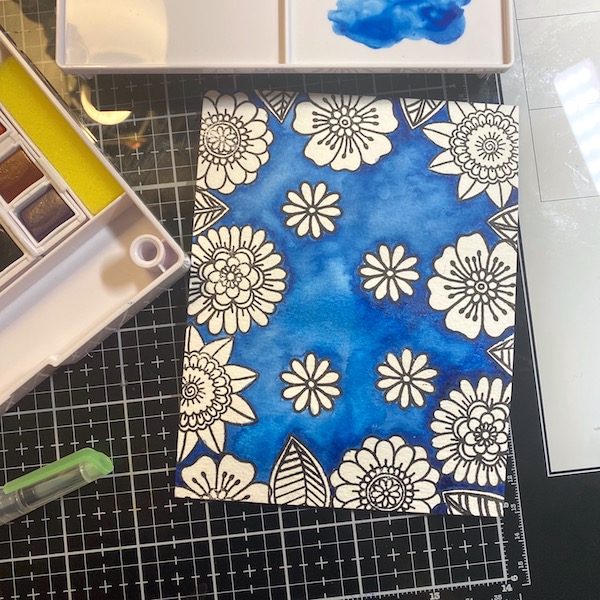 Step Four: Using ECD’s new Watercolor Pallette, watercolor the background of the cardstock with Prussian Blue. Let dry.
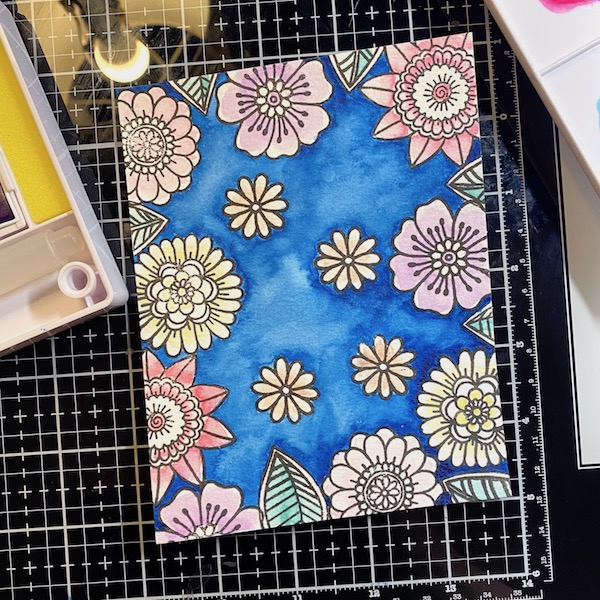 Step Five: Using a combination of other watercolors, paint the flowers and leaves, keeping it light and pale.
 Step Six: Stamp a sentiment from the Splish Splash Sentiments stamp set onto the card using black ink.
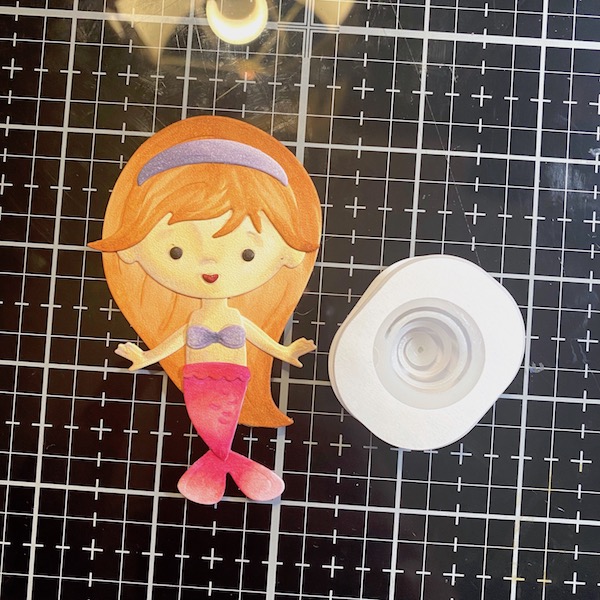 Step Seven: For some extra fun, adhere an action wobbler onto the back of the mermaid.
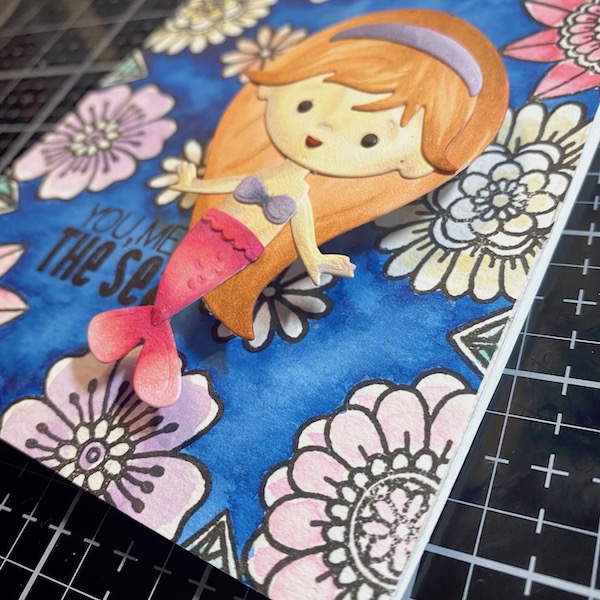 Step Eight: Using 10mm Clear Double Sided Adhesive, adhere the watercolor paper to an A2 card frame. Then adhere the action wobbler to the card frame.
 What do you think? Do you like how the old and the new combine to make a brand new look. Let me know in the comments below. Until then, happy crafting.

 Hey friends! It’s EK and I am popping in today to show you how easily you can manipulate your favorite stamps to use all year long. Every since the Halloween Party Stamp set was released by designer Charlene, I have been absolutely in love with the kitty stamp. It is hands down one of the cutest cats around. However, his little bat wings make him limited in how often you can use him. However, I am sharing today, that with a little creative stamping you can use this cutie all year long!
 Step One: Trim a piece of 90lb Soft Finish Cardstock to 4.25×5.5 inches. Using a stamping platform add you cat stamp from Halloween Party and ink it up. Then before stamping, wipe the ink from the kitty’s wings. You can use any type of ink for this stamping technique. I used Fadeout ink so I could do a little no line coloring.
 Step Two: Using alcohol ink color the image in. I used copic markers.
 It is hard to believe that this sweet little image once had little bat wings set on the body.
 Step Three: Using the Fitted Rounded Rectangle die set, die cut out the stamped image. Using two of the dies from the Stitched Rounded Rectangle die set, die cut a board that is about the size of the card frame.
 Step Four: Using the Fitted Rounded Rectangle die set, die cut a piece of printed paper the size of the opening in the die cut boarder.
 Step Five: Using 6mm Clear Double Sided Adhesive, add the die cut boarder to an A2 Card frame. Using 10mm Clear Double Sided Adhesive, add the printed paper and the stamped image, making both of center.
 Step Six: Stamp a sentiment from the Journaling Elements stamp set in black ink.
 I hope you find it helpful to see how to manipulate your stamps to use them in new and interesting ways. It is super easy and gives all your stamps a new and versatile way of using them.


 Hey Friends! It’s EK, and last week I discovered how gorgeous coloring on Soft Finish Cardstock is with colored pencils, so today I thought I would play around with some stamps that are simply meant to be colored with this medium. I can not be more impressed with how stunning Charlene’s stamps look colored in with my pencils.
 Step One: Trim a piece of 90lb Soft Finish Cardstock to 4.25×5.5 inches. Stamp the sweet gal from the Make a Wish stamp set into the center of the paper. Stamp the image again onto some masking paper (I used post-it note paper). Trim out the image on the masking paper and add it to the stamped image
 Step Two: With the making paper in place, stamp other images from the stamp set over the sweet gal multiple times.
 Here is what the cardstock looks like with the masking paper still in place.
 Here is what the image looks like after the masking paper is lifited.
 Step Three: Color in the image with your colored pencils.
 Step Four: Trim a piece of True Green Soft Finish Cardstock to 4.25×5.5 and added it to an A2 cardframe with some 10mm Clear Double Sided Adhesive.
 What do you think of this medium on Soft Finish Cardstock? Have you experiment with colored pencils on your projects? Let us know in the comments below. Until then, happy crafting!


 Hey Everyone! It’s EK, and today I decided to try something I have never tried before. I decided to try colored pencils coloring on 90lb Soft Finish Cardstock. I was worried that the 90lb Soft Finish Cardstock‘s texture would create uneven coloring, but I am not going to lie, I am absolutely in love with how the texture adds to the overall coloring effect.
 Step One: Die cut the pieces you need from the Octopus, Seashells and Spring Basket die sets using 90lb Soft Finish Cardstock.
 Step Two: Color the die cut pieces using your colored pencils.
 Step Three: Create a background for your colored die cuts. I used Distress Oxides in Cracked Pistachio, Tumbled Glass, and Shaded Lilac plus some shimmer spray on a trimmed piece of 90lb Soft Finish Cardstock. Attach the background to an A2 card frame using 10mm Clear Double Sided Adhesive.
 Step Four: Using a combination of 3mm Clear Double Sided Adhesive, Kids Choice Glue, and 3 dimensional tape, assemble the basket full of sea shells and adhere to the card frame. Adhere the die cut Octopus onto the card, letting his legs over lap the basket.
 Step Five: Stamp your sentiment onto the card frame using blue ink. I used a combination of sentiments from both the Spring Sentiments stamp set and Splish Splash Sentiments stamp set.


