It’s Sandy Diller here with you today. I have a fun, quick and easy card to share. I just got my new Sue Smith Stamps and as soon as I saw this one I immediately thought of one of the cute fairy dies from Joset Designs to use along with it. Just add a Santa hat and you’re good to go.
This is a 5″ X 6.5″ card so I used the largest Stitched Indented Rectangle on the front.
After stamping and embossing I was ready for the cute little fairy.
Using the Fairy 1 die set – I cut, colored and assembled the fairy and then added a Santa hat from the Santa Claus die set.
To finish off this card I cut out some glittered stars and a magic wand. It is still blank on the inside so a personal message can be added.
Hello friends, it’s Sandy Diller with you today for a fun and easy Haunted “Mushroom” House. This is a large card, 6″ X 7″, so that is going to require a custom envelope that you will need to create. This is lots of fun so let’s get started.
Begin by cutting out the house using the Mushroom House Folding Card. Distress Oxide Inks was used here to color the mushroom stem and the lower part of the roof. I used Black Soot for the top part but it does look like green here. It actually looks green on the finished card but I’m ok with that.
Use the same die set to cut the doors and windows. The Halloween Scenery die set was used for the tree & graveyard. One of he Stitched Circles was used for the moon and then edged with orange.
The top part of the roof was cut from a scrap in my stash. Once all pieces were cut and colored, assembly began. The ghost on the top came from one of my older Elizabeth Craft Designs set. The ghosts are cut from vellum so they would look more spooky.
The last piece added was the moon.
Now I must confess that once I got everything assembled the way I wanted it, I was not happy with the way it looked from the inside. To solve that problem – the card was closed – glued shut and mounted on a piece of purple paper. Sometimes in card making we have to take a detour.
Once it looked acceptable – it was added to a black background with a thin boarder all around. At this point – one more ghost was added.
Since this is such a large card a separate back panel was added.
On the inside the largest Indented Rectangle die was used and the sentiment was stamped.
Hi Friends! It’s EK, and I am popping in today to share a new card I crafted using some long neglected crafting supplies and A Way with Words Butterfly Flourish. I just love how elegant the flourishes of this die set make creating something special so simple.
Step One: On a crafting mat or glass, drop three similar liquid watercolors. I used Dr. Ph Martins Hydrus (just unearthed from my moving boxes) in two shades of red and one dark pink.
Step Two: Spray the liquid watercolor with plenty of water.
Step Three: Dip a piece of Watercolor Paper into the liquid watercolor and completely saturated with color. I was able to get three dips out of the puddle.
Step Four: Heat set the watercolor paper. Then spray with a iridescent watercolor spray. I used Perfect Pearls Mists.
Step Five: Die cut the watercolor paper using the Butterfly Flourish die set. I used just the large flourish once and the small flourish twice for this step.
Step Six: Add a piece of Clear Double Sided Adhesive to the watercolor paper. Die cut the detailed butterfly from the Butterfly Flourish die set.
Step Seven: Peel off the backing paper to the Clear Double Sided Adhesive and add Cool Diamond Silk Microfine Glitter to the detailed butterfly.
Step Eight: On a second piece of watercolor paper, die cut a frame using both the Stitched Indented Rectangle die set and Fitted Indented Rectangle die set.
Step Nine: Using 10mm Clear Double Sided Adhesive, adhere the die cut frame to an A2 card frame. Using a combination of 10mm Clear Double Sided Adhesive and Kids Choice Glue, add the flourished butterfly. Using Kids Kids Choice Glue add the glittered butterfly to the flourished butterfly.
Step Ten: Add a sentiment using the Love & Hearts Collection stamp set and two tones of ink. I used both Picked Raspberry and Festive Berries Distress Oxide.
Step Eleven: Adhere the two smaller butterfly flourishes. Add three drops of Pearl Rose Craft Drops and three drops of Transparent Crystal Craft Drops.
I love how this is a surprising simple this card was to create but how elegant it looks.
Let us know in the comments below what A Way With Words dies you would use with your long neglected supplies. Until then, happy crafting.
Hey Crafters! Katelyn here, sharing with you my Hello Card.
To create my Hello Card, I’ve used a variety of dies from the Sidekick Essentials Collection and Joset Designs. You’ll want to read below as I share with you how to recreate my card at home.
Step One. Choose two or three pieces of patterned paper that all coordinate together. From one of the patterned papers, die cut a 4″ Stitched Indented Rectangle out of the patterned paper. Distress the edges of the rectangle. Ink the edges of the rectangle using Black Soot Distress Ink and a blending tool with foam.
Step Two. Die cut a 3 3/4″ Fitted Indented Rectangle out of a second piece of patterned paper. Distress the edges of the rectangle. Ink the edges of the rectangle using Black Soot Distress Ink and a blending tool with foam.
Step Three. Either use a third piece of patterned paper or flip over the patterned paper you just used and die cut a 3 1/2″ Stitched Indented Rectangle. 1/2″ from the bottom on the right hand side, tear the paper a bit into the middle. 1/2″ from the left at the top left hand side, tear the paper down a bit. Distress the edges of the rectangle. Ink the edges of the rectangle using Black Soot Distress Ink and a blending tool with foam.
Step Four. From the Sidekick Essentials 8 die, die cut the large stitched rectangle out of a piece of vellum.
Step Five. Die cut a 3/4″ Diagonal Stitched Fishtail out of a piece of kraft cardstock. Cut the fishtail down to 2 3/4″. Distress the edges of the fishtail. Ink the edges of the fishtail using Black Soot Distress Ink and a blending tool with foam.
Step Six. From the Sidekick Essentials 7 die, die cut the leaf bunch and two single leaves out of White Soft Finish Cardstock.
Step Seven. From the Words 2 – Thinking of You die, die cut the Hello word out of black cardstock.
Step Eight. Adhere the 3 1/2″ stitched indented rectangle to the 3 3/4″ fitted indented rectangle.
Step Nine. Adhere the vellum stitched rectangle in the middle of the 3 1/2″ stitched indented rectangle. Adhere the leaf bunch to the bottom middle of the 3 1/2″ stitched indented rectangle. The leaf bunch will sit overtop of the vellum piece. Adhere the other two single leaves as desired around the leaf bunch.
Step Ten. Staple the fishtail 3/8″ from the bottom and all the way to the left hand side of the 3 3/4″ fitted indented rectangle. Adhere the Hello word to the middle of the fishtail.
Step Eleven. Foam square the 3 3/4″ fitted indented rectangle to the middle of the 4″ stitched indented rectangle.
Step Twelve. Cut a piece of White Soft Finish Cardstock that measures 5 1/4″ x 8″, score at 4″. Adhere the cardfront to the cardbase.
Thanks for joining me today! I hope that I’ve inspired you to create your own version of my Hello Card.
Katelyn
Elizabeth Craft Designs Supplies Used:
Other Supplies Used:
Distress Ink: Black Soot
Blending Tool with Foam
Graphic 45: Nature Sketchbook Patterned Paper Collection
Hey friends! It’s EK, and I am popping in today with an over the top glitter card for a little princess in my life. Let’s be honest, when dealing with the little princess in your life, it really should be over the top, and the new Princess Crown die set is perfect for a little bit of over the top glitter.
Step One: Place some Clear Double Sided Adhesive over a piece of trimmed 90lb Soft Finish Cardstock. Die cut the Princess Crown die set over the Clear Double Sided Adhesive.
Step Two: Peel back the adhesive paper of the crown shape die cut and adhere the detailed crown die cut over into the center of it. Add Lavender Ice Silk Microfine Glitter over the die cut crown shape.
Step Three: Peel the adhesive paper back from the detailed crown die cut and add Imperial Garnet Silk Microfine Glitter over it.
Step Four: Add Bright Cranberry Silk Microfine Glitter over the Princess die cut and the heart from the detailed crown die cut.
Step Five: Add Copper Rose Silk Microfine Glitter over the stars and flair die cut piece.
Step Six: Trim a piece of 90lb Soft Finish Cardstock to 4.25×5.5 inches. Blend dark water soluble ink over the cardstock and spray it with sparkling spray. I used Black Soot Distress Oxide and Perfect Pearls Spray. Let Dry.
Step Seven: Die cut the blended piece of cardstock with a large die from the Stitched Indented Rectangle die set.
Step Eight: Using 10mm Clear Double Sided Adhesive, adhere the die cut blended cardstock to an A2 card frame. Then add the glitter crown on top of the blended cardstock. Using Kids Choice Glue, adhere the rest of the die cuts to the card frame.
Step Nine: Using a stamping platform, stamp stars and a sentiment from the new Once Upon a Time Sentiments stamp set using white pigment ink.
I wish you could see exactly how sparkly this card is with all this glitter. I just adore how the pinks and purples just pop with the black behind it.
Let us know in the comments below if you would craft with this much glitter for the little princess in your life. Until then, happy crafting.
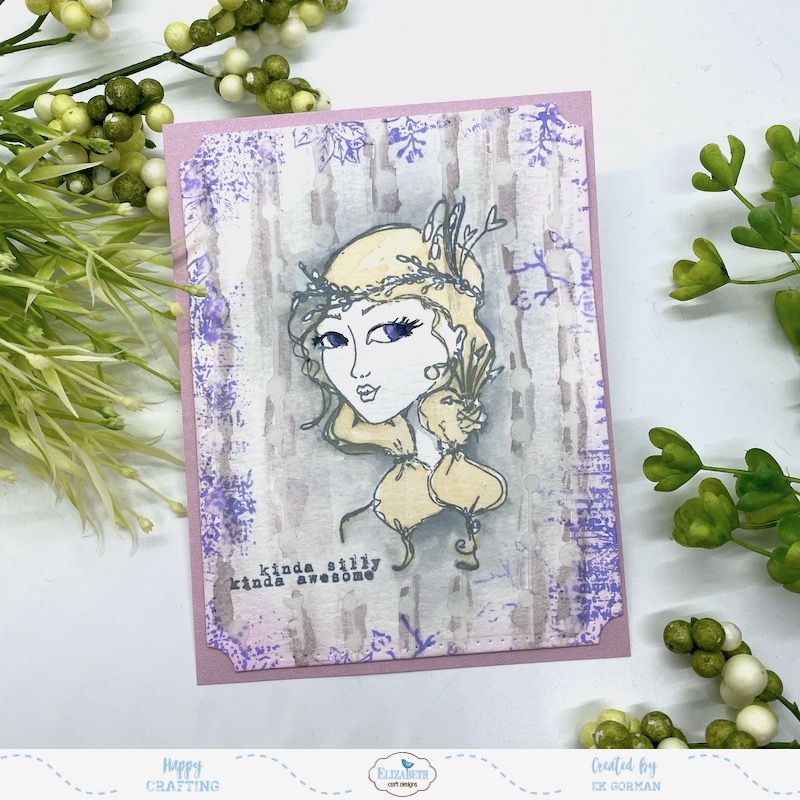
Hey Friends! It’s EK and today I thought it might be fun to try to create a modern take on a vintage look. Designer Ilse and Charlene’s new stamps and stencils make creating this look so simple with their old school flare.
Step One: Stamp out on of the images from the Earthy Girls stamp set onto a piece of Watercolor Paper cut out to 4.25×5.5 inches using some water-soluble ink. I used Weathered Wood Distress Oxide.
Step Two: Using clean water and watercolor paint brush, fade the ink out over the watercolor paper, making the stamped image look bright and bold.
Step Three: Using ECD’s Watercolor Palette, add touches of color to the stamped image.
Step Four: Hand stamp around the edges of the watercolor paper background images from the Words & Layers stamp set using colored ink. I used Shaded Lilac in Distress Oxide.
Step Five: Add a sentiment to the image from the Words & Layers stamp set. I used Weathered Wood Distress Oxide.
Step Six: Add texture to the card using the Dot Dot Dot… stencil and add gel medium through the openings.
Step Seven: Let the gel medium dry.
Step Eight: Highlight the stenciling by adding muted watercolor around the raised portions.
Step Nine: Die cut the watercolor paper with the Stitched Indented Rectangle die set and adhere it to a piece of trimmed Dusky Lavender Soft Finish Cardstock trimmed to 4.25×5.5 inches using 10mm Clear Doubled Sided Adhesive. Add the Soft Finish Cardstock to an A2 card frame.
I love how the pale grey and purple tones have a vintage vibe, but in a fun colorful way.
What do you think? Is this a new look on a vintage vibe? Let us know in the comments below what your favorite take on vintage crafting projects is.
Hello, It’s Sandy Diller here. Today I have a special project to share with you. We recently received a nice note and photo from our grandson who is attending college in Washington State. He told us about his studies to become a physical therapist and about his extracurricular activities. I thought this was something special and wanted to give the photo a place of honor in our home. So proud of him. Even though we are all currently staying home and students are doing online classes – I thought this was appropriate at graduation time.
Let’s get started on today’s project!
I am fortunate to have an older die that cuts a large rosette but if you do not have a die – this rosette can be easily made by hand. To make the rosette using a die you will need two pieces of 12″ X 12″ cut in half. To make the rosette by hand, cut 4 pieces of cardstock 12″ X 4.75″ and then scored every half inch along the 12″ side. Then fold each score line like an accordion, first valley, then mountain folds until each is folded. The die I used made a decorative edge so if you are making yours by hand, it will have a straight edge.
I began with the beautiful Rainbow Bark paper from ModaScrap.
Join all pieces together as shown above.
When all pieces are joined, you will have a funny looking ring like the one above. To make the rosette (shown below) push the outside edges down while gently pushing the bottom edges to the inside.
It will want to pop up if you let go of it so you may need some help here. I always get my husband to come in and hold down the edges while I glue. I like making two circles, one for the front and one a little larger for the back. Add the glue to the center of the rosette and place one circle into the glue. I like to use hot glue to hold it together but you can use any kind of glue, just know that you will need to hold it down until the glue dries. I discovered that it is helpful to use a large round container to hold it in place while you get the folds spread out evenly and ready to glue. It still needs to be held down until the glue cools or dries. I don’t cook but I found a container in my kitchen that worked great.
Cut out all the elements that you want on your rosette and begin to assemble. When I had all my elements added I decided to add some transparent Craft Drops for texture. For the final touch I stamped “Follow Your Dreams” from the Dream Sentiments Clear Stamp Set.
Congratulations to all the 2020 grads – Stay safe and healthy,
Good morning! Laura here today to share another layout I created for my niece’s upcoming wedding!
To create this layout:
Step 1 – Trim one piece of paper to 12 x 10 3/4, ink the edges. Step 2 – ink the edges of a 12×12 paper and adhere the other paper on top. Step 3 – die cut 3 of the largest Stitched Indented Rectangle, then die cut one with butterfly spray, ink the edges, add a piece of white cardstock under the butterfly spray and adhere to the papers.
Step 4 – create your photo mat, ink the edges and using 3D foam dots of cardboard adhere your photo mat to your papers. Step 5 – die cut 4 flowers using your favorite ECD flower die, and assemble. set aside. I used the small flower set and the large flower set. I also decided to create one layer if a flower using the double sided tape and the Ocean Blue glitter from the Beach Palette. Step 6 – die cut a butterfly – I used the small butterfly – using the double sided tape and glitter for the bottom layer and assemble.
Step 7 – die cut one silhouette circle using the largest and second largest circle in the stitched circles.
Step 8 – die cut one heart from the true love die set using double sided tape and glitter.
Step 9 – die cut 11- 1 1/2″ stitched hexagons from various papers and double sided tape and glitter –– I used copper rose and true red.
Step 10 – die cut one celebration flag using double sided tape and glitter.
Step 11 – assemble as shown.
I typically do not take photos in direct sunlight because it washes out the colors but in order to show the shone of glitter, I did take one which you can see below.
And here is the final layout again.
I hope you enjoyed my tutorial! You can see the items I used in the link below.
Hi Everyone, it’s Tina here. By now you’ve seen the new release from Joset Designs. Oh my. There are new character dies such as the panda and koala bear along with some Japanese style dies. My card was inspired by this photo. Below you will find the steps to create your own Koala bear card.
Step 1 – Trim White Soft Finish Cardstock to 8 1/2” x 5 1/2”, score at 4 1/4” and fold in half for a vertical side fold card (A2)
Step 2 – Trim White Soft Finish Cardstock to 5 1/2” x 4 1/4”. Apply Distress Oxide ink onto a craft mat and spray with water. Dip the Cardstock into the ink and heat set. Repeat several times until you reach the desired effect.
Step 3 – Diecut Stitched Indented Rectangles using the background created from Step 2. Adhere to card using 3mm Clear Double Sided Adhesive Tape.
Step 4 – Diecut Koala and Bamboo using either coloured Cardstock or ink colours on White Cardstock. Assemble the pieces using Kids Choice Glue. Adhere to card using Kids Choice Glue and Foam Tape.
Step 5 – Stamp Bear Hugs sentiment using Versamark Ink. Sprinkle Silver Embossing Powder and remove the excess. Heat set it using a heat tool. Diecut Stitched Diagonal fishtail and adhere to card using Foam Tape.
This card can be used for many occasions by changing the sentiment and colours. Below is a link to all the products used. Thank you for stopping by and have a wonderful day!
Hi Everyone, it’s Tina here. I have a super fun card to share with you using Christmas Garden stamp set to create and background and accents. Below you will find the steps to create your own card.
Step 1 – Trim White Soft Finish Cardstock to 8 1/2″ x 5 1/2″, score at 4 1/4 and fold in half for a vertical side fold card. (A2)
Step 2 – Trim Brick Red Soft Finish Cardstock to 5 1/2″ x 4 1/4″. Adhere to card using 3mm Clear Double Sided Adhesive.
Step 3 – Trim White Soft Finish Cardstock to 5 1/2″ x 4 1/4″. Stamp Christmas Garden image using ink of your choice randomly covering the entire panel. See photo below.
Step 4 – Diecut Stitched Indented Rectangles using the background created from Step 3. Adhere to card using Foam Tape.
Step 5 – Stamp Christmas Garden image onto White Soft Finish Cardstock using Gina K Amalgam Ink two times. This is an alcohol friendly ink. Color in the images using any alcohol markers of your choice. I used Spectrum Noir alcohol markers. Fussy cut the images and adhere to card using Kid’s Choice Glue.
Step 6 – Stamp Joyful Wishes using Versamark Ink on Brick Red Soft Finish Cardstock. Diecut Diagonal Stitched Fishtail and adhere to the card using Foam Tape.
Step 7 – Optional – For added interest and sparkle adhere red jewels randomly using Kid’s Choice Glue.
This card was so much fun using one stamp set and makes a wonderful holiday card. Below is a link to all the products used. Thank you for stopping by and have a wonderful day.


 Hi Friends! It’s EK, and I am popping in today to share a new card I crafted using some long neglected crafting supplies and A Way with Words Butterfly Flourish. I just love how elegant the flourishes of this die set make creating something special so simple.
 Step One: On a crafting mat or glass, drop three similar liquid watercolors. I used Dr. Ph Martins Hydrus (just unearthed from my moving boxes) in two shades of red and one dark pink.
 Step Two: Spray the liquid watercolor with plenty of water.
 Step Three: Dip a piece of Watercolor Paper into the liquid watercolor and completely saturated with color. I was able to get three dips out of the puddle.
 Step Four: Heat set the watercolor paper. Then spray with a iridescent watercolor spray. I used Perfect Pearls Mists.
 Step Five: Die cut the watercolor paper using the Butterfly Flourish die set. I used just the large flourish once and the small flourish twice for this step.
 Step Six: Add a piece of Clear Double Sided Adhesive to the watercolor paper. Die cut the detailed butterfly from the Butterfly Flourish die set.
 Step Seven: Peel off the backing paper to the Clear Double Sided Adhesive and add Cool Diamond Silk Microfine Glitter to the detailed butterfly.
 Step Eight: On a second piece of watercolor paper, die cut a frame using both the Stitched Indented Rectangle die set and Fitted Indented Rectangle die set.
 Step Nine: Using 10mm Clear Double Sided Adhesive, adhere the die cut frame to an A2 card frame. Using a combination of 10mm Clear Double Sided Adhesive and Kids Choice Glue, add the flourished butterfly. Using Kids Kids Choice Glue add the glittered butterfly to the flourished butterfly.
 Step Ten: Add a sentiment using the Love & Hearts Collection stamp set and two tones of ink. I used both Picked Raspberry and Festive Berries Distress Oxide.
 Step Eleven: Adhere the two smaller butterfly flourishes. Add three drops of Pearl Rose Craft Drops and three drops of Transparent Crystal Craft Drops.
 I love how this is a surprising simple this card was to create but how elegant it looks.


 Hey friends! It’s EK, and I am popping in today with an over the top glitter card for a little princess in my life. Let’s be honest, when dealing with the little princess in your life, it really should be over the top, and the new Princess Crown die set is perfect for a little bit of over the top glitter.
 Step One: Place some Clear Double Sided Adhesive over a piece of trimmed 90lb Soft Finish Cardstock. Die cut the Princess Crown die set over the Clear Double Sided Adhesive.
 Step Two: Peel back the adhesive paper of the crown shape die cut and adhere the detailed crown die cut over into the center of it. Add Lavender Ice Silk Microfine Glitter over the die cut crown shape.
 Step Three: Peel the adhesive paper back from the detailed crown die cut and add Imperial Garnet Silk Microfine Glitter over it.
 Step Four: Add Bright Cranberry Silk Microfine Glitter over the Princess die cut and the heart from the detailed crown die cut.
 Step Five: Add Copper Rose Silk Microfine Glitter over the stars and flair die cut piece.
 Step Six: Trim a piece of 90lb Soft Finish Cardstock to 4.25×5.5 inches. Blend dark water soluble ink over the cardstock and spray it with sparkling spray. I used Black Soot Distress Oxide and Perfect Pearls Spray. Let Dry.
 Step Seven: Die cut the blended piece of cardstock with a large die from the Stitched Indented Rectangle die set.
 Step Eight: Using 10mm Clear Double Sided Adhesive, adhere the die cut blended cardstock to an A2 card frame. Then add the glitter crown on top of the blended cardstock. Using Kids Choice Glue, adhere the rest of the die cuts to the card frame.
 Step Nine: Using a stamping platform, stamp stars and a sentiment from the new Once Upon a Time Sentiments stamp set using white pigment ink.
 I wish you could see exactly how sparkly this card is with all this glitter. I just adore how the pinks and purples just pop with the black behind it.


 Hey Friends! It’s EK and today I thought it might be fun to try to create a modern take on a vintage look. Designer Ilse and Charlene’s new stamps and stencils make creating this look so simple with their old school flare.
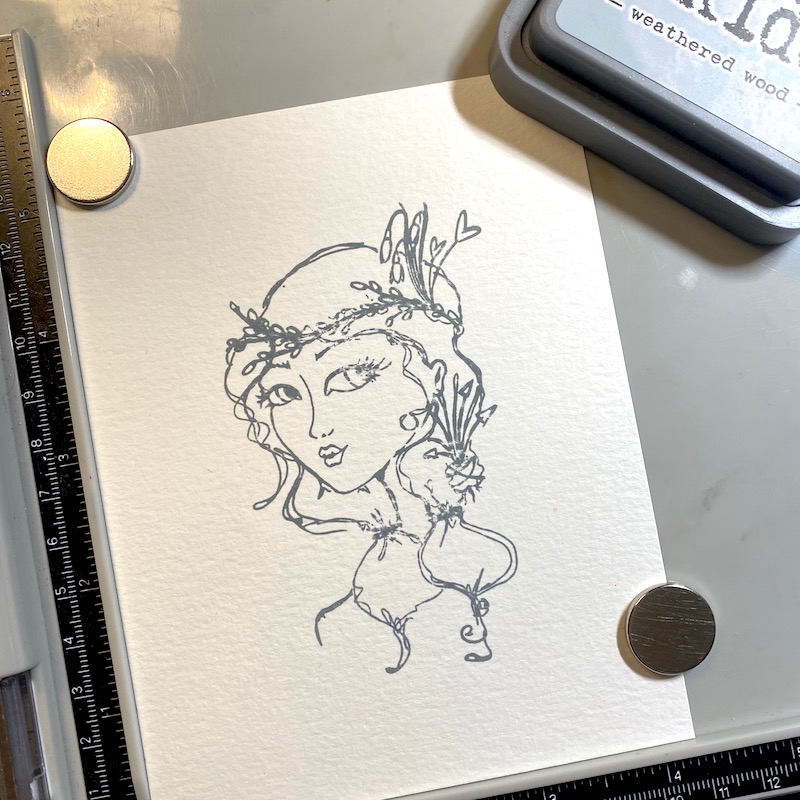 Step One: Stamp out on of the images from the Earthy Girls stamp set onto a piece of Watercolor Paper cut out to 4.25×5.5 inches using some water-soluble ink. I used Weathered Wood Distress Oxide.
 Step Two: Using clean water and watercolor paint brush, fade the ink out over the watercolor paper, making the stamped image look bright and bold.
 Step Three: Using ECD’s Watercolor Palette, add touches of color to the stamped image.
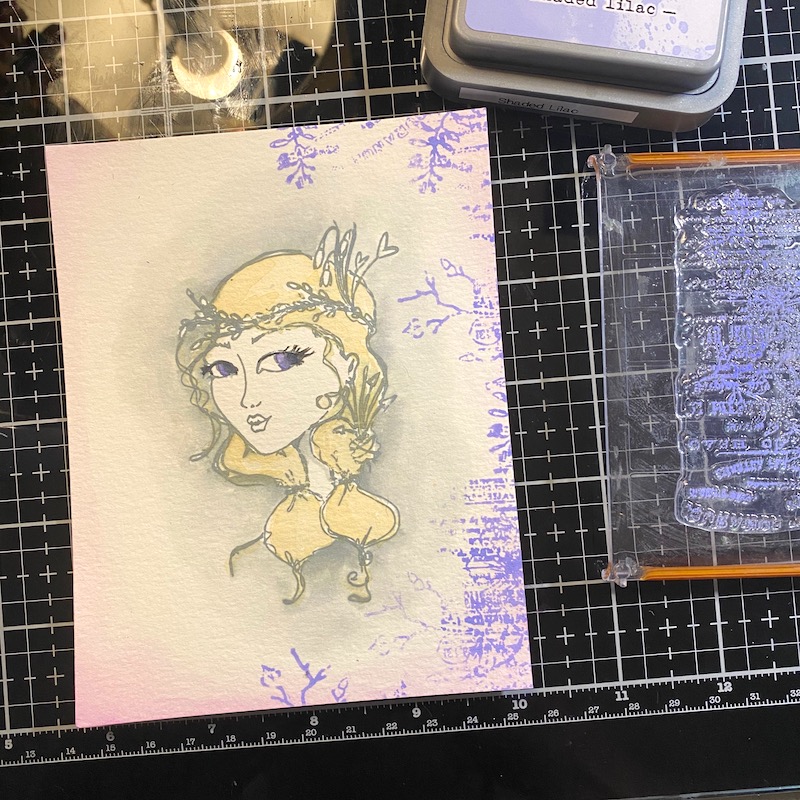 Step Four: Hand stamp around the edges of the watercolor paper background images from the Words & Layers stamp set using colored ink. I used Shaded Lilac in Distress Oxide.
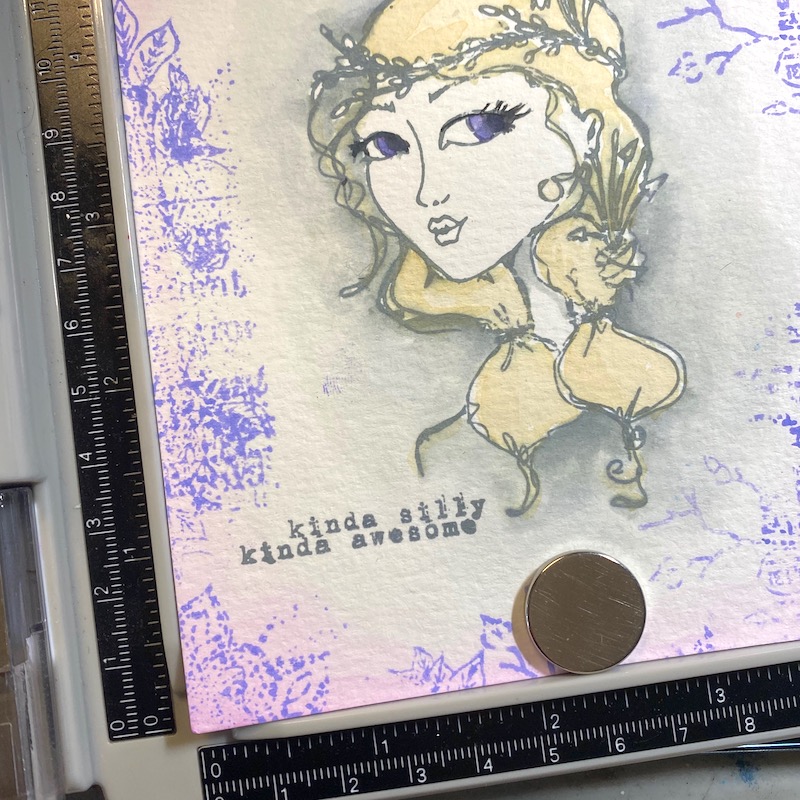 Step Five: Add a sentiment to the image from the Words & Layers stamp set. I used Weathered Wood Distress Oxide.
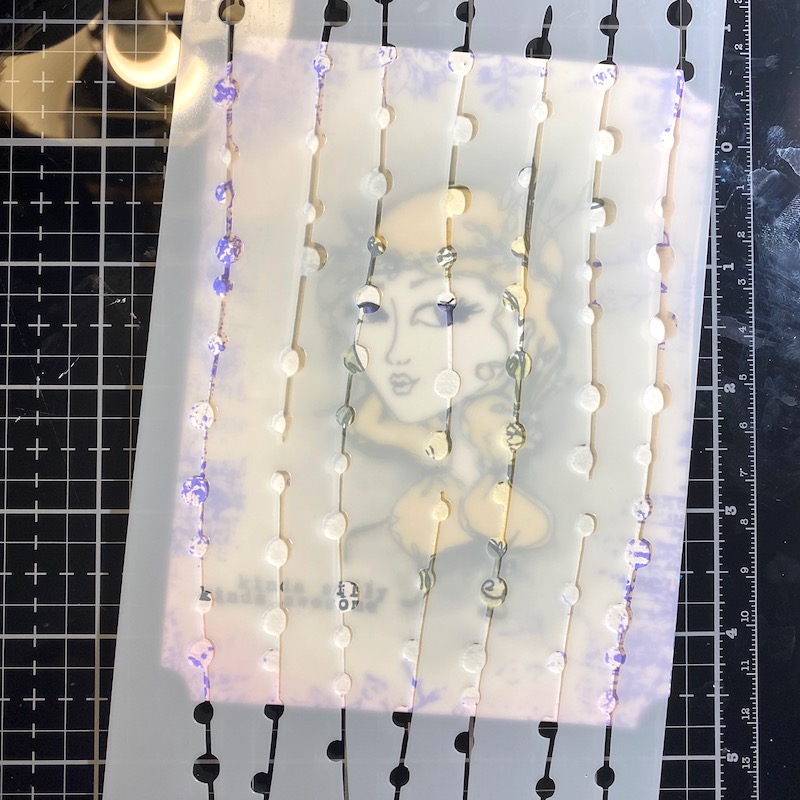 Step Six: Add texture to the card using the Dot Dot Dot… stencil and add gel medium through the openings.
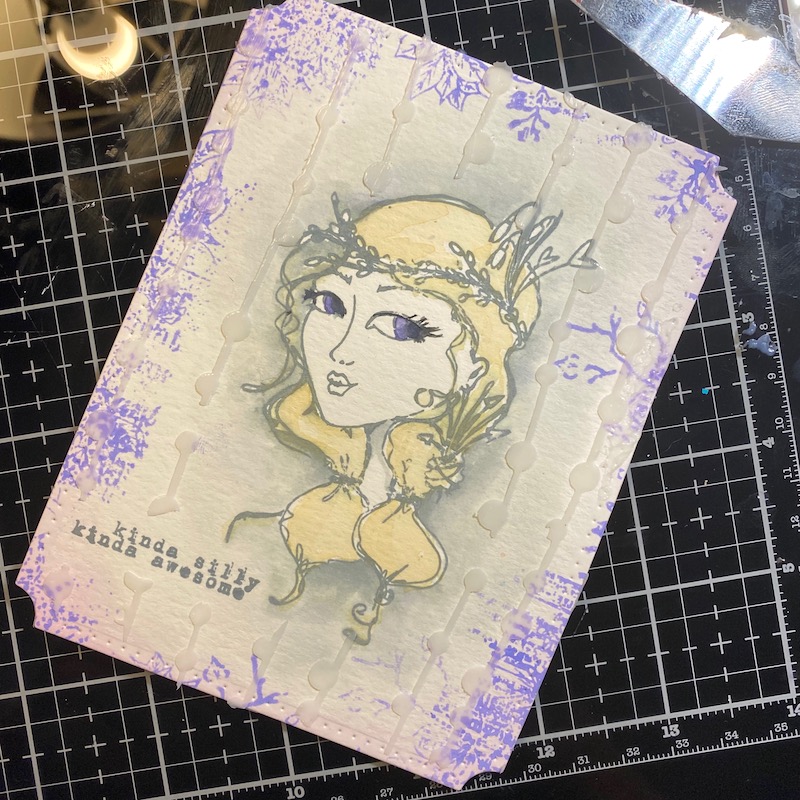 Step Seven: Let the gel medium dry.
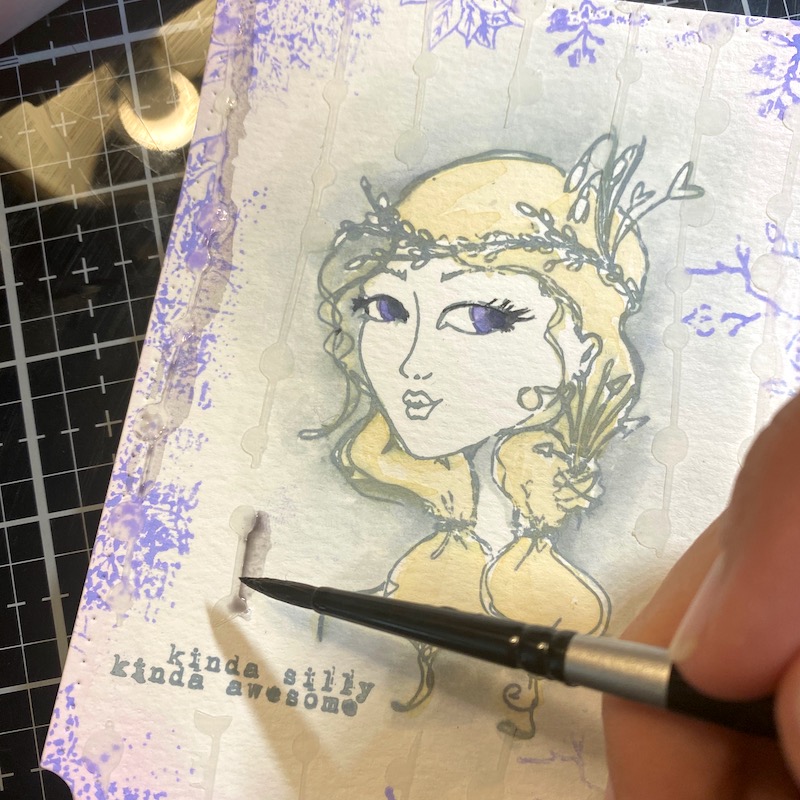 Step Eight: Highlight the stenciling by adding muted watercolor around the raised portions.
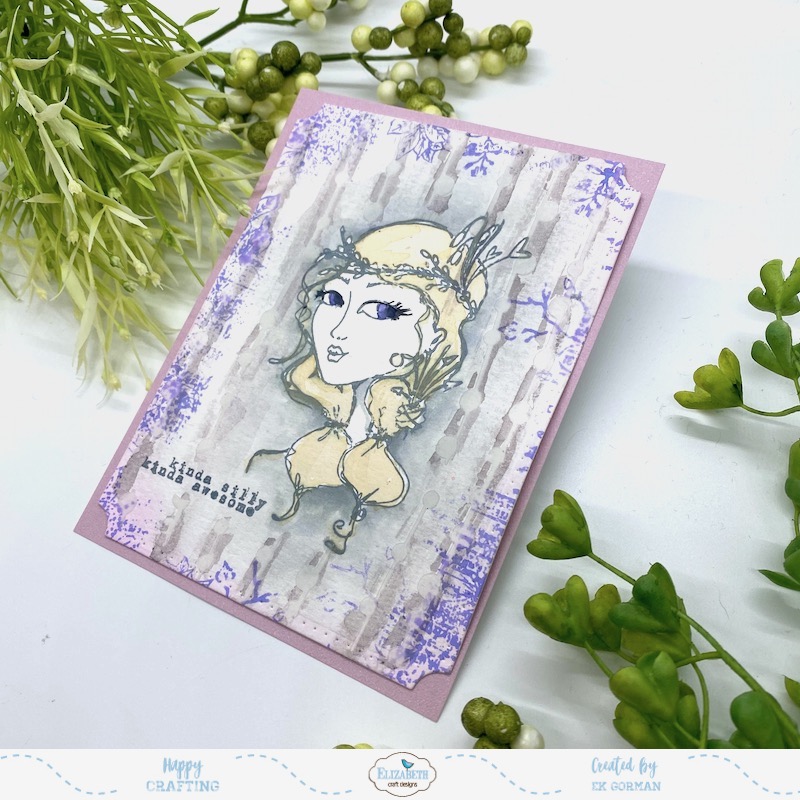 Step Nine: Die cut the watercolor paper with the Stitched Indented Rectangle die set and adhere it to a piece of trimmed Dusky Lavender Soft Finish Cardstock trimmed to 4.25×5.5 inches using 10mm Clear Doubled Sided Adhesive. Add the Soft Finish Cardstock to an A2 card frame.
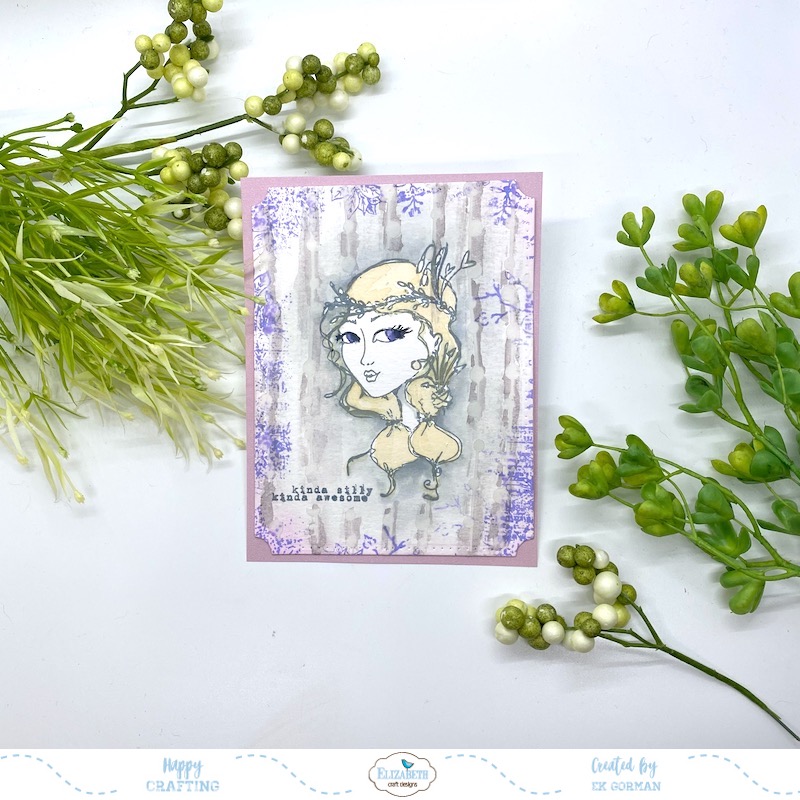 I love how the pale grey and purple tones have a vintage vibe, but in a fun colorful way.


