Browsing Tag

Tags & More

A Way With Words

Brackets and Watercolours Thanks Card

October 23, 2015

Hi!  It’s Suzanne Cannon here from Quietfire Design with a project using a fun technique that works with almost all A Way With Words dies and Elizabeth Craft Designs Tags & More dies.

Thanks_Bracketed_Watercolour_Suzanne-10-15w_sig (003)

By die cutting one of the Tags & More decorative inserts on either side of the card you can create brackets that hug and frame the word.  (Each Tags & More die set has several of these decorative overlays.)

Instructions:

1. Form an 8” x 5.5” tent-fold card base from red cardstock.

2.  Cut a 6.75” x 4” panel from watercolour paper.  Die cut a small maple leaf and Thanks from another piece of  watercolour paper. Use a ball stylus to score veins into leaf

Watercolour_Thanks_3_sig (003)

3. Use a wet-in-wet technique to randomly colour the watercolour paper panel, die cut leaf and Thanks with Distress Ink Re-inkers.  Allow to dry.  Curl the leaf with your fingers.

Watercolour_Thanks_4_sig (003)4. Mat the watercolour panel with black cardstock leaving a narrow border.

Watercolour_Thanks_5_sig (003) 5. Cut a 6.5 x 4” (approximate) panel from black cardstock. To create first bracket opening, tape leaves insert die to the left end cardstock with removable tape and die cut. Follow steps 6 – 9 to create the side of the bracket.

Watercolour_Thanks_7_sig (003)

6. Use a soapstone pencil to lightly draw a straight line across the black panel. (Don’t press into the cardstock, the line is temporary and will be removed in step 8.)

Watercolour_Thanks_6_sig (003)

7. Position Thanks  to determine the space you will need to leave for your word.

Watercolour_Thanks_8_sig (003)

8. Using the soapstone pencil mark, align the leaves insert die on the right side of the word.  Use removable tape to hold in place and die cut. It should be the mirror image of the leaves cut in step 5. Use a clean soft rag to wipe off the soapstone pencil mark. Watercolour_Thanks_9_sig (003) 9. If needed, trim the black cardstock panel so that the distance from the leaves and the ends of the rectangle is the same at both sides. Mat the black rectangle on the watercolour panel with foam tape. The final size of the die cut panel is 6.25 x 3.5”.

10. Use the fine pointed scissors and tweezers to cut slivers of foam tape and adhere Thanks between the brackets. Adhere the maple leaf with foam tape, positioning it as shown in the photo so it extends upward at the end of the swirl on the letter ‘k’.

11. Adhere assembled panels to card base with foam tape.

Elizabeth Craft Designs has many Tags & More sets with wonderful decorative inserts that will work really well for this technique.  Here is one using Believe and one of the inserts from Tags & More 9 Sparkle (1077).

Believe2_Bracketed_Suzanne_sig

Enjoy mixing and matching your A Way With Words dies and any of those versatile Tags & More insert (decorative overlay) dies that make such great brackets!
Happy Creating!

Suzanne


Supplies:

Quietfire Design “Thanks” (1058)

Tags & More 3 – Leaves (953)

Susan’s Garden – Woodland Leaves (1092) 6 piece set

4″ X 9″ Watercolor Paper – 10 pack (WP903)

Susan’s Garden 4pcs. All metal Tool Set in Luxury Case (sku 808)

Fine Pointed Tweezers by Elizabeth Craft Designs, Inc. (801)

Fine Pointed Scissors by Elizabeth Craft Designs, Inc. (802)

Elizabeth Craft Designs Clear Double-Sided Adhesive Tape

Other supplies:

T-Square ruler
Soapstone pencil
Foam tape in clear and black
Core’dinations cardstock in black and red
Ranger Distress Inks; Peeled Paint, Festive Berries, Squeezed Lemonade, Dried Marigold

Recipe for 2-Sided Mixed Media Tags

October 18, 2015

Tag-A

By Judi Kauffman

My favorite recipes have very few ingredients; for example, graham cracker brownies (crushed grahams, sweetened condensed milk, chocolate chips). The same is true for craft projects, so when I decided to write a recipe for 2-sided mixed media tags I kept it simple: Two dies (952 Tags & More 2 – Deco, 711 Ladybugs), two surfaces (cardstock and Shimmer Sheetz), plus assorted leftovers, or what I like to call “table scraps” (the bits and pieces that accumulate at the side of my work table).

BenC

As you can see from the photos above and the ones that follow, both sides of my tag are symmetrical with something large, centered to anchor the composition. There are also small elements to move the eye and relieve the formality. (Symmetry can be quite stiff unless diagonals are introduced.)

Tag-D

Tag-E

All of the Tags & More die sets in the series have a mix of decorator pieces as well as a basic shape, so you can choose a different one if Deco is not your style.

  1. For a 2-sided tag, start with two pieces of cardstock (or one each of scrapbook paper and solid color cardstock). Sandwich with Clear Double Sided Adhesive Sheet in between and die cut the basic tag in whatever length you want. As shown, the tag is 3.25” x 6”. Then die cut the decorative overlay at the top of the tag.

FenG

  1. Back the Shimmer Sheetz or patterned paper you’ve selected for corners and reinforcements with Clear Double Sided Adhesive Sheet prior to cutting. Die cut 2 matching reinforcements for the top of the tag (front and back), and two pairs of decorative corners (a pair for each side). Reminder: The Metal Adaptor Plate is required for die cutting Shimmer Sheetz. Review Els van de Burgt’s YouTube video if you have not tried this technique. Tip: Choose lightly sanded or alcohol ink-altered Shimmer Sheetz for the reinforcements and corners. It adds extra sparkle and durability.
  1. Die cut a ladybug from metallic red and standard black cardstock. Alternatively, die cut a butterfly, dragonfly, flower, or whatever suits your tag.
  1. Add the reinforcements and decorative corners to both sides of the tag. Optional: Distress the cardstock corners and solid color side of the tag with black ink before adding corners and reinforcements.
  1. Arrange and adhere the collage elements on one side of the tag. Combine the ladybug with a mix of torn stamped or pre-printed paper, a canceled postage stamp, purchased stickers, Shimmer Sheetz scraps. Use the Tim Holtz Tiny Attacher to “frame” the collage with small silver staples, used as linear elements.
  1. Arrange and adhere the collage elements on the other side of the tag.
  1. Optional: Display the tag on a Card Stand/Easel so it can be turned over to show both sides. (Optional easel made with 1071 Card Stand/Easel die from Els van de Burgt Studio.)

Design Detour: Things to Notice

*Per Step 5, there are two staples set vertically at each side; there are two staples set horizontally as well, one just below the ladybug and one about an inch above the postage stamp. It is this orientation of the staples that turns them into a frame instead of turning up as randomly-added embellishments.

*Save a lot of canceled postage stamps. They are wonderful little works of art. This one, from Norway, echoed both the colors (red and black) and the shapes (circles) in the ladybug. This repetition of color and shapes is intentional, not accidental, and why it is so much fun to find bits and pieces to combine in a collage!

*I arranged the diagonal elements so that your eye will move around instead of getting stuck in the middle of the collage. There is a diagonal pull between the bright red ladybug and the purchased Happy Birthday sticker on the front side of the tag, and how your attention is pulled from the white on the birds in the drawing to the white dimensional embellishments (butterfly and bird) on the back side.

Supplies:

Elizabeth Craft Designs –

952 Tags & More 2 – Deco or other Tags & More set

711 Ladybugs

1071 Card Stand/Easel (optional)

Shimmer Sheetz in color(s) of choice

803 Metal Adaptor Plate

Clear Double Sided Adhesive Sheet

Other – Collage elements including canceled stamp, stamped paper, pre-printed sticker, scrapbook paper, small drawing, dimensional flat-backed butterfly and bird; Tim Holtz Tiny Attacher (idea-ology); 3/8” grosgrain ribbon (Really Reasonable Ribbon); Black dye ink pad; Sanding block (Optional: To sand the hole reinforcements); Alcohol inks (Optional: To alter Shimmer Sheetz for reinforcements and decorative corners)

Colouring on a Rainy Day Tag

October 13, 2015

Hi! It’s Marsha here!

Are you into the colouring for adults craze? Here in the Netherlands it’s THE thing right now and there are colouring books for adults available everywhere!

Have you wondered how you can combine the colouring with your love for die-cutting and cardmaking? Well, I have… And here’s what I came up with:

Marsha Valk | Elizabeth Craft Designs: Rainy Day Tag

And here are the steps to create the tag:

Marsha Valk | Elizabeth Craft Designs: Rainy Day Tag

1. Die-cut about 20 umbrella tops out of white cardstock or watercolour paper. I needed a total of 17 umbrella tops to complete the tag, but it’s good to have a few to choose from.

Be mindful of the paper you are using. It needs to be suitable for the markers or pens you will be using later on. I coloured with Sakura Koi Coloring Brush Pens and I used them in combo with the 270 gr Soft Finish Cardstock.

It worked well for me, but if you know you love to layer with fairly wet waterbased markers the 4 x 9″ watercolour paper could be a better choice for you.

Marsha Valk | Elizabeth Craft Designs: Rainy Day Tag

2. Colour your umbrella tops. Wait until the ink on the umbrella tops is dry before you doodle on them with a permanent fine tip pen.

You can also doodle on the blank umbrellas first and then colour them in. Test if your pen is really waterproof before you go this route. I know from experience that you can’t trust a pen not to bleed when you go over the lines with wet media, even if it says ‘waterproof’ on the pen!

Marsha Valk | Elizabeth Craft Designs: Rainy Day Tag

3. Watercolour a moody background for the tag. I used the Koi Brush Pens to watercolour with and I did it on a big sheet of Soft Finish Cardtock so I could cut it to size later on.

To watercolour with the Brush Pens, you scribble some of the ink onto a saucer or a plastic lid and then you pick the ink up with a wet watercolour brush.

Marsha Valk | Elizabeth Craft Designs: Rainy Day Tag

Let the watercoloured cardstock air dry to prevent from buckling.

Marsha Valk | Elizabeth Craft Designs: Rainy Day Tag

4. Cut the watercoloured cardstock to 4,5 x 8,5 “. Die-cut it with the Tags & More 9 Sparkle Set.

Marsha Valk | Elizabeth Craft Designs: Rainy Day Tag

5. Add some ‘rain’ to the tag with a light grey pen or marker.

Marsha Valk | Elizabeth Craft Designs: Rainy Day Tag

6. Adhere the umbrella tops to the tag with Transparent Double Sided Tape.

Marsha Valk | Elizabeth Craft Designs: Rainy Day Tag

7. Finish the tag with a handwritten sentiment or quote and add any additional details you wish.

Marsha Valk | Elizabeth Craft Designs: Rainy Day Tag

Happy colouring!

Marsha

SUPPLIES:

Elizabeth Craft Designs:
928 Rainy Day
1034 Flourishes & Branches
1077 Tags & More 9 Sparkle
PSF102 Soft Finish Cardstock 8.5″ X 11″ 270gr /100Lb 10 pack
505 Transparent Double Sided Adhesive Tape – 3 mm

Other:
Waterbased markers/pens (Sakura Koi Coloring Brush Pens)
Black permanent fine liner (Sakura Pigma Micron)

Els van de Burgt Studio

Fall Leaves Nature Tag Card

October 12, 2015

Fall Tag Card

Created by Mary Dimercurio Prasad for the Susan Tierney-Cockburn Design Team

Happy Fall! This is Mary with a colorful Fall card. The leaves are so fun to make! Google “Fall leaves” for many beautiful examples you can use as models for your leaves.

Making the Card

1. Cut a piece of bright yellow-orange cardstock 4 1/4 x 11 inches (half of an 8 1/2 x 11 sheet). Fold in half. Optional: add a piece of leaf paper to the inside flap (you could also stamp leaves and color them). With the card closed, place main die at opening (across from fold) and cut. Trim both sides. Open card; on front side of card, line up leaves decorator die with hole and die cut.

2. Die cut a set of Woodland Leaves from white cardstock. Color using PanPastels. Draw veins with colored pencils. Use a fixative before shaping (this is optional but will prevent some of the color from coming off onto the pad). Shape each leaf using Metal Tool Set and molding pad. Add more color if necessary.

Tag Close Up

3. Stamp quote All Things of Nature in black ink on light yellow cardstock. Using label decorator die from Katie Label Pivot Card, center and die cut quote. Use Distress Inks and ink blending tool to decorate edges of label. (Optionally you could use PanPastels; be sure to use fixative.)

4. Adhere leaves, label (dimensional tape), sequins, and buttons as shown.

5. Dye seam binding ribbon with Distress Inks. Tie ribbon through back tag hole and twine through front tag hole as shown.

Card Closed

Supplies

ECD Supplies:

Other Supplies:

  • Cardstock: Bright Yellow-Orange, White, Light Yellow
  • Fixative
  • Black Ink
  • Distress Ink: Barn Door, Spiced Marmalade, Wild Honey, Mustard Seed, Mowed Lawn, Peeled Paint
  • Ink Blending Tool
  • Colored Pencils (e.g. Prismacolor)
  • Buttons
  • Sequins
  • Twine
  • Seam Binding Ribbon
  • Dimensional Tape

The Shine of The Butterfly

September 27, 2015

IMG_4617
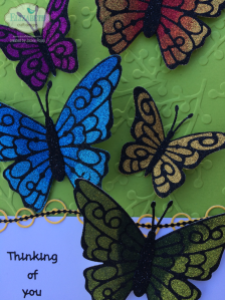
Hi, It’s Jackeline here. For my project today I created a tag that I decorated using new butterflies from the Els van de Burgt Studio Collection.

Let’s get started:

1. Cut a green cardstock rectangle measuring 8 1/2″ x 4 1/4″ (a standard 8 1/2″ x 11″  sheet cut in half lengthwise is enough for two tags). Use the Tags & More 9 Sparkle die to round off the short end at the top. Also die cut a hanging hole.

2. Emboss this piece using the Berry Banch Embossing Folder.

3. Cut a strip of white cardstock measuring 2″ x 4 1/4″. Back it, and a small scrap of white cardstock with Clear Double Sided Adhesive Tape. From the small adhesive-backed scrap die cut a hole reinforcement and position it at the top of the tag.

4. Die cut 2 yellow cardstock Ribbons & Jewels strips (backed with Clear Double Sided Adhesive Tape before cutting). Set strips aside till step 11.

To built the Butterflies:

5. Back a piece of white cardstock large enough to die cut 3 large butterfly silhouettes (Butterfly 1) and  2 small butterfly silhouettes (Small Butterfly) with Clear Double Sided Adhesive Tape. Die cut the 5 butterflies.

6. Die cut one large and one small butterfly overlay from scraps of release sheet from Clear Double Sided Adhesive Tape left from this or from other projects.

7. Working one butterfly at a time, remove the release sheet a die cut butterfly and position the overlay mask (made in step 6) onto the exposed adhesive. (Take care not to touch any exposed adhesive with your fingers – use Fine Point Tweezers as needed to avoid this!) Apply Silk Microfine Glitter in one or more colors, starting with the darkest colors first (toward the body of the butterfly) and the lighter colors next (to complete the wings). Brush off excess and polish with a fingertip to bring out the sparkle.

8. Take off the mask and apply Basic Black Silk Microfine Glitter to complete the butterfly. Polish as in step 7. IMG_4618 (1)

9. Repeat steps 7 and 8 for all butterflies.

There are 38 beautiful colors in the Silk Microfine Glitter palette from Elizabeth Craft Designs, plenty of choices for creating magical butterflies. The colors I used for my butterflies are in the supply list.

For more information on how to use the glittering technique, watch a tutorial by Els Here

Decorating the Tag:

10. Place the white strip 1/4″ inch from the bottom of the tag. Trim off excess at sides. Add ‘Thinking of You’ peel-off

11. Decorate the top and bottom edges of the white cardstock with yellow die cut Ribbons & Jewels strips from step 4. Add black peel-off lines down the center of Ribbons & Jewels strips, curving the peel-offs as shown. Trim yellow die cut strip and black peel-offs at the sides as needed.

12. Bend the butterfly wings upward for dimension and use a small piece of Clear Double Sided Adhesive Tape behind the body of each butterfly to secure them onto the tag. Alternate large and small butterflies as shown and angle them so they appear to fly.

13. Optional: Add cord or ribbon loop to the tag.

I hope you enjoyed this tutorial and will create your own butterfly tag very soon!

Jackeline.

SUPPLIES LIST:

Elizabeth Craft Designs

1077 Tags & More 9 Sparkle
1070 Ribbons & Jewels
1072 Small Butterfly
1073 Butterfly 1
343 Black Assorted Words
1016 Black Lines
E103 Berry Branch
502 Transparent Double Sided Tape Sheet – 8.5″ x 11″ – 5 pack
801 Fine Pointed Tweezers
802 Fine Pointed Scissors
601 Basic Black – Silk Microfine Glitter
619 Fuchsia – Silk Microfine Glitter
638 Solar Gold – Silk Microfine Glitter
633 Forest Green – Silk Microfine Glitter
634 Leaf Green – Silk Microfine Glitter
614 True Red – Silk Microfine Glitter
613 Orange – Silk Microfine Glitter
623 Royal Blue – Silk Microfine Glitter
625 Sky – Silk Microfine Glitter

Others

Green and White Cardstock
Yellow Paper


A Way With Words

Merry Christmas

September 3, 2015

ECDChristmas9Tagwm


Hi everyone,

It’s Frances Byrne here. Today I am sharing a Christmas card that I created using the new Tags & More 9 – Sparkle die set along with one of the new A Way with Words sentiment dies from Quietfire Designs. The width of the Tags & More 9 – Sparkle die set is 4 1/4 inches and of course can be any length, so it is perfect to use for creating cards.

The layout of this card can be adapted for any occasion just by changing the colors, sentiment die and dies used to decorate the card.

Here’s how I created my card:

1. Creating the base card –

  • Cut a piece of red card 4 1/4 inches x 11 inches. Score the card along the 11 inch side at 5 1/2 inches (do not fold yet).

ECDChristmas9Tag4wm

  • Line up the main tag die from the Tags & More 9 – Sparkle at the top of the red card stock so that the edges of the die will line up on the edge of the card and die cut.
  • Place the swirls decorative overlay die from the same die set at the top of the tag so that the rounded shape of the overlay lines up with the rounded shape of the tag and die cut.

ECDChristmas9Tag5wm

  • Fold the card along the score line we created early to create a side folded A2 card as per the photo above.

2. Cut a piece of Gold Shimmer Sheetz large enough to cut the A Way with Words Merry Christmas sentiment die. Adhere Transparent Double Sided Adhesive Tape to the back of the Shimmer Sheetz and die cut the sentiment. Make sure to use the metal adaptor plate when die cutting Shimmer Sheetz.

  • Adhere the Gold Shimmer Sheetz Merry Christmas word to the front of the card. The flourish at the bottom of the sentiment should be as close to the bottom of the card as possible.

ECDChristmas9Tag2wm

3.  From green card die cut three holly leaves using the Holly Leaves & Berries die set. Shade the edges of the leaves using Bright Yellow Green & Turquoise Pan Pastels from the Susan’s Garden PanPastel Flower Coloring Kit 2.

  • Attach a piece of Transparent Double Sided Adhesive Tape to the front of a piece of red card large enough to die cut the four berry cluster from the Holly Leaves & Berries die set. Remove the protective backing from the adhesive and cover with True Red Silk Microfine Glitter. Polish the glitter with your finger.
  • Attach the Holly Leaves & Berries to the top of the card as per photo.

ECDChristmas9Tag3wm

4. The inside of the card:

  • Cut a strip of green card 2 inches x 4 1/4 inches. Attach to the right hand edge of the inside of the card, so that the green with show through the die cut swirls when the card is closed.
  • Adhere a Gold/Silver Glitter Border Peel-Off Sticker to the edge where the red and green card join.
  • Stamp the sentiments “Merry Christmas” and “and Happy New Year!” from the Merry & Bright Clear Stamp set using black ink to the red portion of the card.
  • Die cut two more holly leaves from green card using the Holly Leaves & Berries die set. Sponge the edges using the PanPastels as per the front of the card in step 3.
  • Attach a piece of Transparent Double Sided Adhesive Tape to the front of a piece of red card large enough to die cut the three berry cluster from the Holly Leaves & Berries die set. Remove the protective backing from the adhesive and cover with True Red Silk Microfine Glitter. Polish the glitter with your finger.
  • Adhere the Holly Leaves & Berries to the bottom of the inside of the card underneath the sentiment.

Thanks for stopping by today. I hope you have enjoyed my tutorial.

Supplies:

Elizabeth Craft Designs:
1056 Quietfire “Merry Christmas”
1077 Tags & More 9 – Sparkle
926 Holly Leaves & Berries
0212 Gold Metallic Shimmer Sheetz
509 Transparent Double Sided Tape 152mm
614 True Red Silk Microfine Glitter
30116 Susan’s Garden PanPastel Flower Coloring Kit 2
CS003 Merry & Bright Clear Stamp Set
7010 Gold/Silver Glitter Borders Peel-Off Stickers
 
Other:
Cardstock: white, red, green
Foam Tape
Scoring Tool
Black Ink

Oma’s Tag Book

September 1, 2015

Hello, everyone. It’s Els here today with a project that is keeping me grinning – my very first tag book to celebrate our new granddaughter, Annika! Instead of precise step-by-step instructions I want to share what I did in a more general way so you can get inspired to make a tag book to celebrate and chronicle whatever is going on in your life. I named my tag book “Oma’s Tag Book” as oma is the Dutch word for grandmother.

IMG_6908

Front of tag book

IMG_6909

Back of tag book

IMG_6914

The tag book opens at the back. Velcro was used to secure the cover.

Instructions:

  1. Gather some photos that have a central theme: New baby (!), vacation, back to school, a milestone birthday or anniversary, a sports team, your collection of shoes. (In other words, it can be a big event or something whimsical.)
  1. Choose coordinating solid color cardstock, Shimmer Sheetz, and printed papers.
  1. Pick your favorite Tags & More die set, or several sets. Pick your favorite Fitted Frames die set, or several sets. I chose Tags & More 9 – Sparkle and a combination of Fitted Frames.
  1. Create a tag for each page. All tag reinforcements are die cut from Shimmer Sheetz for durability. Use the photos showing my tags to help you create interesting layouts. Some tags have one photo, others have two. You can make the tags one-sided or decorate both sides. Embellish and layer a lot, or just a little bit! *See note about the front cover tag after step 6.
  1. Complete the book by connecting the pages with a metal ring. Decorate the ring with ribbons, twine, wire, or whatever combination you want.
  1. Tag books make wonderful and very special holiday gifts! Individual tags can be used as tag cards for friends or family, coaches, teachers, and others.

*Note: If you did not already notice this from looking at the second and third photo, be sure to make the front cover tag at least 3” longer than all of the others! Score it at the bottom, fold onto the back cover and add four Velcro dots to keep the book closed and tidy.

Pages of tag Book:

IMG_6916

This was the first picture that our daughter Joset sent us when Annika was born. I printed out the text message as I thought it would be fun to add to my page.

IMG_6917

Oma & Annika

IMG_6918

Annika

IMG_6919

Joset & Annika

IMG_6920

Annika in her beautiful ballerina outfit.

IMG_6922

“Happy family”

IMG_6924

Uncle Mark and Annika.

IMG_6927

Opa & Oma

Supply list:

Elizabeth Craft Designs Supplies –

1077 Tags & More 9 – Sparkle

952 Tags & More 2 – Deco (for heart reinforcements)

1061 Fitted Frames 1 – Lace Rectangles

1062 Fitted Frames 2 – Lace Squares

1063 Fitted Frames 3 – Curvy Rectangles

1064 – Fitted Frames 4 – Curvy Squares

726 Balloons

SS 0214 Red Metallic Shimmer Sheetz

SS 0212 Gold Metallic Shimmer Sheetz

502 Transparent Double Sided Tape Sheet

614 True Red Silk Microfine Glitter

7018 Red/Gold Glitter Dots


Other Supplies –

Photos

Pattern paper – Kaisercraft and BoBunny

Metal ring

Velcro dots


Videos

Rococo Cards

August 25, 2015

Hi, It’s Marsha here. Today I’m sharing a couple of cards with loads of glitter and gold!

Marsha Valk | Elizabeth Craft Designs: Rococo Cards

I recently visited the Charlottenburg Palace in Berlin. The palace is heavily decorated in baroque and rococo style. I left the palace and its beautiful garden with heaps of inspiration!

I especially loved the look of the gilded plaster in combination with pastel coloured walls that are painted to look like marble.

Marsha Valk | Elizabeth Craft Designs: Rococo Cards

The cards that I’ve created for this post are inspired by what I saw at the palace!

I’ve created a video to show you my process:

And here are the written steps to create the cards:

1. Start by covering a sheet of watercolour paper with water and then paint it with watercolours. I used a Dutch fluid watercolour called Ecoline. The colours will blend and flow. Let the colour pool in some places and drag it around with your brush to try and create a marble effect. Let the page dry completely.

2. Cut the watercolour paper into pieces of about 4,25 x 6,3 inches. Use the Tags & More 9 Sparkle die to round off one of the sides. Then use the overlay die with the dots to create… the dots.

Don’t throw away the ‘confetti’ that comes out of the holes just yet! Keep it in a safe place for the time being.

3. Use the Tags & More 9 Sparkle die to round off one side of a strip of Gold Metallic Shimmer Sheet to place behind the dots in the card. Adhere it to the back of the card.

4. Take a scrap of heavy cardstock (I used the same watercolour paper that I used as the card base) and die-cut a couple of butterflies, a Quietfire word or two and maybe a heart.

Cover each die-cut with VersaMark ink and then heat emboss it with gold embossing powder. Repeat this step until you are happy with the result. I heat embossed each die-cut twice.

Marsha Valk | Elizabeth Craft Designs: Rococo Cards

5. Cut a strip of Double Sided Adhesive Tape to about 4,25 x 2 inches. Die-cut it with the Tags & More 9 Sparkle die to mirror the rounded edge at the top of the card.

Adhere the strip to the lower part of the card. Remove the top liner and cover the sticky with Solar Gold Silk Microfine Glitter. Tap off the excess. Burnish the glitter with your finger to reveal the awesome sparkle.

6. Decide how you want to decorate the card. I started by adhering the ‘confetti’ I collected from a couple of the cards first. Then I placed my gold embossed die-cuts and I added a couple of glitter details. I finished each card with small specks of paint that I splattered on with a black and a white paint marker.

7. Adhere the card to a slightly larger folded note card or back it with a second piece of rounded off paper to create a single card like I did.

Happy crafting!

Marsha

SUPPLIES:

Elizabeth Craft Designs:

713 Small Butterfly
1055 Quietfire ‘Hello’
1058 Quietfire ‘Thanks’
1066 Ornament set 5 coming soon!
1072 Small Butterfly coming soon!
1073 Butterfly 1 coming soon!
1074 Leaf & Berry Branches coming soon!
1077 Tags & More 9 Sparkle coming soon!
212 Shimmer Sheetz – Gold Metallic
502 Transparent Double Sided Adhesive Tape Sheet
505 Transparent Double Sided Adhesive Tape – 3 mm
638 Silk Microfine Glitter – Solar Gold

Other:
Watercolour paper
Watercolours or spray ink (I used Royal Talens Ecoline)
Embossing ink (VersaMark)
Embossing powder (American Crafts – Zing! Metallic Embossing Powder Gold)
Dot adhesive runner
Liquid adhesive
Paint markers (Posca)
Scraps of painted paper

Blue Christmas

August 20, 2015


ECDBlueChristmaswm

Hi everyone,

It’s Frances Byrne here. Today I am bringing you a project using some of the new Elizabeth Craft Designs dies to create a Christmas decoration that can be displayed. For this project I used the new Tags and More – 9 Sparkle die set, Alphabet 2 – Lower Case, Ornament Set 5 and the Card Stand/Easel, along with a couple of older dies sets.

ECDBlueChristmas2wm

Here is how I created my Christmas Tag Decoration:

1.  Cut a piece of blue card and a piece of white card that measures approx 4 1/2 inches x 8 inches (we will be cutting this down so it doesn’t need to be exact).

  • Line up the main tag die from the Tags & More 9 – Sparkle at the top of the blue card stock and die cut. Snip off the excess cardstock around the top of the die and then use your trimmer to trim off both sides to make them even with the top part of the die. Trim tag shape so it is 7 1/4″ long.
  • Place the snowflake decorative overlay die from the same die set at the top of the tag so that the rounded shape of the overlay lines up with the rounded shape of the tag and die cut.
  • Adhere a piece of Transparent Double Sided Adhesive Tape to the front of the white card stock and place the main tag die from the Tags & More 9 – Sparkle and die cut. Trim of sides of tag as we did for the blue tag above.
  • Remove the protective backing from the white tag and adhere this behind the blue tag being careful not to touch the adhesive close to the top of the white card.
  • Cover the adhesive which shows through the top of the blue tag with Warm Diamond Silk Microfine Glitter, polish glitter with your finger and brush excess off.

2.  Adhere a piece of Transparent Double Sided Adhesive Tape to the front of a piece of white card stock. Trim so the card measures 3/4 inches x 4 1/2 inches.

  • Remove the protective backing from the adhesive.
  • Cover the adhesive with Warm Diamond Silk Microfine Glitter, polish glitter with your finger and brush excess off.
  • Adhere strip approximately 1/4 inches from the bottom of the tag. Trim of any overhanging edges level with tag.

3.  Adhere a piece of Transparent Double Sided Adhesive Tape to the front of piece of thin white card approx 2 1/5 inches x 8 1/2 inches.

  • Remove protective backing from adhesive.
  • Cover the adhesive with Silver Silk Microfine Glitter, polish glitter with your finger and brush off excess.
  • Use the Alphabet 1 Caps die to cut cut the letters “M” and “C”
  • Use the Alphabet 2 Lower Case die to cut the following letters: ‘e’; ‘r’; ‘r’; ‘y’; ‘h’; ‘r’; ‘i’; ‘s’; ‘t’; ‘m’; ‘a’; ‘s’
  • Starting with the letter ‘s’, adhere the letters of the word “Christmas” onto the white glittered strip at the bottom of the tag so the letter ‘s’ is close to the right hand edge of the tag.
  • Starting with the letter ‘M’ adhere the letters of the word “Merry” so that the bottom of the letters touch the top of the white glittered strip at the bottom of the tag so the letter ‘M’ is close to the left hand edge of the tag.

ECDBlueChristmas4wm

4.  Cut a piece of white card large enough to die cut two solid hearts from the Ornament Set 5 die set. Cover the front of the card with Transparent Double Sided Adhesive Tape. Die Cut two solid hearts.

  • Cut a piece of Silver Shimmer Sheetz large enough to die cut two lattice decorative overlay hearts from the Ornament Set 5 die set. Die Cut two lattice decorative overlay hearts. Make sure to use the metal adaptor plate when die cutting Shimmer Sheetz.
  • Remove protective backing from adhesive on the solid hearts.
  • Attach the Shimmer Sheetz decorative overlay to the solid heart being careful not to touch the adhesive on the solid heart with your fingers.
  • Cover the adhesive with Warm Diamond Silk Microfine Glitter, polish with your finger and brush off excess.
  • Die cut two of the large hangers from the Ornament Set 5 die set from Silver Shimmer Sheetz (adhere a piece of Transparent Double Sided Tape to the back of the Shimmer Sheetz before die cutting). Attach the hangers to the top of the heart so heart looks like a decoration.
  • Adhere the two hearts to tag referring to photo above using foam tape.
  • Using blue ribbon, create two bows and attach to the top of each heart ornament as per photo above.

5.  Cut a piece of white card stock approximately 1 3/4 inches x 5 inches. Adhere Transparent Double Sided Adhesive Tape to the front of the white card.

  • Remove protective backing from adhesive.
  • Cover the adhesive with Warm Diamond Silk Microfine Glitter, polish with your finger and brush off excess.
  • Die cut 3 of the smallest snowflakes from the Snowflakes  die set.
  • Attach snowflakes to tag using photo above for placement.

6.  Decorate the Lattice Heart Ornaments; Snowflakes and the snowflake overlay at the top of the tag using Blue/Gold Glitter Dot Peel Off Stickers. (Note: I have used the glitter dots on the swirls as well as the lattice portion of the heart ornament.)

ECDBlueChristmas3wm

7.  From a piece of blue card stock die cut the Card Stand/Easel. Emboss Card Stand/Easel using the Snowflakes Embossing Folder.

8.  Place the tag ornament onto the Card Stand/Easel.

Thanks for stopping by today. I hope you enjoyed my tutorial.

Supplies:

Elizabeth Craft Designs:
1077 Tags & More 9 – Sparkle (Coming soon)
1066 Ornaments Set 5 (Coming soon)
1071 Card Stand/Easel (Coming soon)
757 Snowflakes
967 Alphabet 1 – Caps
1075 Alphabet 2 – Lower Case (Coming Soon)
0211 Silver Metallic Shimmer Sheetz
E126 Snowflakes Embossing Folder
7018 Blue/Gold Glitter Dots Peel Off Stickers
508 Transparent Double Sided Tape 64mm
639 Warm Diamond Silk Microfine Glitter 
603 Silver Silk Microfine Glitter
802 Fine Pointed Scissors
  
Other:
Cardstock: white; blue
Ribbon
Foam Tape


Merry Christmas

August 9, 2015

IMG_4587

Hello everyone,

It’s Jackeline here. For my project today I created a Christmas tag using some of the new dies from The Els van de Burgt Studio Collection.

Let’s Started:

1. Cut two rectangle pieces 8″ x  4 1/4″, one in red cardstock and one in patterned paper.

2. Place the tag top die from Tags & More 9–Sparkle  at the top of both pieces and run it through your die cutting machine to create the tag shape.

3. Use the decorative overlay die from Tags & More 9 Sparkle to die cut the swirly pattern at the top of the tags, only on the patterned tag.

4. Adhere the patterned tags to the red tag using double side adhesive. Decorate with red glitter dots.

5. Apply a piece of Transparent Double-Sided Tape to white cardstock large enough to die cut the two silhouette poinsettia using the new die from Els’s Collection Remove release sheet and cover  with Solar Gold Silk Microfine Glitter. Polish and brush off excess glitter.

6. Die cut two overlay poinsettia in yellow cardstock. To create the leaves, die cut two silhouette poinsettia in green cardstock. ensemble, and  decorate the center of the poinsettia with some gold glitter dots.

7. Die cut a piece in red cardstock  using the Ribbons & Jewels die. Cut this piece in three, decorate with some red glitter dots and add them behind the leaves.

8.  For the sentiment apply a piece of transparent Double Sided Tape to Gold Shimmer Sheetz large enough to die cut Merry Christmas using a combination of the  lower and upper case alphabet dies.

9. Die cut the stand/easel in green cardstock using the new die from Els Studio Collection.

I hope you enjoyed this tutorial.

SUPPLIES 

Elizabeth Craft Designs

1077 Tags & More 9 Sparkle
1075 Alphabet 2 Lower Case
967 Alphabet 1 – Caps
1071 Card Stand/Easel
1070 Ribbons & Jewels
1067 Poinsettia
638 Solar Gold – Silk Microfine Glitter
7018 Gold Glitter Dots
7018 Red Glitter Dots
SS0212 Gold Metallic – 3 Pack
510 Transparent Double Sided Tape – 101mm

Others

Cardstock: Red, Green and yellow.
Patterned Paper

%d bloggers like this: