Browsing Tag

Winter Scenery Die

Cardmaking Joset Designs Paper Flowers Sidekick Essentials Soft Finish Cardstock

Snow Globe Shaker Card

December 22, 2021

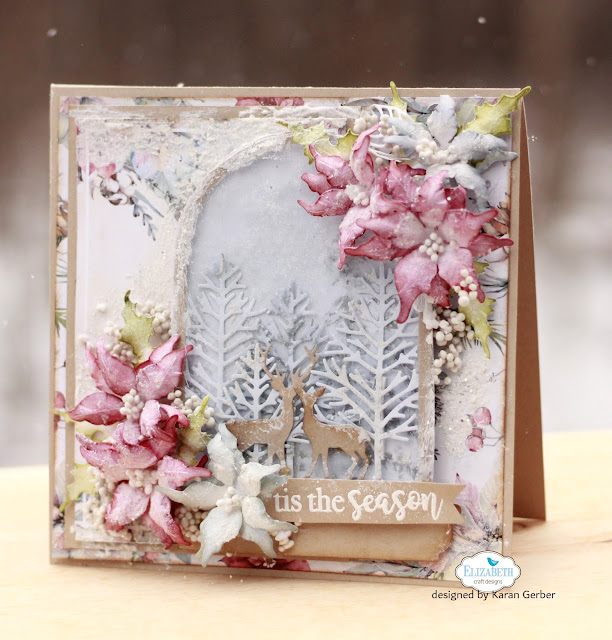
Hi Friends and welcome to my last blog post for the year for Elizabeth Craft Designs. It was a little over a year ago when I first began my journey with Elizabeth Crafts. Creating with their florals and A5 Planner dies this past year has been so much fun. I just couldn’t close out my year without sharing one final Christmas Card. 

At this point, I am not sure what 2022 will bring with Elizabeth Craft Designs, but I hope you love my final project. 

The florals were designed using Florals 12. I know I have shared a lot of projects with these florals but Christmas to me isn’t just a day, it isn’t just a month, it’s a season. And this Season my family and I have much to be thankful for!  So with Christmas season upon us, I set out to create one last Christmas Card for 2021.

Here on St Joseph Island, we see deer all the time. They are almost sighted each day we head out for errands. I couldn’t resist creating a shaker card with Joset’s Snow Globe and those deer and trees from the Winter Scenery Set.  

To begin with, I cut out the globe on pattern paper and on craft cardstock and than traced it out on acetate so I have a full size piece for the front of the globe. I fussy cut out foam tape and taped the back trim of the die to create a shaker card. I placed glitter on the inside of the shaker.

I cut four of the trees from the Winter Scenery Die Set and cut thin strips of foam tape to adhere to the back of the trees to add some dimension to the globe. I adhered the deer from the Snow Globe Sidekick Set to the front. I just love how this looks, it creates an awesome winter scene in that globe doesn’t it? 

Die cutting out 6 large and 6 medium florals along with 6 leaves I colored and shaped them (if you are a member of the Elizabeth Crafts family Group on Facebook, I did a Live on Friday, Dec 17th and you can see just how I shaped and created those gorgeous florals here: Live Facebook with Karan. If you are not a member, be sure to become one so you can view the replay)

So getting back to my card, I stamped and heat embossed my sentiment from the Classic Christmas Sentiments set using White Embossing Powder and attached that to the bottom of the card. 

My final step was to add snow paste and I thought some Art Stones would be a nice touch and look like snow balls around the florals. 

Thank you for following me along this year with my craft shares for Elizabeth Craft Designs. Have yourself a Merry Christmas and I am praying that 2022 will see us all back to normal. Blessings for a bright, prosperous and Healthy 2022!

Yes it was snowing when I took this photo, so fitting for the style of my card Happy Scrapping and I hope to be sharing more with you in 2022!

Elizabeth Craft Designs Supplies:

Elizabeth Craft Designs General Joset Designs Soft Finish Cardstock Uncategorized

Merry and Bright Christmas Card

November 28, 2021

Hey Crafters! Katelyn here, sharing with you my Merry and Bright Christmas Card.

To create my Merry and Bright Christmas Card, I’ve used a variety of dies and stamps from Joset Designs. You’ll want to read below as I share with you how to recreate my card at home.

Step One. Cut a piece of White Soft Finish Cardstock that measures 3 1/4″ x 8 1/4″.

Step Two. From the Winter Scenery Die, you’ll need to cut the slim line snow piece out of a piece of White Soft Finish Cardstock.

Step Three. You’ll need the Merry & Bright sentiment from the stamp set out of the Classic Christmas Kit. Apply Emboss It Ink to the stamp and stamp in the middle of the 3 1/4″ rectangle piece. Sprinkle Kells Gold Modern Gilding Powders over the sentiment. Tap off the excess powder and emboss with a heat tool.

Step Four. From the Classic Christmas Kit, choose three of the snowflakes. Die cut each snowflake once out of a piece of white shimmer cardstock.

Step Five. From the Winer Scenery Die, die cut one large tree, one medium tree and two small trees out of a piece of White Soft Finish Cardstock. Using a blending tool with foam, blend Forest Moss Distress Ink over the entire surface of each tree.

Step Six. From the Winter Scenery Die, die cut the moose out of a piece of White Soft Finish Cardstock. Using a blending tool with foam, blend Gathered Twigs Distress Ink over the bottom portion of the moose. Using a blending tool with foam, blend Tea Dye Distress Ink over the antlers of the moose.

Step Seven. Place the snow slim line piece over top of the 3 1/4″ rectangle. Adhere the large tree in behind the slim line piece as desired on the left hand side. Adhere a small tree to the right of the large tree on the snow slim line piece.

Step Eight. With the snow slim line piece still over top of the 3 1/4″ rectangle. Adhere the moose to the right hand side of the 3 1/4″ rectangle close to the bright word. Adhere the medium tree in behind the slim line piece as desired on the right hand side. Adhere a small tree to the left of the medium tree on the snow slim line piece.

Step Nine. Adhere the snow slim line piece to the 3 1/4″ rectangle piece.

Step Ten. Cut a piece of White Soft Finish Cardstock that measures 7″ x 8 1/2″, score at 3 1/2″. Adhere the cadfront to the cardbase.

Step Eleven. To finish the card, splatter Brushed Pewter Distress Spray Stain on the card with a paint brush as desired.

Thanks for joining me today! I hope that I’ve inspired you to create your own version of my Merry and Bright Christmas Card at home.

Katelyn

Elizabeth Craft Designs Supplies Used:

Other Supplies Used:

  • Distress Ink: Forest Moss, Gathered Twigs and Tea Dye
  • Blending Tool with Foam
  • Ranger Ink: Emboss It Ink
  • Quietfire Design: Kells Gold Modern Gilding Powders
  • Misc: White Shimmer Cardstock
%d bloggers like this: