Hi! How many hobbies do you have? And have you ever combined your hobbies? I love the cards with the machine stitching, cross- stitching, watercoloring… It’s a surprising amount of things you can pull into your cards. Today I am doing a very easy one – adding origami paper to my card. My son got these and gave me the “less cool” ones and I thought they were perfect to use with the Asian Accessories die set.
I die cut the lantern out of 4 sheets of origami at a time – which is a great time saver since the paper is thinner than regular card stock. The paper is so very pretty and also has a nice, almost velvety texture that adds to the card.
To start the card, I trimmed a sheet of white card stock to 5 5/16″ x 4 1/8″ and sponged the top a soft blue. Using an awl, I poked two small holes at the top and strung a gold wire through it. ( I lost the packaging but I think it is 24 gauge or thinner.) I found this to be a lot easier to control than twine and love the shine to it. I popped up 3 lanterns with foam tape on them. The strings that attach the lantern to the wire was cut from black card stock that had the double sided adhesive on the back. Carefully put one side in front of the wire and the other on the back.
The final addition is a the die cut of Congratulations covered with Silver Sands Microfine Silk glitter with a black drop shadow. I’m looking forward to when I could use this motif for a party invitation!
Hey Crafters! Katelyn here, sharing with you my Shoot For The Moon Card.
To create my Shoot For The Moon Card, I’ve used a variety of dies and stamps from Suzanne Cannon as well as Els van de Burgt Studio. You’ll want to read below as I share with you how to recreate my card at home.
Step One. Die cut a 4″ Stitched Rectangle out of kraft cardstock.
Step Two. Die cut a 3 1/2″ Stitched Rectangle out of White Soft Finish Cardstock.
Step Three. Die cut a 2 1/2″ Stitched Rectangle out of White Soft Finish Cardstock. From the Soar Collection stamp set, you’ll need the shoot for the moon quote. Apply Jet Black Archival Ink to the stamp and stamp in the middle of the 2 1/2″ stitched rectangle.
Step Four. Die cut the Flourish Frame from the Flourish Frame die out of a piece of black cardstock.
Step Five. Die cut the Stars Spray from the Butterflies & Stars Spray die out of Sunflower Soft Finish Cardstock. Choose a total of nine stars.
Step Six. Adhere the Flourished Frame to the 4″ stitched rectangle.
Step Seven. Foam square the 3 1/2″ stitched rectangle to the middle of the 4″ stitched rectangle.
Step Eight. Place the 2 1/2″ stitched rectangle in the middle of the 3 1/2″ stitched rectangle. Adhere three stars in the top right corner underneath the 2 1/2″ stitched rectangle. Adhere two stars in the bottom left corner underneath the 2 1/2″ stitched rectangle. Adhere the remaining four stars as desired on the 2 1/2″ stitched rectangle. Foam square the 2 1/2″ stitched rectangle to the middle of the 3 1/2″ stitched rectangle.
Step Nine. To finish the card, cut a cardbase out of White Soft Finish Cardstock that measures 4″ x 10 1/2″, score at 5 1/4″. Adhere the cardfront to the cardbase.
Thanks for joining me today! I hope that I’ve inspired you to create your own version of my Shoot For The Moon Card.
Karen here today from Craftily Yours! One of the most fun things for me to do in crafting is to try out new techniques. I love cruising You-Tube to find out new things to try. In today’s post, I’m trying stamping with a stencil using water on distress oxide inks.
My first card using the super fun new stamps from Sue. This one from the For You Stamps. I stamped it in black ink and then moved it just slightly and stamped it again with Squeezed Lemonade Distress Ink. It is die cut with a Stitched Circles Die. I adhered the circle to a piece of blue cardstock and fussy cut the border. Then I die cut a Mandala Die using 90lb White Soft Finish Cardstock and 101mm Double Sided Adhesive and stuck that to the background and added a few White Craft Drops.
For that fun background, I applied Distress Oxide ink (Salty Ocean, Mustard Seed and Candied Apple) on 90lb White Soft Finish Cardstock. I think spritzed lightly the Dot Dot Dot… template with water and laid it over the rainbow of ink and pressed it in with a paper towl. After heat drying, I got the last image to the right. It’s so pretty! I then die cut it using the Fitted Indented Rectangles Dies.
I decided to try it again with lighter colors. Here I used Tumbled Glass, Cracked Pistaschio and Speckled Egg. I love the look of this softer version too. The background is cut with a Fitted Rounded Rectangle. I love that stamp from the Pieces of Life 4 – Retro Stamps. (Hint: lots of good sentiments in that set!) I die cut it with the Stitched Circles die and added a Blooming Branches die cut that I’d colored up with Mowed Lawn and Twisted Citron. To this card, I also added a smidge of lace and some Silver Craft Drops.
Thank you for stopping by today!
Craftily yours, Karen
Supplies from Elizabeth Craft Designs
Other Supplies
Distress Oxides, Black Ink, Lace, and blue cardstock
Hey Friends! It’s EK Gorman back to share one of my favorite things in this world to do when making cards. I just love to make a card that looks elegant and lovely, but in fact has an underlined teasing tone to it. One of my favorite stamps to create this type of card is A Way With Words Happy Birthday Collection stamp set. It has just the right amount of elegance and teasing to create the perfect birthday card for that friend who might be getting old.
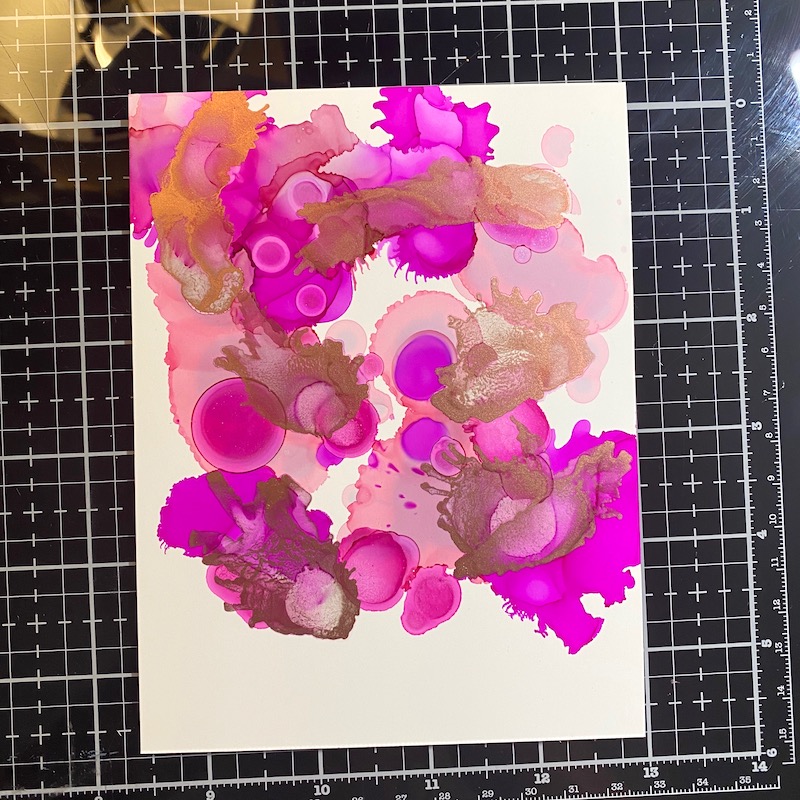
Step One: Pull out a piece of Yupo paper and splatter on some alcohol ink to create a background.
Step Two: Die cut the yupo paper with the A Way with Words Big Balloon die set.
Step Three: Using a piece of 90lb Soft Finish Cardstock trimmed to 4.25×5.5 inches. Blend a collection of coordinating ink onto the cardstock to create a soft background.
Step Four: Adhere the balloon onto the cardstock using 10mm Clear Double Sided Adhesive.
Step Five: Die cut and adhere the bow to the balloon from the Big Balloon die set. I used Kids Choice Glue to adhere the bow.
Step Six: Using a permanent black ink and a stamping platform, stamp the sentiment onto the balloon from the Happy Birthday Collection stamp set.
Step Seven: Adhere the card front to an A2 card frame using 10mm Clear Double Sided Adhesive. Trim any bit of the balloon that hangs off the card frame.
I hope my birthday card makes you smile. Let us know in the comments below if you enjoy making cards that make people laugh. Until then, happy crafting.
I think now more than ever we need to reach out to those we love. Not for any special reason, just to share love. I thought this might be a fun way to do it! We get to make a beautiful bright moon inside the ornament, create a stencil so we have a sweet spray of stars and we get to stamp a super special message.
Here’s how you can do it, too…..
Instructions:
Form a 5 x 7” tent fold card base from navy cardstock.
Cut a 4 x 6” panel from navy cardstock. Die cut the Star Spray from scrap cardstock and use as a stencil. Lightly stencil the stars across the panel with Distress Oxide Brushed Corduroy.
Die cut the flourished ornament and the flourished moon from white cardstock which has had Double Sided Adhesive adhered to the front side.
Remove the release paper and one at a time thermal emboss the flourished ornament with Forever Platinum and then the flourished moon with Brushed Silver. So nice and bright!
Stamp the sentiment (Awwww!) on white cardstock with Night Sky ink and die cut with the smallest Fitted Rectangle. Die cut the smallest Stitched Rectangle from navy cardstock and adhere them together.
Mount the gilded ornament and moon as shown on the stenciled panel (the flourishes can hang over the edge of the panel!). Mount the sentiment panel on the panel with 3D adhesive squares overlapping the ornament.
Mount the stenciled panel on the card base with 3D adhesive squares.
Send to someone you love!
Be kind, be calm, stay safe. You are loved! Happy creating, Suzanne
Elizabeth Craft Designs Supplies:
Love Joy Peace Ornament
Others:
Navy Cardstock White Cardstock Modern Gilding Powders: Burnished Silver, Forever Platinum Distress Brushed Corduroy VersaMagic Night Sky Glue Dots 3D Foam Squares
With Father’s day just around the corner, we thought today would be a great time to showcase some wonderful projects for dad. What better way to celebrate this special day with a handmade card, planner page or scrapbook layout. We hope these creations will inspire you to get started on your Father’s day project.
First project is from one of our new designers Joseph Nguyen who greated this adorbale dad card using the Honey Bear die set in combination with the fishing rod from the Camping Accessories and the hat from the Safari Accessories. For the word “dad” Joseph used dies from the Planner Essentials 23 – Retro Alphabet Trio. Love the sparkles on this card from the Silk Microfine Glitter. To see more of Joseph’s creations, make sure to check out his Facebook page HERE.
Next project is from Joyce Schmidt who is also one of our new designers. Joyce made this stunning card using the Vintage Gentleman die set in combination with the Postage Stamp Squares. To color she used some beautiful embossing powders and Distress Inks. For more informtion on how to create this card, make sure to check out this video.
Katelyn Gosart made this beautiful layered happy father’s day card using the reindeer die from the Planner Essentials 13 – Xmas Winter Insert in combination with the Planner Patterns and the Entwined Circles. For the base of her card she used the Stitched Squares and Stitched Circles. Love seeing Christmas dies being used all year round. For more information, make sure to check out Katelyn’s blog HERE.
Let’s have a drink. A great card for Father’s day created by EK Gorman. Love the ink background standing off with the cocktail and the masculine colors. For the cocktail EK used the Summer Drink die set and for the sentiment the Words 3 – Happy Holidays and Beach Sentiments. For more info on how to create this card, check out EK’s blog HERE.
Next card is from Karen Ostergard who also used the fishing rod from the Camping Accessories, this time in combination with the Hippo/Rhino die set. Love the paper that Karen picked for the background that almost looks like water. For the sentiment she used the Build Your Own Sentiment 1. A great card for Father’s day. Find out more on Karen’s blog HERE.
Next project is created by Marjolijn van Elsberg. She created this beautiful tag with a picture of her husband, the father of their daughter Sarah. What a beautiful gift for this special day. Marjolijn did a lot of work on the Gelli plate and used alcohol inks to get this beautiful vintage look. She also used a few dies from the Planner Essentials line to decorate the tag. Find out more on Marjolijn’s blog HERE.
Laura Gilhuly created this beautiful scrapbook page for Father’s day using a combination of dies and stamps from the Planner Essentials Collection as well as the Kaleidoscope Background and the Make Your Mark Stencil. Laura also used the beautiful Watercolor Palette. I love the many details on this page and the colors she picked. For more information on how to re-create this page, make sure to check out Laura’s blog HERE.
Samantha Klaebe created two beautiful masculine birthday cards using the Geometric background die in combination with the Watercolor Palette and the Your Day stamps designed by Sue Smith. A great card that can be used for many occasions depending on the sentiment used. I love the bright colors she picked. For more information, make sure to check out Samantha’s blog HERE.
Tanja Kabel created this beautiful card that is easy to re-create and can be used for many different occasions like retirement, happy holidays, birthdays and more. For this card she used the Palm Trees die set in combination with the Build Your Own Sentiments 1. I love the cloud backgound she created. Make sure to check out Tanja’s blog HERE for more inspiration.
One last card featuring the Camping Accessories and the Honey Bear die sets. I love the clean look of this card created by Tina Guigui. For the sentiment she used the Build Your Own Sentiments 1. A popular stamp set that creates lots of fun sentiments. The little bees are included in the Honey Bear set and the pond in the Bridge & Lotus set. For more info, check out Tina’s blog HERE.
Suzanne Canon created this simple yet elegant card for dad using a combination of dies from her A Way With Words Collection. For the sentiment she combined the Mr from the “Mr and Mrs” set and de perfect from the “You are perfect” set. Love how versatile these dies are. For the background she used the Stitched Rectangles and the Flourished Frame. Find more info HERE.
Last project for today is this masculine card created by Annette Green who used the car from the Planner Essentials 16 – Christmas Tree page. Another great example that Christmas dies can be used all year round by leaving out little details or adding some. Annette picked some beautiful paper for her background to match the truck. For more info, make sure to check out Annette’s blog HERE.
Today I am sharing a very clean and simple card – some days we just need that kind of thinking – or more likely for me, all that I am capable of at the moment. Lol!
Recently Els did a Friday tutorial (Sparkling Zen cards)on using the glitter on the bamboo dies. It inspired me to go through my set of stamps to see what saying would go with it. Normally, I find the stamp first and then choose the embellishments. I found this lovely sentiment from A Bit of Fragrance Collection by Suzanne Cannon. I think it is just a wonderful reminder during these crazy times.
After creating my glittered bamboo, I set them aside to do the background. I chose a stitched edge rectangle and sponged the edges a soft blue and green as pictures. After arranging (but not adhering the bamboo) to the card, I carefully stamped the sentiment in the open space. I then glued the bamboo stalks on and the entire thing to a white card base. Very easy but the glitter makes it a fancy card to me.
Hey Crafters! Katelyn here, sharing with you my Good Luck Card.
To create my Good Luck Card, I’ve used a variety of dies from Suzanne Cannon as well as Els van de Burgt Studio. You’ll want to read below as I share with you how to recreate my card at home.
Step One. Choose a piece of patterned paper. Die cut a 4″ Stitched Rectangle out of the patterned paper. Distress the edges of the rectangle. Using a blending tool with foam, ink the edges of the rectangle with Black Soot Distress Ink.
Step Two. Choose a piece of coordinating patterned paper. Die cut a 3 1/2″ Stitched Rectangle out of the coordinating patterned paper. Distress the edges of the rectangle. Using a blending tool with foam, ink the edges of the rectangle with Black Soot Distress Ink.
Step Three. Die cut the Flourished Frame out of White Soft Finish Cardstock.
Step Four. Choose a piece of coordinating patterned paper. Die cut the Flourished Oval Frame out of the coordinating patterned paper. Using a blending tool with foam, ink the edges of the frame with Black Soot Distress Ink.
Step Five. From the same piece of patterned paper that you’ve die cut the 3 1/2″ rectangle out of, die cut a 2 1/2″ Stitched Oval out of the patterned paper. Distress the edges of the oval. Using a blending tool with foam, ink the edges of the oval with Black Soot Distress Ink.
Step Six. Die cut the Good Luck sentiment out of White Soft Finish Cardstock.
Step Seven. Apply Emboss It Ink to a piece of White Soft Finish Cardstock. Sprinkle Dilly Dilly Lavender Modern Gilding Powder on to the cardstock. Tap off the excess powder and emboss with a heat tool. Apply Emboss It Ink to another piece of White Soft Finish Cardstock. Sprinkle Armenian Pink Modern Gilding Powder on to the cardstock. Tap off the excess powder and emboss with a heat tool. Die cut the Butterflies Spray from the Butterflies & Stars Spray out of the Dilly Dilly Lavender cardstock. Die cut the Butterflies Spray out of the Armenian Pink cardstock. You’ll need a total of nine lavender butterflies and ten pink butterflies.
Step Eight. Adhere the Flourished Frame to the 4″ stitched rectangle. Adhere the 3 1/2″ stitched rectangle to the 4″ stitched rectangle.
Step Nine. Adhere the flourished oval frame to the stitched oval. Foam square the stitched oval to the middle of the 3 1/2″ stitched rectangle. Adhere the Good Luck sentiment to the middle of the flourished oval frame.
Step Ten. Adhere the purple and pink butterflies as desired around the Good Luck sentiment and flourished oval frame.
Step Eleven. Cut a cardbase out of White Soft Finish Cardstock that measures 4 1/4″ x 11″, score at 5 1/2″. Adhere the cardfront to the cardbase.
Thanks for joining me today! I hope that I’ve inspired you to create your own version of my Good Luck Card.
Katelyn
Elizabeth Craft Designs Supplies Used:
Other Supplies Used:
Quietfire Design: Modern Gilding Powder – Dilly Dilly Lavender and Armenian Pink
Hey Friends! It’s EK, and today I am make some unique graduation cards for a very unique time. Right now nothing feels or looks normal, so crafting a few high school graduation cards in the traditional way seemed inappropriate. So I thought, it might be fun to create a unique look for these graduates who are learning to grow up too fast. I found that designer Suzanne’s A Way With Words Be Brave Bold Yourself die set was perfect for the look for which I was aiming.
Step One: Blend some water soluble ink over WatercolorPaper trimmed to 4.25×5.5 inches. I used Distress Oxides in Victorian Velvet, Dusty Concord, and Frayed Burlap in an ombre corner to corner blend.
Step Two: Spray the Watercolor Paper with watercolor spray. I used Distress Oxide in Tattered Rose.
Step Three: Let the ink spray dry. I just love how this turned out and find the look a little romantic.
Step Four: Die cut the inked paper with the Stitched Indented Rectangle die set.
Step Five: Die cut the graduation sentiment from the inked paper with the Be Brave Bold Yourself die set. I choose to use the sentiment ‘Be Brave, Be Yourself’. The really cool thing about die cutting the way I have, is that you can make two separate cards from this one die cut. You can use the negative inked paper and the die cut works to create two unique cards.
Step Six: Using 6mm Clear Double Sided Adhesive, adhere the inked cardstock to a piece of Lavender Soft Finish Cardstock trimmed to 4.25×5.5 inches.
Step Seven: Set the die cut sentiment back into the open spaces, and adhere the negative die cut pieces back into the open places using some Kids Choice Glue.
Step Eight: Adhere the the lavender cardstock to an A2 card frame using 10mm Clear Double Sided Adhesive. To finish the first card, add a few drop of Transparent Crystal Craft Drops.
Here is the finished look of the first card using the negative pieces of the die cut from the Be Brave Bold Yourself die set.
Step Nine: To create the second card, die cut a second trimmed piece of Lavender Soft Finish Cardstock with the Stitched Indented Rectangle die set. Adhere the Be Brave Bold Yourself die set die cut piece onto the cardstock using Kids Choice Glue.
Step Ten: Add some heart stamping from Susanne’s A Way With Words Love & Hearts Collection stamp set using some pale purple ink. I used Distress Oxide ink in Victorian Velvet.
Step Eleven: Adhere the cardstock to an A2 card frame for the finished look.
I just adore how these two cards came out and think they will be a fun card for these special 2020 graduates. Are you creating cards for graduates this year? Are you creating a traditional looking card or are you creating a unique one to symbolize the uniqueness of these times? Let us know in the comments below. Until then, happy crafting.


 Step One: Pull out a piece of Yupo paper and splatter on some alcohol ink to create a background.
 Step Two: Die cut the yupo paper with the A Way with Words Big Balloon die set.
 Step Three: Using a piece of 90lb Soft Finish Cardstock trimmed to 4.25×5.5 inches. Blend a collection of coordinating ink onto the cardstock to create a soft background.
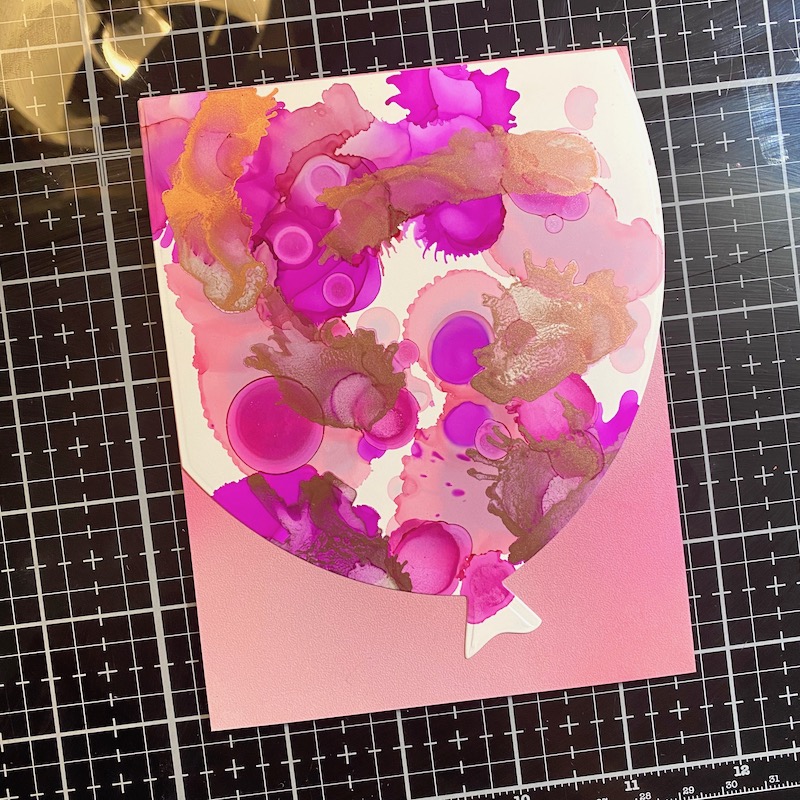 Step Four: Adhere the balloon onto the cardstock using 10mm Clear Double Sided Adhesive.
 Step Five: Die cut and adhere the bow to the balloon from the Big Balloon die set. I used Kids Choice Glue to adhere the bow.
 Step Six: Using a permanent black ink and a stamping platform, stamp the sentiment onto the balloon from the Happy Birthday Collection stamp set.
 Step Seven: Adhere the card front to an A2 card frame using 10mm Clear Double Sided Adhesive. Trim any bit of the balloon that hangs off the card frame.
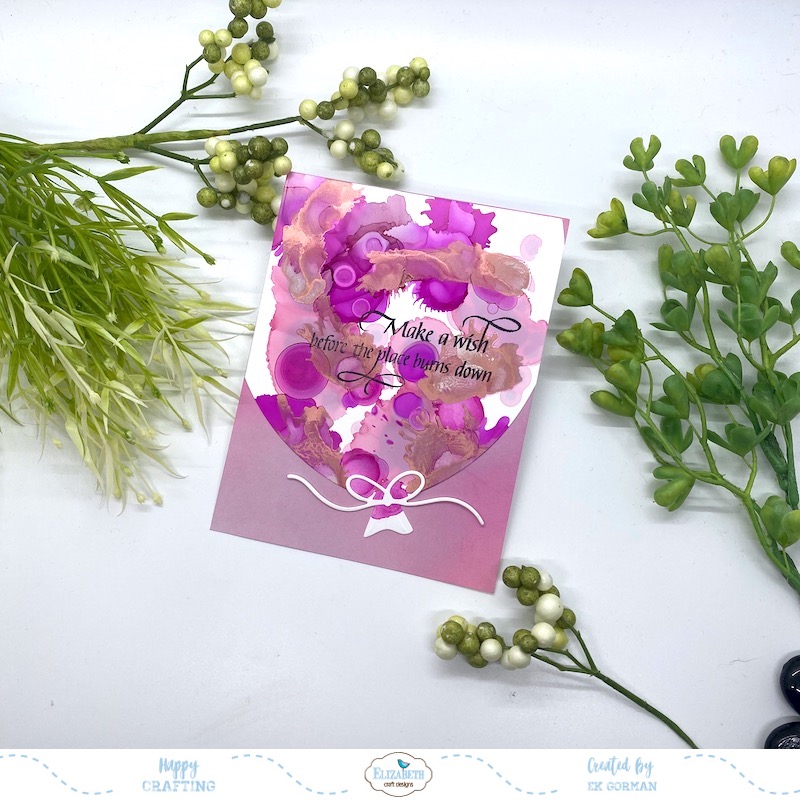 I hope my birthday card makes you smile. Let us know in the comments below if you enjoy making cards that make people laugh. Until then, happy crafting.


 Hey Friends! It’s EK, and today I am make some unique graduation cards for a very unique time. Right now nothing feels or looks normal, so crafting a few high school graduation cards in the traditional way seemed inappropriate. So I thought, it might be fun to create a unique look for these graduates who are learning to grow up too fast. I found that designer Suzanne’s A Way With Words Be Brave Bold Yourself die set was perfect for the look for which I was aiming.
 Step One: Blend some water soluble ink over Watercolor Paper trimmed to 4.25×5.5 inches. I used Distress Oxides in Victorian Velvet, Dusty Concord, and Frayed Burlap in an ombre corner to corner blend.
 Step Two: Spray the Watercolor Paper with watercolor spray. I used Distress Oxide in Tattered Rose.
 Step Three: Let the ink spray dry. I just love how this turned out and find the look a little romantic.
 Step Four: Die cut the inked paper with the Stitched Indented Rectangle die set.
 Step Five: Die cut the graduation sentiment from the inked paper with the Be Brave Bold Yourself die set. I choose to use the sentiment ‘Be Brave, Be Yourself’. The really cool thing about die cutting the way I have, is that you can make two separate cards from this one die cut. You can use the negative inked paper and the die cut works to create two unique cards.
 Step Six: Using 6mm Clear Double Sided Adhesive, adhere the inked cardstock to a piece of Lavender Soft Finish Cardstock trimmed to 4.25×5.5 inches.
 Step Seven: Set the die cut sentiment back into the open spaces, and adhere the negative die cut pieces back into the open places using some Kids Choice Glue.
 Step Eight: Adhere the the lavender cardstock to an A2 card frame using 10mm Clear Double Sided Adhesive. To finish the first card, add a few drop of Transparent Crystal Craft Drops.
 Here is the finished look of the first card using the negative pieces of the die cut from the Be Brave Bold Yourself die set.
 Step Nine: To create the second card, die cut a second trimmed piece of Lavender Soft Finish Cardstock with the Stitched Indented Rectangle die set. Adhere the Be Brave Bold Yourself die set die cut piece onto the cardstock using Kids Choice Glue.
 Step Ten: Add some heart stamping from Susanne’s A Way With Words Love & Hearts Collection stamp set using some pale purple ink. I used Distress Oxide ink in Victorian Velvet.
 Step Eleven: Adhere the cardstock to an A2 card frame for the finished look.


