Step 4 – Trim coordinating papers to 2×12, 1×11, .75×11, 6×4.25, 4×6, a photo mat, .25×5, .5×4.25, 1×3.5 and distress all the edges then adhere as shown
Step 5 – Die cut and assemble 5 flowers. I used coordinating papers and white cardstock with florals 7, Florals 9, Florals 8, and Florals 3. I used the watercolor palette on the white flowers after I had assembled them
Hey Friends! It’s EK, and today I am popping in and sharing a few cards I created using hand stamped printed paper I created using Ilse and Charlene’s Stamps and Stencils. I love how you can created exactly the ‘printed’ paper you need using simply papers and monochromatic color scheme.
Step One: Using a diagonal line, hand stamp a fauna stamp from the Spring Fling stamp set onto Watercolor paper using colored ink. I used Rustic Wilderness Distress Oxide.
Step Two: Finish stamping the fauna in a diagonal pattern, alternating the direction of the stamp with each line.
Step Three: Spray the images with water, and set with a heat gun.
Step Four: Blend a lighter shade of ink through the Dot Dot Dot stencil and blend extra ink around the edges of the watercolor paper. I used Shabby Shutter Distress Oxide.
Step Five: Repeat step one using three of the flower stamps from the Spring Fling stamp set in a new shade of ink. I used Speckled Egg Distress Oxide.
Step Six: Repeat step two, finishing the diagonal stamping.
Step Seven: Repeat step three, spraying the ink with water. This one did not bleed as much as the others.
Step Eight: Repeat step four, blending ink through the Waves stencil and around the edges. I used Speckled Egg Distress Oxide for the background as well as the stamping.
Step Nine: Repeat step one using the Poppy Dream stamp set. I used Barn Doors Distress Oxide.
Step Ten: Repeat step two, and finish the stamping. Can you tell which row I messed up on?
Step Eleven: Repeat step three, spraying the ink with water.
Step Twelve: Repeat step four, blending a lighter ink through the Make Your Mark stencil. I used Abandon Coral Distress Oxide.
Step Thirteen: Repeat step one using a different stamp from the Poppy Dream stamp set. I used Crackling Fire Distress Oxide.
Step Fourteen: Repeat step two, and finish the stamping.
Step Fifteen: Repeat step three, spraying the ink with water. I really love how this one bleed.
Step Sixteen: Repeat step four, blending a lighter ink through the Make Your Mark stencil. I used Dried Marigold Distress Oxide.
Step Seventeen: Repeat step one using the Journaling Elements stamp set. I used Worn Lipstick Distress Oxide.
Step Eighteen: Repeat step two, and finish the stamping. On this printed paper, I added a second row using one of the sentiments from the stamp set.
Step Nineteen: On this printed paper, I added a second row using one of the sentiments from the stamp set.
Step Twenty: Repeat step three, spraying the ink with water.
Step Twenty One: Repeat step four, blending a lighter ink through the hearts on the Make Your Mark stencil. I used Spun Sugar Distress Oxide for an almost water mark look.
Step Twenty Two: Repeat step one using the Journaling Elements stamp set and the oversized sentiment ‘perfect’. I used Dusty Concord Distress Oxide. I added a second row of stamping using Milled Lavender and the paint brush strip stamp.
Step Twenty Three: For this printed paper, I added a third layer of stamping using the dash stamp set in Seedless Preservers Distress Oxide.
Step Twenty Four: Repeat step three, spraying the ink with water.
Step Twenty Five: Repeat step four, blending a lighter ink through the dash marks on the Make Your Mark stencil. I used Milled Lavender Distress Oxide again, loving how it blended into the stamped image of that same color.
Step Twenty Six: Die cut all six of the ‘printed’ papers using the Stitched Rounded Rectangle die set.
Step Twenty Seven: Using 10mm Clear Double Sided Adhesive, adhere the ‘printed’ papers onto A2 card frames.
Step Twenty Eight: Die cut black and white sentiments for the hand stamp ‘printed’ papers. I used a collection of planner die sets to create my sentiment die cuts. They are from the Planner Essentials 1, Planner Essentials 2, Planner Essentials 4, Planner Essentials 7, Planner Labels, and Retro Label Sayings stamp set. Adhere the sentiments to each of the cards.
Card One
Card Two
Card Three
Card Four
Card Five
Card Six
Do you ever created your own printed paper? Let us know in the comments below. Until then, happy crafting.
Hey Friends! It’s EK and I am back with a few mixed media cards. The holidays may be over, but it is time to send out thank you notes to all those who blessed us with their kindness. So today, I pulled out my gel plate and several of Ilse and Charlene’s stencils and stamps to create these thank you cards.
Step One: Using a gel plate, brayer, and some paint in tones of beige, prep the plate. I used Distress Paint in Antique Linen and Vintage Photo.
Step Two: Lay the Dot Dot Dot… stencil over the beige ink. I was able to make four prints from this process. The first is the cleaning of the brayer, the second is cleaning off the stencil, the third is a piece of paper laid on both the plate and stencil and the fourth is the paint left on the plate after the stencil was lifted.
Step Three: Repeat step one and two this time using green paint and the Waves stencil. I used Shabby Shutters and Cracked Pistachio Distress Paint.
Each piece of 5.5×8.5 inch piece of cardstock was treated with the exact same techniques as the first time.
Step Four: Repeat steps one and two with red paint and the Dot Dot Dot… stencil again. I used Festive Berries and Abandoned Coral Distress Paint.
Step Five: Die cut two of the prints with the Stitched Hexagons die set.
Step Six: Die cut the second two prints with the Stitched Rounded Rectangle die set.
Step Seven: Using the left over prints, stamp the sentiment from the Journaling Elements stamp set in black water resistant ink.
Step Eight: Die cut the sentiment with the Fitted Fishtails die set. The tails will be trimmed off, but the shape and size were perfect for the sentiment.
Step Nine: Prepare two more prints using the Make Your Mark stencil. I used Bundled Sage and Cracked Pistachio Distress Paint.
Step Ten: Stamp four times some holly from the Oh the Joy of Christmas stamp set.
Step Eleven: Add red liquid coloring to the boys. I used Distress Stain in Fired Brick.
Step Twelve: Fussy cut out the holly.
Step Thirteen: Prepare four A2 card frames. Blend ink around the edges of the card frames. I used Cracked Pistachio Distress Oxides. Using 10mm Clear Double Sided Adhesive, adhere the die cut prints onto the card frames.
Step Fourteen: Stamp an image of a girl onto the prints. I used the Funky Chicks stamp set.
Step Fifteen: Using a liquid adhesive, adhere the fussy cut holly to the card frame. I used Kids Choice Glue.
Step Sixteen: Using three dimensional tape add the print with the sentiment to the card frame.
Step Seventeen: Add some liquid color to the eyes and lips of the stamped girl. I used Peeled Paint and Fired Brick Distress Stains. Add a highlight of white to the eyes.
Do you create mixed media cards with both stencils and stamps? What are your favorite to use? Let us know in the comments below. Until then, Happy Crafting.
Good morning! The holiday season is upon us and I am excited! To share my Christmas spirit I created a Christmas layout of my husband and our oldest boy.
To create this layout: Step 1 – Cover your paper with clear gesso (allow to dry or heat set) then use your favorite ECD stencil ( I used the dot dot dot stencil)and texture paste on the left hand side of the paper – I used a paper from the worn wood paper pack Step 2 – using the splatter technique splatter your coordinating colors on the paper over your stenciled image using your scissors cut three small indents on your paper then distress all your edges Step 3 – using coordinating colorants color the lace and allow to dry. Using your double sided tape adhere the lace to the indents that you cut earlier. Step 4 – color a large circular frame and a title with white gesso and allow to dry. Once dry use Snowflake paste on both pieces and allow to dry
Step 5 – die cut 11 poinsettias and 5 of just the smallest, some leaves and 3 large and 3 small pine cones from the Christmas Accents die set. Ink the edges of all pieces and assemble. Once assembled add snowflake paste to each piece and allow to dry.
Step 6 – die cut as many stems & branches from the Create a Wreath as you want, ink the edges, add the pearl rose craft drops to the berry part of the branches and add snowflake paste and allow to dry
Step 7 – Mat your photo and assemble as shown Step 8 – add some seed beads, gems or art stones
Hey Friends! It’s EK and I am popping in to share with you a little just because card! In a year filled with crazy ups and downs, one of the things that has become a positive in the year is I have started sending friends and families cards just because I am thinking of them. I am not waiting for their birthday or a holiday, I am just popping a note in the mail and saying “I am Thinking of You!” So with all of these simple no reason cards heading out, I have been upping my game in types of cards I am making and I find ECD’s Ilse and Charlene line of stamps and stencils are perfect for just these moments.
Step One: Stamp and heat emboss small floral images from the Spring Fling stamp set onto a piece of trimmed 90lb Soft Finish Cardstock. I used Rose Gold embossing powder.
Step Two: Using colored pencils, add a little color to the insides of the heat embossed flowers.
Step Three: Blend some ink around the edges of the cards stock. I used Victorian Velvet Distress Oxide.
Step Four: Using the Dot Dot Dot stencil, blend ink through the stencil onto the cardstock. I used Scattered Straw Distress Oxide and a dirty blending brush.
Step Five: Using the Story Telling stencil, blend a contrasting ink. I used Dusty Concord Distress Oxide.
Step Six: Stamp one of the girls from the Earthy Girls stamp set onto a piece of 90lb Soft Finish Cardstock. Color the image in with colored pencils. Fussy Cut out the image.
Step Seven: Using 10mm Clear Double Sided Adhesive, add the background cardstock to an A2 card frame. Add the trimmed girl to the card face using 6mm Clear Double Sided Adhesive.
Do you send cards to loved ones simply because? What is your favorite ECD products to use? Let us know in the comments below. Until then, happy crafting!
Hey Crafters! Katelyn here, sharing with you my Dream Tag.
To create my Dream Tag, I’ve used a variety of dies, stamps and stencils from Charlene and Ilse’s Art Journal Specials Collection as well as a couple of dies from the Planner Essentials Collection. You’ll want to read below as I share with you how to recreate my tag at home.
Step One. Die cut the small tag from the Planner Essentials 26 – Planner Pocket 3 – Tag & Toppers die out of White Soft Finish Cardstock. Place the Dot Dot Dot… stencil on top of the tag. Using a palette knife with Texture Paste Opaque Matte put the paste through the stencil. Remove the stencil and allow time for the texture paste to dry.
Step Two. Sprinkle Magenta Nuance in Hot Pink, Turquoise and Ocean on the tag. Spritz the powder with water. Allow time to dry. Once the tag has dried, apply Emboss It Ink to one of the background stamps from the Words & Layers stamp set and stamp on the left hand side of the tag. Sprinkle Magical Mysteries – Kiss of The Fairy Embossing Powder over the stamped image. Tap off the excess powder and emboss with a heat tool. Ink the edges of the tag using Black Soot Distress Ink and a blending tool with foam.
Step Three. Die cut the small tag topper from the Planner Essentials 26 – Planner Pocket 3 – Tag & Toppers die out of a piece of book page. Ink the edges of the topper using Black Soot Distress Ink and a blending tool with foam.
Step Four. Choose one of the reinforcements out of the Reinforcement Variety Pack. Die cut one reinforcement out of kraft cardstock. Ink the edges of the reinforcement using Black Soot Distress Ink and a blending tool with foam.
Step Five. Die cut the Street lamp from the Streetlights die out of black cardstock.
Step Six. Die cut both Blooming Branches from the Blooming Branches die out of White Soft Finish Cardstock.
Step Seven. Die cut the single bud from the Budding Florals die out of kraft cardstock. Trim the stem of the bud to your desired length.
Step Eight. From the Morning Letters stamp set, you’ll need the letters to spell the word dream. Apply Jet Black Archival Ink to the letters and stamp onto a piece of White Soft Finish Cardstock. Fussy cut around the word. Ink the edges of the word using Black Soot Distress Ink and a blending tool with foam.
Step Nine. Cut a piece of cheesecloth.
Step Ten. Adhere the book page tag topper to the top of the tag. Adhere the reinforcement over top of the circle at the top of the tag.
Step Eleven. Adhere the cheesecloth piece to the left hand side of the tag as desired. Adhere the street lamp 3/8″ from the left of the tag. Adhere the two blooming branches as desired around the street lamp.
Step Twelve. Foam square the single bud 1/8″ from the left of the tag. Use adhesive and foam squares to adhere the Dream word 3/8″ from the bottom and all the way to the right hand side of the tag.
Step Thirteen. To finish the tag, tie a piece of twine through the top of the tag.
Thanks for joining me today! I hope that I’ve inspired you to create your own version of my Dream Tag.
Katelyn
Elizabeth Craft Designs Supplies Used:
Other Supplies Used:
Distress Ink: Black Soot
Blending Tool with Foam
Ranger Ink: Jet Black Archival Ink, Emboss It Ink and Texture Paste Opaque Matte
Emerald Creek Craft Supplies: Magical Mysteries – Kiss of the Fairy Embossing Powder
Magenta Nuance: Hot Pink, Turquoise and Ocean
Misc: Black Cardstock, Kraft Cardstock, Book Page, Cheesecloth and Twine
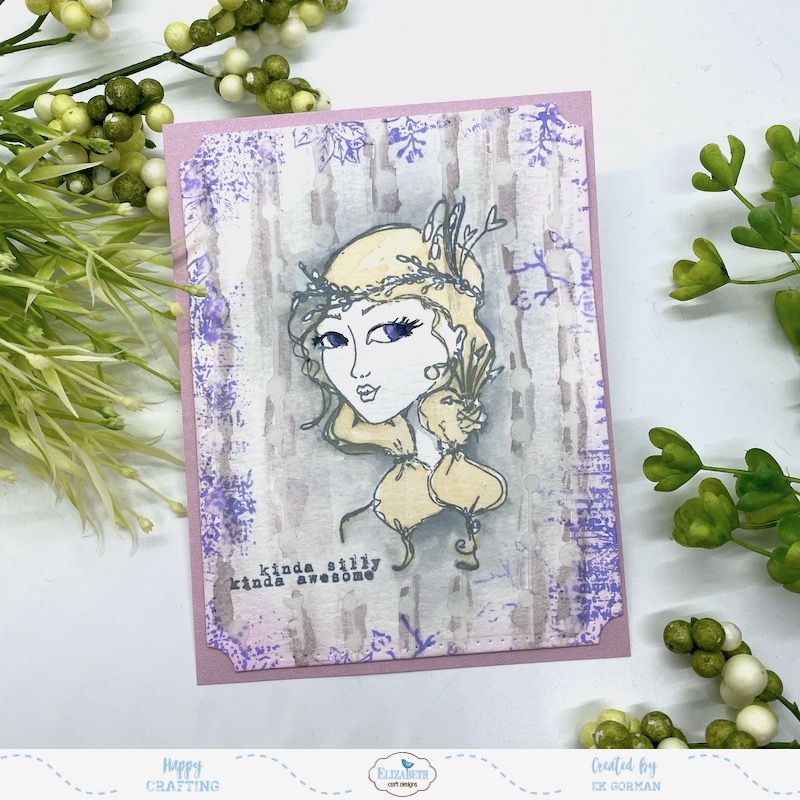
Hey Friends! It’s EK and today I thought it might be fun to try to create a modern take on a vintage look. Designer Ilse and Charlene’s new stamps and stencils make creating this look so simple with their old school flare.
Step One: Stamp out on of the images from the Earthy Girls stamp set onto a piece of Watercolor Paper cut out to 4.25×5.5 inches using some water-soluble ink. I used Weathered Wood Distress Oxide.
Step Two: Using clean water and watercolor paint brush, fade the ink out over the watercolor paper, making the stamped image look bright and bold.
Step Three: Using ECD’s Watercolor Palette, add touches of color to the stamped image.
Step Four: Hand stamp around the edges of the watercolor paper background images from the Words & Layers stamp set using colored ink. I used Shaded Lilac in Distress Oxide.
Step Five: Add a sentiment to the image from the Words & Layers stamp set. I used Weathered Wood Distress Oxide.
Step Six: Add texture to the card using the Dot Dot Dot… stencil and add gel medium through the openings.
Step Seven: Let the gel medium dry.
Step Eight: Highlight the stenciling by adding muted watercolor around the raised portions.
Step Nine: Die cut the watercolor paper with the Stitched Indented Rectangle die set and adhere it to a piece of trimmed Dusky Lavender Soft Finish Cardstock trimmed to 4.25×5.5 inches using 10mm Clear Doubled Sided Adhesive. Add the Soft Finish Cardstock to an A2 card frame.
I love how the pale grey and purple tones have a vintage vibe, but in a fun colorful way.
What do you think? Is this a new look on a vintage vibe? Let us know in the comments below what your favorite take on vintage crafting projects is.


 Hey Friends! It’s EK and today I thought it might be fun to try to create a modern take on a vintage look. Designer Ilse and Charlene’s new stamps and stencils make creating this look so simple with their old school flare.
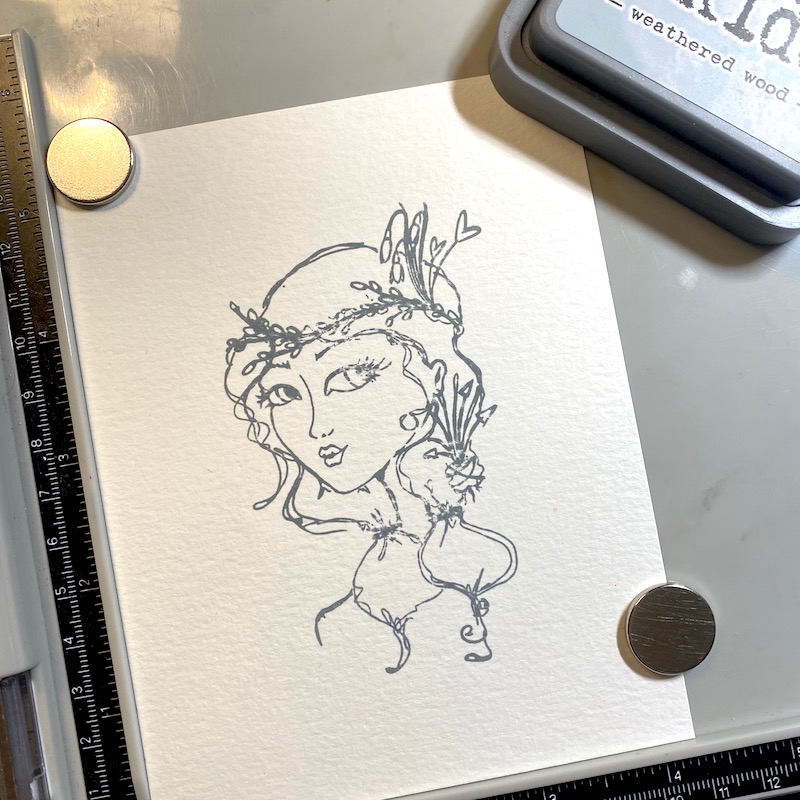 Step One: Stamp out on of the images from the Earthy Girls stamp set onto a piece of Watercolor Paper cut out to 4.25×5.5 inches using some water-soluble ink. I used Weathered Wood Distress Oxide.
 Step Two: Using clean water and watercolor paint brush, fade the ink out over the watercolor paper, making the stamped image look bright and bold.
 Step Three: Using ECD’s Watercolor Palette, add touches of color to the stamped image.
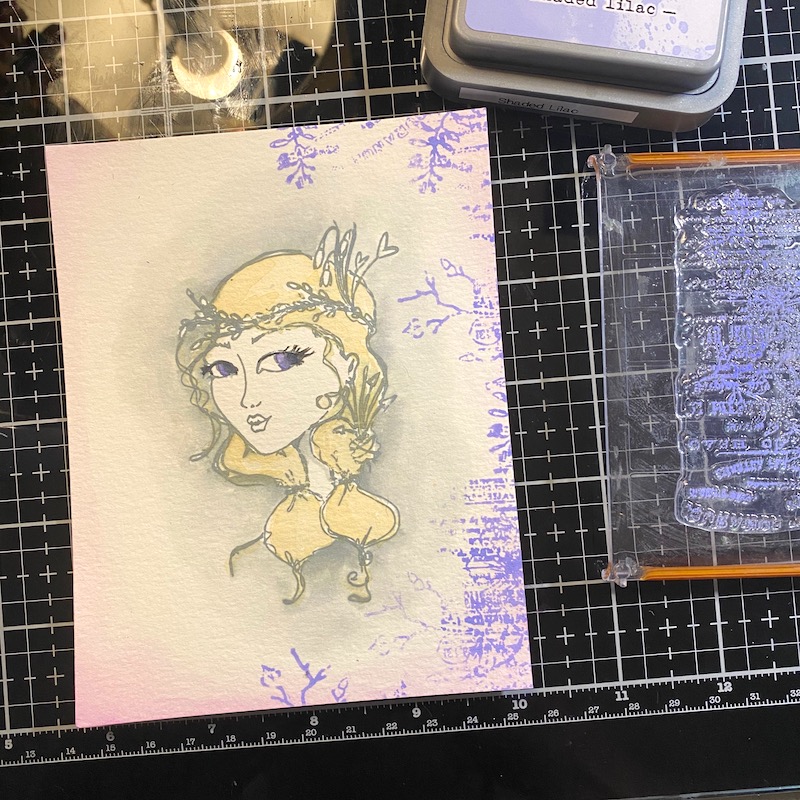 Step Four: Hand stamp around the edges of the watercolor paper background images from the Words & Layers stamp set using colored ink. I used Shaded Lilac in Distress Oxide.
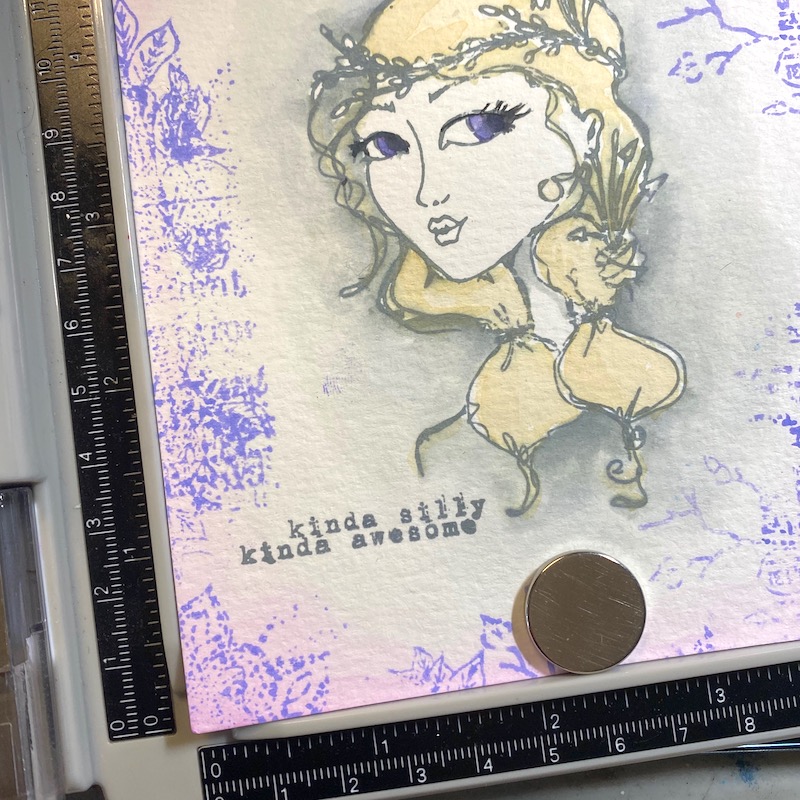 Step Five: Add a sentiment to the image from the Words & Layers stamp set. I used Weathered Wood Distress Oxide.
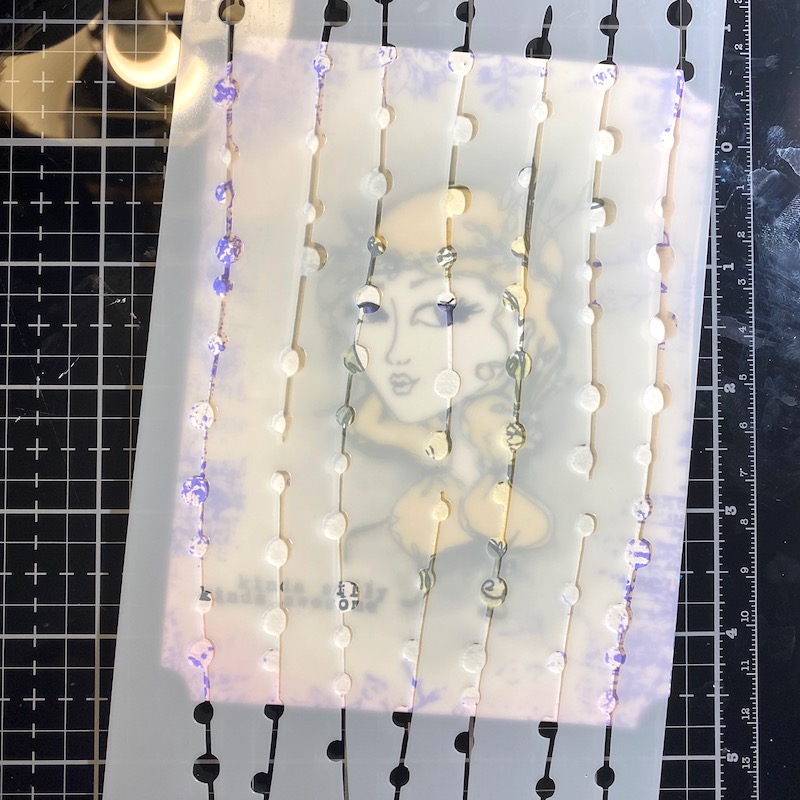 Step Six: Add texture to the card using the Dot Dot Dot… stencil and add gel medium through the openings.
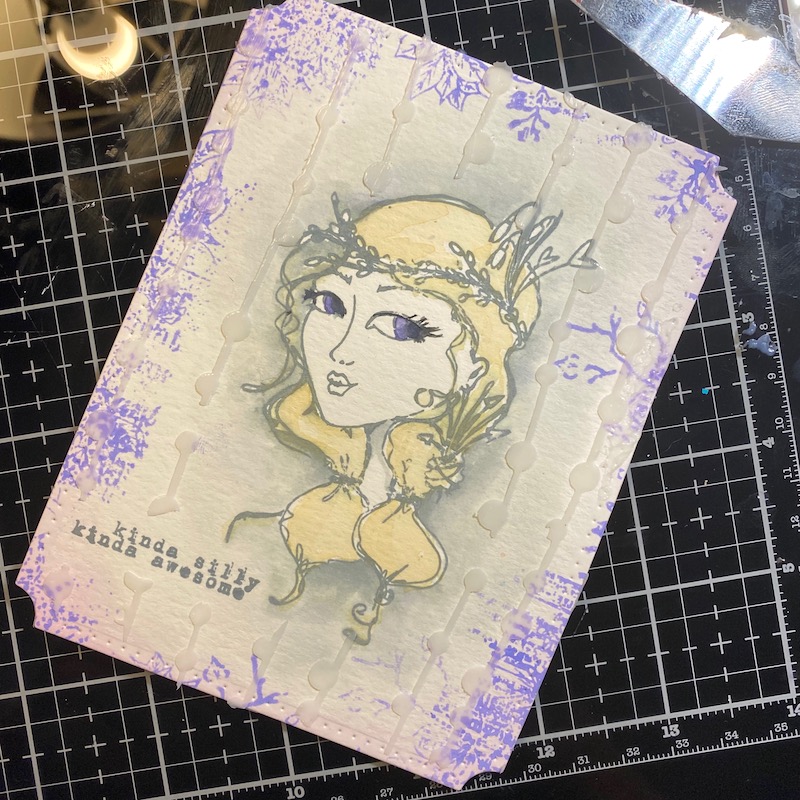 Step Seven: Let the gel medium dry.
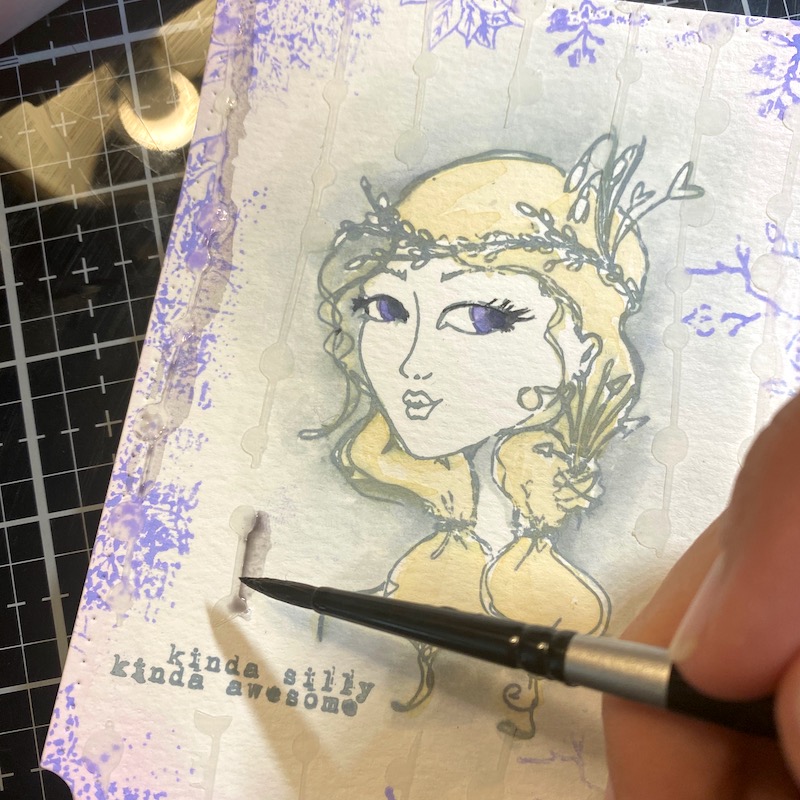 Step Eight: Highlight the stenciling by adding muted watercolor around the raised portions.
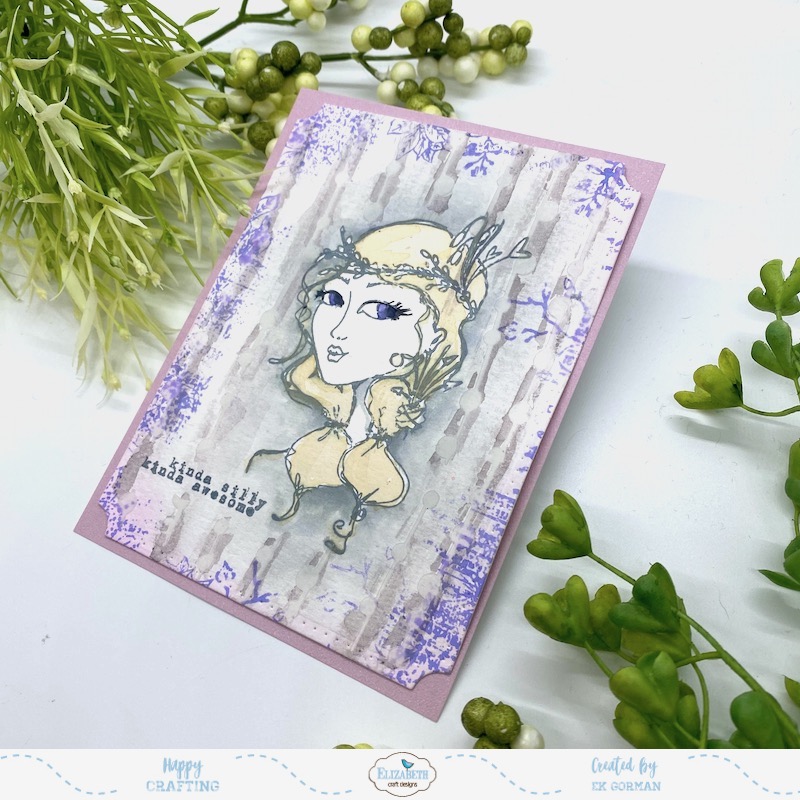 Step Nine: Die cut the watercolor paper with the Stitched Indented Rectangle die set and adhere it to a piece of trimmed Dusky Lavender Soft Finish Cardstock trimmed to 4.25×5.5 inches using 10mm Clear Doubled Sided Adhesive. Add the Soft Finish Cardstock to an A2 card frame.
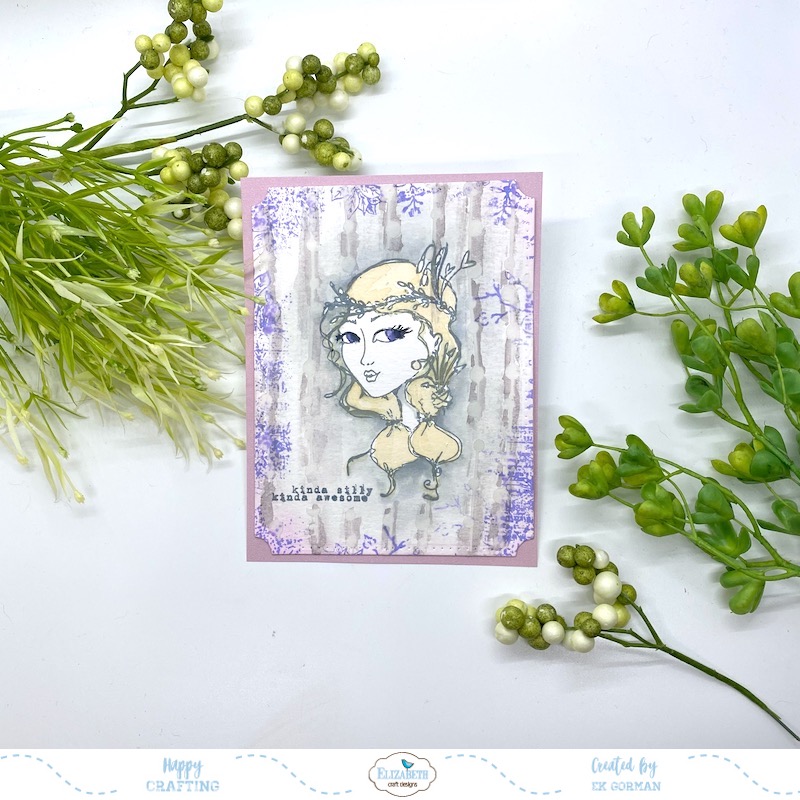 I love how the pale grey and purple tones have a vintage vibe, but in a fun colorful way.
