Hi, Kelly Booth here! Have you seen the new Spiral Circle Pull Card by Karen Burniston yet?
This die is so much fun and it comes with 9 really cool accessory dies as well! There are so many different ways to use this die. I am going to show you one that I made using the cute bees from the Ladybugs Peel-Off sticker sheet.
Here is the front of the card in my happy colors!
And the card opened up:
Directions for making this card:
1. Cut a piece of teal cardstock 5.25″ by 11, score in half at 5.50″
2. Stamp background stamp on all sides of this piece with Audrey Blue dye Ink.
3. Place the Spiral Circle Pull Card die on the center fold lining up the little nubs to the fold and cut using your die cut machine like this:
4. Fold card so it pulls and trim 1.25″ from each side making the card 4.25″ by 5.50″.
5. Take a piece of white cardstock and run the Scalloped Spiral Circle Pull die through your die cutting machine and stamp polka dots on both sides. Blue on one side and yellow on the other.
6. Cut 3 sets of the Bunch of Flowers 1 from white cardstock.
7. Cut circle from white cardstock using the largest circle accessory die from the Ring Accordion set. Cut stitched circle from yellow cardstock using the middle stitched circle die from the same set.
Below is a photo showing the dies I used to finish the card:
8. Adhere a piece of double sided adhesive onto white cardstock large enough to fit one small bee and one large bee from the Ladybugs Peel-off sheet.
9. Remove release sheet and place bees peel-offs onto the adhesive. Shake some Cool Diamond Silk Microfine Glitter over the adhesive and bees, polish with your fingers and shake off excess glitter.
10. Color bees with alcohol markers and cut them out.
11. Apply a a tiny amount of liquid glue onto the back edge of the large scalloped spiral pull and adhere it to the the large circle on the inside of the card.
12. Place a tiny bit of glue on the bottom of the center spiral and close card to get it in the right position. Let this dry.
13. Adhere white flowers to the spirals and adhere a second flower to the back of each flower. Adhere Glitter Dot Peel-Offs to the flower centers and color them using a yellow alcohol marker. Place one on each side of the flower centers that are visible.
14. Glue small bee onto the spiral near the end so he pops up slightly when the card is opened.
15. Adhere a glitter dot on each of the closure tabs for a little sparkle.
Below is what it should look like at this point.
16. Cut a small oval from white cardstock using one of the accessory dies from the Katie Label Accordion Card set. Ink edges slightly and stamp sentiment in black. Adhere on the far right side of the card.
17. Adhere large white circle to the front of the card and the stitched yellow circle (cut in step 7) on top using pop dots.
18. Adhere large bee to the stitched yellow circle and add a flower or two for a finished look.
So many possibilities using this fun new die created by Karen Burniston for Elizabeth Craft Designs!
If you have any questions, leave a comment here and I will get back to you. Thank you for stopping by the Elizabeth Craft Designs Blog today!
Hi – Karen Aicken here. For today’s post I wanted to share a different style of Stand-Up card using the new Hello Stand Up Helper die from Elizabeth Craft Designs. I saw a similar card somewhere on the web and I wanted to make one right away. As you can see in the picture below, the card looks like a normal A2 sized card but the middle part with the jar adhered is where the card stands up.
This is a quick card to make – Let’s get started!
Instructions:
1. Cut a piece of card stock or patterned paper to 8.5 x 5.5″. Score in the centre at 4.25″ to give you a 5.5″ wide x 4.25″ tall top fold card.
2. You are going to cut two vertical strips down the front of your card, one on each side. Start at the fold and cut down to the bottom edge. Each strip is 1.25″ wide. When you are finished your top fold card will have a 1.25 x 4.25″ strip, a 3 x 4.25″ strip and a 1.25 x 4.25″ strip … everything still joined at the fold but not at the bottom edge.
3. Glue the two side strips down to the card, making sure the edges are even and leaving the 3 x 4.25″ wide” strip untouched.
4. Now, score the 3 x 4.25″ strip in half horizontally at about 2″ from the bottom edge. (2-1/8 is exactly half, but I hate measuring 1/8″ so tend to go with the 2″ mark instead).
5. Working on the inside of your card, decide on where you want your Stand Up Helper to be inside your card and place your die. I have been putting mine about 1″ up from the bottom edge. It’s a good idea to hold it in place with a post-it note or piece of washi tape. Run it through your die cutting machine, where it will cut away the top edge but only score the bottom edge. (Brilliant!!)
6. Decorate as desired. The decorative panels attached to each side strip measure 1″ x 4″. I also cut some flowers and leaves for the sides, adding foam tape and enamel dots.
The paper stack I used had a sheet of printed jars, so I fussy cut one out to use on this card, cutting the lid off of a 2nd one to pop up over the first with foam tape.
7. Cut the small dragonfly, with the wings and overlay image from patterned paper and the body from white card stock. Adhere together and pop up on the panels with foam tape onto the jar. Adhere the jar to the centre card panel, making sure to keep the adhesive below that 2″ fold line. This is the same as for regular Stand-Up cards too.
8. To make the HELLO stand out a little more, I cut it again from pink card stock and trimmed off the bottom edge. Then I adhered it right on top of the one that cut through the inside of the card.
9. Decorate the inside as desired. I added some die cut leaves and a flower & enamel dot, as well as a stamped image below the HELLO. You can cut a piece of coordinating patterned paper to fit above the Word Stand Up Helper; the height will depend on where you cut your Stand Up Helper, and the width is 2.75″.
I am loving Stand-Up (or Easel) cards these days. I love that they fold flat for mailing and can fit in a standard envelope. Then the card stands up for display!
This was actually the second card I made, the first one was quick and simple and you can see it today on my BLOG. For my Elizabeth Craft Designs post though, I wanted to show how fun this card is to embellish.
I hope you will make some Stand Up Cards of your own! With the variety of Stand-Up Helpers now available here at ECD, there is truly something for any occasion.
Hi, it’s Karen Burniston with the July Pop it Ups Designer Challenge. Each month I challenge my Designer Challenge team to use Pop it Ups dies for a specific theme. This month the challenge was Christmas in July (or other winter holiday) and I made a second optional challenge to design a second card as a simple reproducible design. You’re going to love what they came up with for both parts of the challenge!
For my project, I wanted to teach a fun hybrid card called a Pivot Accordion, where I cut the Evergreen Pivot Card into the pages of the Fancy Accordion Album. Watch the video to learn this technique, which would also work with the Katie Label Accordion and House Pivot Card.
Here are some photos and additional details about the project made in the video. One of the nice things about all the pieces in the Holiday House die is that they can be combined in different ways to make smaller houses, too. For the front of the card I used just the smaller house, roof, door-as-a-chimney and window.
When the card is opened you’ll see the full size Holiday House on Page 1, using all ten dies in the set. You can watch me assemble the Holiday House in this video:
Here is a top view of the Pivot Accordion plus a close-up of the trees. I didn’t mention this in the video but I used Copic markers to tint the glitter dots the same purple and blue colors as in the papers.
Other Supplies: White cardstock, Echo Park “Winter Wishes” Patterned papers, gray ink
Let’s check in with the amazing Designer Challenge Team to see what they came up with for both simple and not-so-simple holiday cards. Each one of these creations is featured with more photos, information, supply lists and general instructions on the designers’ personal blogs. Click each name to see the blog posts for each card.
SIMPLE FLATS:
Did you know that there are currently 33 dies in the Pop it Ups Collection and of those, only 15 of them are interactive card dies? The other 18 dies are accessory dies that will work great with the pop-ups, but can also be used on their own for flat cards and layouts.
Fran Sabad chose the new Outdoor Edges for a classy white and silver card front featuring a greeting stamp that works perfectly with the evergreen tree edge die. She cut the same edge from silver foil cardstock and offset it slightly behind the white one to create a detail shadow. What a great tip!
Donna Wright has an absolutely brilliant idea for maximizing card yield by using both the positive and negative sides of two die cuts, the Outdoor Edges and Merry Christmas dies. These are cards that would be both efficient and inexpensive to produce in multiples.
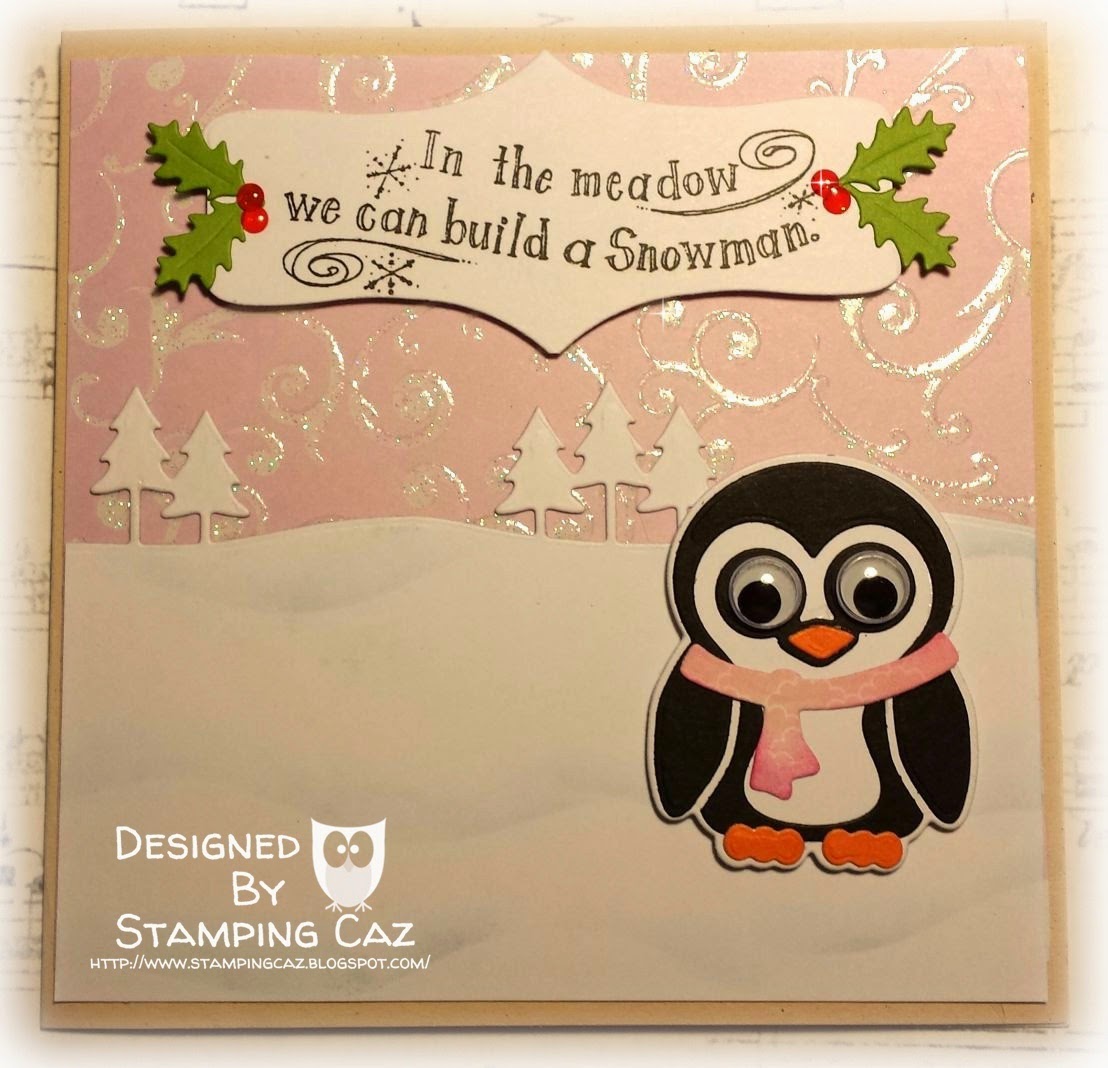
Caz Counsell used the new Chilly the Penguin die for this fun card front, also featuring the Outdoor Edges, the leaf from the Spiral Circle Pull Card, and a label made with the Agatha Edges. So sweet!
HOLIDAY PIVOT CARDS:
The new Evergreen Pivot Card is the fifth Pivot Card in the Pop it Ups collection. These dies are popular for their ease of use and for the way that they decorate the exterior and interior of the card with the same pivoting item. Many of the team chose to use Pivot Cards this month. Let’s see what they made.
Summer Hills-Painter used the Katie Label Pivot Card for a simple design suitable for any holiday. Here she shows both Christmas and Hanukkah. The snowflakes came from two other Pop it Ups die sets – the All Seasons Tree (smallest snowflake) and the new Spiral Circle Pull Card (two larger snowflakes). I always like to remind people that the accessory dies in Pop it Ups die sets are meant to be shared! Mix and match!
Raquel Mason shows that with the Evergreen Pivot card’s included decorator dies, you don’t need anything else! She made this entire simple, yet dynamic Christmas card using just the Evergreen Pivot Card set, which comes with the pivot card, three decorator trees, a die to cut 9 small ornaments, a die to cut 4 stars, a present and ribbon.
Karen Aicken went a different route with the Evergreen Pivot card, focusing on an outdoor holiday scene with simple embossed green trees. She also used the snowflakes from the Spiral Circle Pull Card and the Outdoor Edges. These three die sets are used together on a lot of the challenge cards this month. In the same blog post, Karen made a second Evergreen Pivot Card using glitter lines in fun designs to decorate the trees.
Helen Cryer used the same three dies as Karen’s green card – Evergreen Pivot Card, Outdoor Edges and the snowflakes from the Spiral Circle Pull Card. But check out the difference, not only between Helen’s card and Karen’s card, but between Helen’s card and Helen’s second, same-design-but-different-papers card! Ah the beauty of die cutting, where the colors, theme, textures, patterns and (in the case of Pop it Ups) placement is all up to YOU!
Caz Counsell and Frances Byrne also used the same three dies – Evergreen Pivot Card, Outdoor Edges and the snowflakes from the Spiral Circle Pull Card. They even chose similar stamps and themes, yet their cards are so unique. Caz chose to decorate her trees with the built-in emboss features and a few glittered ornaments. . .
. . . whereas Frances chose patterned paper and brightly colored ornaments and stars. Both cards are knock outs!
I’m sure you’ve already decided that the Evergreen Pivot Card is a must-have, but to seal the deal, check out how well it works with the tripling technique in this card by Fran Sabad. Once again you’re seeing the Outdoor Edges and the snowflakes from the Spiral Circle Pull Card used perfectly with the Evergreen Pivot Card. I just love Fran’s choice of red stars atop the trees.
Shelly Hickox used the Evergreen Pivot Card’s decorator trees to make 3D trees that can still fold flat for mailing. You’ll definitely want to check out her blog post to see a video of this card being opened. The Outdoor Edges work perfectly to create the rolling hills.
Summer Hills-Painter created a very unique card using the doubling technique with the House Pivot Card die to create a double fence pivot card. Then she bent the outer portions of the fences back in line with the card so they are only revealed when the card is opened. Behind the fence she added the largest Evergreen Pivot Card decorator tree, cut from Honeypop paper to make an expanding 3D tree. The new Holiday House die set finishes off this masterpiece.
HOLIDAY GENERAL POP-UP CARDS:
The new Lorna Label pop-up die is the fourth die in the category of “general” pop-up, joining the Garden Bench, Lucy Label and Lots of Pops. General pop-ups are the traditional style where the pop-up is revealed only upon opening the card, like a magic trick.
Raquel Mason created a stunner with the new Lorna Label, using the two separate platforms to full advantage to animate the new Holiday House and decorator trees from the Evergreen Pivot Card set. This card has a beautiful front, too, so click over to give it a look.
Karen Aicken layered her way into a breathtaking Christmas scene using the Garden Bench die. She mixed in pieces from several more Pop it Ups – a practice I encourage! The Outdoor Edges die set makes a gorgeous backdrop combined with one All Seasons Tree with glittery branches. She used the Christmas lights from the Holiday House to adorn the bench and added Agatha Edging and the new ECD Holly Flourish die at the bottom. The greeting is a Katie Label. So beautiful!
Another stunner comes courtesy of Helen Cryer, who shows off several of the new releases from the ECD line (Els and Joset) like the Crystal Flowers, Holly border, Merry Christmas and Candle dies. She created her scene on the new Lorna Label pop-up die. I love that this card is made entirely with dies!
Kelly Booth shows off the new Fancy Seasons Frame Edges on this classy simple 2-page, 2-color Fancy Accordion card, which also features the Outdoor Edges and a decorator tree from the Evergreen Pivot Card die.
Helen Cryer‘s color scheme on this Ring Accordion card is simply beautiful. She added acetate panels to be able to “float” the new ECD Ornaments #3 die set, which works perfectly with the Ring Accordion. Once again the snowflakes from the Spiral Circle Pull Card work perfectly with other sets.
Raquel Mason created a super fun 3-page Ring Accordion with some very clever die combinations, like the holly leaves from the new ECD Candle die used as the hands for the new Clock & Gears die. She made a fun scene for Chilly the Penguin in the center panel with decorator trees from the Evergreen Pivot Card set and Chilly holds the strand of lights from the Holiday House.
HOLIDAY SPIRAL CIRCLE PULL CARDS:
The Summer Release includes a brand new type of die from me – the Spiral Circle Pull Card. This die combines the opening mechanism of a z-fold flip card with an optional interior spiral to create a pop-up. Two little tuck slots keep the card closed so you won’t get an accidental reveal. To open, simply pull.
Frances Byrne wanted to show two options with the Spiral Circle Pull Card. The first is a very simple flip card using a decorator tree from the Evergreen Pivot card. For her second version, she stepped up the design with a few additional elements, like the Holly Border die and the spiral, embellished with holly leaves and berries. Either card would be quick to make.
Kelly Booth made this adorable Spiral Circle Pull Card using a perfectly colored stamped image on the front, embellished tuck slots, and cute stamped envelopes flying on the spiral. With this die you’ll be able to choose your card size and placement along the fold.
Kelly Booth made another wonderful Spiral Circle Pull Card, this time with holly on the spiral that peeks out in the closed position. Then pull the card open and see the holly fly. (Check her blog for the “open” photos)
Donna Wright drops the mic with this AMAZING Spiral Circle Pull Card featuring a joyous snowman dancing on the spiral. The two larger snowflakes come included in the set and then Donna used the small snowflakes from the All Seasons Tree to fill the background with bejeweled snowflakes. What a fabulous card!
Hopefully we have inspired you to start planning your holiday cards and incorporating some Pop it Ups dies. The dies are shipping this week to independent stores worldwide, so check with your local store to see if they have ordered. For customers without local stores you will be able to order from the website here: Pop it Ups Dies
I’ll be back next month on August 20th with another Designer Challenge. In August the team will be showing off the Character dies (Hoppy, Poppy, Chilly and Props 1) with any type of project they can dream up.
Hi everyone – Helen here today! The new Summer Release from Elizabeth Craft Designs will be available SO soon, and I made a simple Stand Up card using a couple of the new products – the Rainy Day die set, the Thinking of You Stand Up Helper, and a new color Shimmer Sheetz. I wanted to show how easy the Stand Up Helpers are.
Directions:
1. Cut a piece of thick double-sided patterned paper to 12” x 4.5”, and two strips of the same paper, 1.25” x 4.5” (ie. The light blue strip, and diagonal patterned strip, in the picture below.)
2. Cut a 3” square of Light Blue Metallic Shimmer Sheetz, and emboss it with the Lots of Dots embossing folder.
3. Cut a 3.25” square of contrasting patterned paper, and adhere the Shimmer Sheetz square to the centre of it.
4. Cut a thin strip of the contrasting patterned paper .5” x 4.5”
5. Cut out an umbrella, hand cut 2 contrasting umbrella panels, cut two lots of boots, and two flowers and flower centres.
6. Fold the big sheet of paper in half, and fold one half in half again. Place the Stand Up Helper die half way down the unfolded side, and die cut, as shown below.
7. Adhere the Shimmer Sheetz square so that about a third of it sticks up over the top of the fold, on the top half of the card.
8. Use a glue pen and small self-adhesive foam pads to adhere the other card elements as shown in the picture below.
9. Stick the remaining 1.25” x 4.5” strip of patterned paper to the underneath of the card, covering the hole left by the Stand Up helper die cut.
I hope that if you haven’t tried making a Stand Up card yet, that you’ll be inspired to give one a go!
Judi Kauffman shared some happy summertime cards she made as a guest designer for Norwegian stamp company Rubber Dance. She used Tsukineko Timber Brown StazOn ink to stamp the shells on White Iris Shimmer Sheetz. Using the same ink, she stamped the mesh, image with mother and child, and Anne Morrow Lindberg quote on Worldwin Paper’s ColorMates Smooth & Silky 90# White cardstock. The two dotted backgrounds are Yellow and Blue Iris Shimmer Sheetz embossed with Lots of Dots Folder, lightly sanded to bring out the white core of the SS and tone down a bit of the sparkle. Cardstock pieces and the shipping tag were sponged with Ranger Adirondacks Brights in Sailboat Blue and/or Sunshine Yellow. She used Prismacolor pencils to color the water and sky on the card with mesh background. All three Kraft Brown card bases measure 5” x 7”. The little yellow bubbles are die-cut from Yellow Velvet Adhesive sheets. Judi photographed the cards on her patio in the late afternoon so they would be dappled in sunlight – a nice touch!
Hi Everyone, it’s Jackie and I’m showing you a sneak peek of two new dies by Elizabeth Craft Designs that will be available mid-July. With Graphic 45 paper collection called ‘By the Sea’ I thought this paper line would be a good way to show off the new Rubber Ducky (920) and Rainy Day (928).
Instructions:
1. Create card base from Navy cardstock. Cut 5.5″x 11″ square; fold and score in half ( 5.5 ” Square card size).
2. Cut ‘Set Sail’ 5 1/4″ square. Adhere to navy paper using Double-sided Adhesive. Cut Red paper 5″ square and adhere to ‘Set Sail’ paper.
3. Cut ‘Beachcomer’ paper 4 3/4″ square. Place Karen Burniston’s Accordion Circle Card die in the middle and run through die cutting machine. Adhere on red paper using pop up dots. Cut out middle shown by Karen Burniston video seen here. Flip over the circle and adhere to middle of circle.
4. Use Wendy Vecchi reinkers in the following colours Cornflower Blue and Forget-Me-Not plus Tim Holtz’s Silver Mixative onto Ranger Teflon sheet. Spray with Rubbing Alcohol, so colours spread. Take white cardstock and swish through colors as shown.5. Cut out bubbles using Blue Velvet Adhesive and adhere to color background as shown. Place in Damask embossing folder and run through die cutting machine. Cut out circle using largest die from Accordion Circle Card. Adhere using pop up dots. Sponge blue ink on top of the embossed areas and sponge black ink along the edges.
6. Die cut Rubber Ducky and his wing using Yellow Velvet Adhesive. Cut eye using Black Velvet Adhesive and beak using Orange paper. Sponge Diarylide Yellow, Orange and Red Iron Oxide PanPastel to add more dimension as shown.
7. Apply Double-sided Adhesive to white paper, cut umbrella using the umbrella die from the set called ‘Rainy Day’ (928). Apply Sky and Blue Purple Silk Microfine Glitter alternating between colors. Cut out handle using Black Velvet Adhesive.
8. Cut out boots using Yellow Velvet Adhesive and overlay using Amethyst Gemstone Shimmer Sheetz.
9. Cut bubbles using the newest Light Blue Metallic Shimmer Sheetz and apply them using a Quickie Glue Pen. Cut ‘Hello’ from Light Blue Metallic Shimmer Sheetz and apply as shown.\
10. Take Glitter Icicles Peel-offs and color them using Tombow Markers 371 and 397 for waves. Apply on the bottom of card as shown.
It’s Frances here again. I have been playing with some of the new Elizabeth Craft Designs dies that are being released this month. They should be available in stores near you any day now! For today’s card I used the new Crystal Flower dies and one of the new Word Stand-Up Helper dies (I used the Best Wishes Stand-Up Helper Die for this card). Of course as you can see, I haven’t used the die to create a Stand Up card, but rather on the edge of my card.
Here’s how I created my card:
1. Cut a piece of purple card which measures 4 1/4 inches x 11 inches. Score this at 5 1/2 inches so you have a top folded card that measures 4 1/4 inches x 5 1/2 inches.
2. Cut a piece of designer paper which measures 3 1/4 inches x 5 1/2 inches. (As I am layering this to my card with foam tape, I like to adhere this to a piece of card the same size for extra strength.
3. Cut a piece of dark green card 1 /2 inches by 7 inches. Take the Best Wishes Stand-Up Helper die and position it at the top right hand side of the stripe of card, about 3/4 inches from the edge. Cut with you die cutting machine. Cut along the stripe of card where the base of the letters hit the card (black line on the top right photo). Cut along this line so you are left with just the words attached to the green stripe of card (bottom left photo). Apply some adhesive to the left edge of the designer paper and adhere the paper to the Best Wishes stripe, leaving a small border of card showing (bottom right photo).
4. Use foam tape to attach the designer paper to the right side of the card.
5. Using the Crystal Flower Set 1 die cut a small flower and large flower from Purple Iridescent Shimmer Sheetz.
6. Cut a piece of Double Sided Adhesive Paper 3 1/2 inches x 6 1/2 inches. Remove protective layer from one side and place onto a piece of thin card or designer paper. Die cut paper using both flowers and the large flower center from the Crystal Flower Overlay Set 1 die. (You may need to use the Metal Adaptor Plate when diecutting the flower as it has a lot of fine detail). Remove all the excess pieces from the flower if needed. Remove protective backing from the Adhesive Paper and cover flowers with Lavender Silk Microfine Glitter, polishing the glitter into the adhesive with your fingers. Use the Amethyst Silk Microfine Glitter for the flower center.
7. Attach each glittered overlay piece to it’s Shimmer Sheetz flower using foam tape to give extra dimension. Attach the small flower to the large flower using foam tape and off setting the flower so the petals line up between the petals of the larger flower. Attach flower center to the middle of the small flower using foam tape. Attach completed flower to the bottom left hand side of my card as per photo again using foam tape.
8. Die cut the Flourish with Flowers from light green card and attach to card as per photo.
One of my favorite of the new July release dies is the Rubber Ducky set. It’s so cute! I kept envisioning the sweet ducky in pink and blue for a baby card and that was my inspiration for today’s project – a congratulations baby card for a little girl.
Here’s how I made it:
1. Fold a 8 1/2 x 5 1/2 piece of white cardstock in half to form a A2 size card base. Cut yellow pattern paper to 4 1/4 x 5 1/2 , ink edges brown and adhere to card front.
2. Cut another piece of white cardstock to 5 x 3 3/4. Die cut Congratulations on the top left using Congratulations Stand Up Helper. Trim top flush with bottom of word.
3. Cut pink pattern paper to 4 1/4 x 3 1/2, ink edges and adhere to center of Congratulations cardstock from previous step. Adhere to card front using pop dots or foam adhesive.
4. Die cut ducky and wing from pink Velvet Adhesive (for a boy, use light blue Velvet Adhesive).
Die cut beak from yellow cardstock, eye from white cardstock and bow (from Ornament Set 3) from yellow pattern paper.
5. Assemble duck. I also made a boy duck – isn’t he cute! I’ll be using this one for a baby boy card on my blog later this month so stay tuned!
6. Die cut banner pieces from Karen Burniston’s Lots of Pops in yellow pattern paper and plain yellow cardstock. Stamp and cut out letters. Adhere to banners then to white twine. (TIP: only add a small glue dot to the inner bottom of each piece in order to move and adjust the banners).
7. Add banner to top of Congratulations as shown using small glue dots in the corners. Tie bows and adhere to each end of twine.
8. Die cut white and yellow pattern paper flowers. Using a small hole punch, punch out centers from scrap of pink Velvet Adhesive and adhere to center of flowers. To create dimension, place flowers on a piercing pad and cup using a ball stylus or the back of a pen, anything with a rounded end will work.
9. To complete the card, adhere ducky as shown using pop dots or foam adhesive. Add flowers around the base of ducky using a small glue dot on the back in the center of each flower. By adding the glue dot in the center of the flower, the petals can remain cupped up.
Here is another picture of the completed card.
I hope you enjoyed making our pink ducky friend today. Using boy themed papers and the blue ducky you could easily convert this sketch into a baby boy card as well.
Here’s another peek at a couple new releases. This is a fun inlay technique for dies. The only trick is to be sure to keep all the small pieces of background (kraft) card stock when you die cut the words.
1. Cut kraft card stock to 4 1/4 inches by 11 inches; fold in half to form card base. Cut another piece of kraft card stock to 3 3/4 inches by 5 inches. Cut a piece of black card stock to 4 inches by 5 1/4 inches.
2. Lightly measure and draw lines lengthwise across the 3 3/4 x 5 piece of kraft card stock, starting from the top, every 3/4ths of an inch. Use these to line up your word dies. Die cut words with spacing as shown. Be careful to keep all the small pieces from the words. Use the leaf and berries from the Snowman Die Set to fill in as shown.
3. Die cut the words in red, green and yellow card stock.
4. Apply adhesive around the back edges of the die cut kraft card stock. Apply adhesive all over the black card stock leaving about a quarter inch around the edges. You want enough to cover all places where the die cuts will go but none on the edges that will show.
5. Center and adhere the die cut kraft card stock onto the black paper. You should see the adhesive through the holes (if not, use a small amount of liquid adhesive in those areas). Puzzle piece the colored die cut words, leaves, and berries where they fit. Once the words have been adhered, add the small background pieces (e.g. the inside of the “o”). Erase pencil lines drawn earlier.
6. Apply adhesive to back of black card stock. Tie a length of twine around the bottom; be sure to leave enough to tie an offset bow on the front. Center and adhere to card base. Hint: if the bow loops do not cooperate, use a small amount of liquid adhesive under the loops.
Hi! It’s Candy here. Today i’m bringing you a sneak peek into one of the new die sets that will be available in mid-July.
My cousins love the movie “Frozen” and they sing the songs from it incessantly. I had just spent some time with them when I received the new Elizabeth Craft Designs Snowman die. Every time I saw the Snowman, I thought of the lyrics from the song, “Do You Want to Build a Snowman?” and this card just came to me …
1. Cut card base 5.5″ x 8.5″. Score at 4.25″ and fold.
2. Cut striped patterned paper 4.75″ x 4″. Ink and apply to card front near the top fold.
3. Cut snowflake paper 5.25″ x 3.75″. Ink and apply to card front near the bottom as shown.
4. Cut navy paper 1.75″ x 3″, ink and apply to front of card.
5. Cut a strip of double-sided adhesive and adhere it to a strip of white cardstock. Then adhere it to a Transfer Sheet.
6. Place the snowman dies on the cardstock that is adhered to the Transfer Sheet. Use the Metal Adaptor Plate and run it through your Big Shot.
7. Use ink, chalk or markers to color each piece (this saves you from running lots of colors of cardstock through the die cutting machine.)
8. Assemble broom and hat and place all of the pieces on the protective sheet removed from the double-sided adhesive.
9. Cut patterned paper 5.25″ x 4″. Ink edges.
10. Staple protective sheet with pieces on it to patterned paper. Then adhere patterned paper to the inside of the card.
11. Adhere another piece of double-sided Adhesive to a piece of white cardstock. Leave the protective sheet on and cut out the snow and the snowman with the dies. Remove the protective sheet and coat each piece with Silk Microfine Glitter Warm Diamond. Polish.
12. Use dimensional foam to adhere snow and snowman to front of card. Add googly eyes, nose, mouth and Glitter Dots.
13. Print sayings on the computer, mat with coordinating paper, ink and apply to front and inside of card.
14. Add Glitter Snowflakes and Glitter Icicles as shown.


