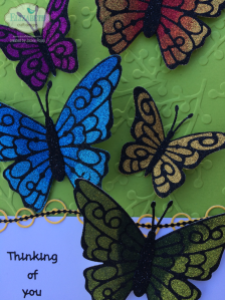
Hi, It’s Jackeline here. For my project today I created a tag that I decorated using new butterflies from the Els van de Burgt Studio Collection.
Let’s get started:
1. Cut a green cardstock rectangle measuring 8 1/2″ x 4 1/4″ (a standard 8 1/2″ x 11″ sheet cut in half lengthwise is enough for two tags). Use the Tags & More 9 Sparkle die to round off the short end at the top. Also die cut a hanging hole.
2. Emboss this piece using the Berry Banch Embossing Folder.
3. Cut a strip of white cardstock measuring 2″ x 4 1/4″. Back it, and a small scrap of white cardstock with Clear Double Sided Adhesive Tape. From the small adhesive-backed scrap die cut a hole reinforcement and position it at the top of the tag.
4. Die cut 2 yellow cardstock Ribbons & Jewels strips (backed with Clear Double Sided Adhesive Tape before cutting). Set strips aside till step 11.
To built the Butterflies:
5. Back a piece of white cardstock large enough to die cut 3 large butterfly silhouettes (Butterfly 1) and 2 small butterfly silhouettes (Small Butterfly) with Clear Double Sided Adhesive Tape. Die cut the 5 butterflies.
6. Die cut one large and one small butterfly overlay from scraps of release sheet from Clear Double Sided Adhesive Tape left from this or from other projects.
7. Working one butterfly at a time, remove the release sheet a die cut butterfly and position the overlay mask (made in step 6) onto the exposed adhesive. (Take care not to touch any exposed adhesive with your fingers – use Fine Point Tweezers as needed to avoid this!) Apply Silk Microfine Glitter in one or more colors, starting with the darkest colors first (toward the body of the butterfly) and the lighter colors next (to complete the wings). Brush off excess and polish with a fingertip to bring out the sparkle.
8. Take off the mask and apply Basic Black Silk Microfine Glitter to complete the butterfly. Polish as in step 7. 
9. Repeat steps 7 and 8 for all butterflies.
There are 38 beautiful colors in the Silk Microfine Glitter palette from Elizabeth Craft Designs, plenty of choices for creating magical butterflies. The colors I used for my butterflies are in the supply list.
For more information on how to use the glittering technique, watch a tutorial by Els Here
10. Place the white strip 1/4″ inch from the bottom of the tag. Trim off excess at sides. Add ‘Thinking of You’ peel-off
11. Decorate the top and bottom edges of the white cardstock with yellow die cut Ribbons & Jewels strips from step 4. Add black peel-off lines down the center of Ribbons & Jewels strips, curving the peel-offs as shown. Trim yellow die cut strip and black peel-offs at the sides as needed.
12. Bend the butterfly wings upward for dimension and use a small piece of Clear Double Sided Adhesive Tape behind the body of each butterfly to secure them onto the tag. Alternate large and small butterflies as shown and angle them so they appear to fly.
13. Optional: Add cord or ribbon loop to the tag.
I hope you enjoyed this tutorial and will create your own butterfly tag very soon!
SUPPLIES LIST:
Elizabeth Craft Designs
1077 Tags & More 9 Sparkle
1070 Ribbons & Jewels
1072 Small Butterfly
1073 Butterfly 1
343 Black Assorted Words
1016 Black Lines
E103 Berry Branch
502 Transparent Double Sided Tape Sheet – 8.5″ x 11″ – 5 pack
801 Fine Pointed Tweezers
802 Fine Pointed Scissors
601 Basic Black – Silk Microfine Glitter
619 Fuchsia – Silk Microfine Glitter
638 Solar Gold – Silk Microfine Glitter
633 Forest Green – Silk Microfine Glitter
634 Leaf Green – Silk Microfine Glitter
614 True Red – Silk Microfine Glitter
613 Orange – Silk Microfine Glitter
623 Royal Blue – Silk Microfine Glitter
625 Sky – Silk Microfine Glitter
Others
Green and White Cardstock
Yellow Paper


Beautiful Jackie! Love how you used the Ribbons & Jewels die with the Peel-off border.
Thank you ladies. ?
Beautiful!
Beautiful colors – love the Silk Microfine Glitter!