Browsing Tag

Cardmaking

Cardmaking Joset Designs Paper flowers Paper Flowers

You’re So Cute

April 22, 2022

Karen here today. I’m sharing a couple cards I made with the same sketch but different products from Elizabeth Craft Designs. Today I used the adorably cute Elephant and the Florals 12 to make two very different cards!

How cute is that Elephant! And so easy to put together. I used grayish brown and beige cardstock to cut the pieces and colored his eyes with a Copic C7. I also added a little blush for the cheeks with distress ink in Kitsch Flamingo. To create the card front, I just cut a piece of 90 lb White Soft Finish Cardstock at 4-1/4×5-1/2″ and taped a triangle of the patterned blue paper to it, and I then cut that with a stitched rectangle die. The sentiment is from the Furrever Friends set.

Love these beautiful flowers from the Florals 12 set. They were cut with the 90 lb Soft Finish Cardstock and then colored with DIstress Oxides in Salty Ocean and Scattered Straw. I colored, then dampened with water, and then shaped them.

Yes, it’s never too soon to start making Christmas Cards! I used the Cute Winter Sentiments on this one!

Thanks for stopping by today!

Craftily yours, Karen

Supplies from Elizabeth Craft Designs

Other Supplies

Patterned cardstock and inks

Cardmaking Paper flowers Paper Flowers

Thinking Of You – New Florals with Karan

April 6, 2022

Good morning friends and welcome back! It’s Karan Gerber here today to share a card with you designed using Florals 16 and the new Shadow Frame die.

Being the frame die is large for a card, I cut it down on the straight end of the frame and kept the angled end, the way it was, I cut a piece of pattern paper to use as the background and adhered the frame on top. 

I colored the florals using Distress Inks – Picked Raspberry, Kitsch Flamingo, and a bit of Antique Linen. 

Using my shaping tool, as well as the groove tool and my fingers, I shaped these to resemble Hibiscus. When we are in Florida, the Hibiscus are always in full bloom and they look so beautiful, so my idea came from that. 

Thank you for dropping by today and I hope I have inspired you to give the new Florals Volume 4 a try.

Karan

Elizabeth Craft Designs Supplies:

Beautiful Blooms Cardmaking

Respect

March 18, 2022

Hi crafty friends, Michelle here! Today I am using the beautiful Respect Stamp Set and coordinating dies to make more of a simple card.

Step 1: Stamp both the smaller floral and sentiment in black ink. Colour the image using alcohol markers and add some small white detailed dots using a white gel pen.

Step 2: Die cut both images 2more times on plain white cardstock without stamping. This provides a bit more stability to them, rather than using foam adhesive. It is also easier when you have small delicate areas.

Step 3: Cut a piece of white cardstock to 3.75″x5″ and ink blend a half circle using Pumice Stone Distress Oxide Ink to the right center side of the cardstock. This can be done using a stencil or cutting a circle with masking paper. Without removing the mask, add some white splatters using watercolour paint or gouache. Be sure to also protect the exposed side of your cardstock, ensuring that the white splatters are only on the ink blended half circle.

Step 4: Once dry, adhere your card together using double sided tape and foam adhesive and add a few sequins. Add all of this to a top folding A2(4.25″x5.5″) sized cardbase.

Supplies Used:

Cardmaking Paper Flowers Scrapbooking

Birdhouse Florals

March 16, 2022

Hi friends, welcome back. It is Karan Gerber here. Today I am sharing a card using florals 5 and the Birdhouse die from Joset. 

I created Daisies from Florals 5 using a groove tool to add dimension to the petals. I colored using Sunflower Archival ink and used prills in the center (they are called Rippit).

The birdhouse is perfect for a card, and with snow still on the ground in my area I felt adding a bit of snow paste to the top of the house fit perfectly. To add some detail to the background I set the birdhouse on a die cut using the Stitched Circles. I love adding layers using the stitched dies.

I thought the Floral Burst background set off the daisies and love how that gold mirri mimic my handmade daisies. Thank you for dropping by and until next time, Happy Scrapping!

Elizabeth Craft Designs Supplies:

Fantasy Flowers Paper Flowers Sidekick Essentials

Gift Box with Handmade Roses

March 3, 2022

Hello friends and welcome! It is Karan Gerber here to share a gift box i created and i have adorned the cover with Handmade Roses using Florals 8.

Cutting out 8 sets of florals 8 and plenty of leaves, i set about coloring these with Tea Roe Archival Ink and Magenta Hue Archival Ink. 

the inside of the box, i created a card, using the cutout from the top of the box which is Sidekick Essentials 5. I matted the cut out in gold mirror paper long with the sentiment from the paper collection i used.

The top of the box, i covered with Acetate and used the Floral Burst Background to do a die cut in Gold Mirri and I love how this turned out, it looks so elegant.  

I hope you enjoyed my project today and until next time

Happy Scrapping!


Cardmaking Fantasy Flowers Paper Flowers

Happy Birthday Card

February 16, 2022

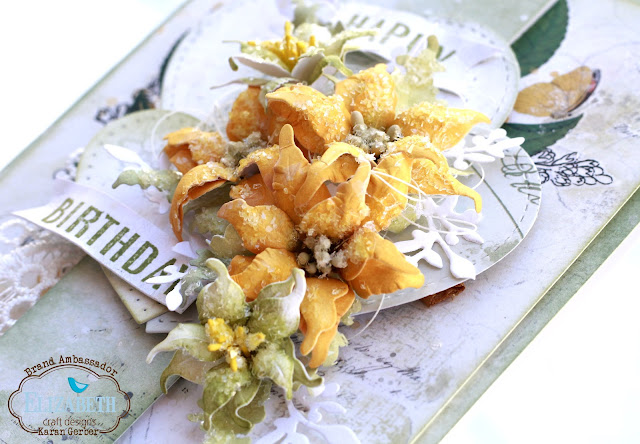
 Hello Friends and welcome back. It is Karan Gerber hosting the blog today and I am sharing a card using Florals 12 to create some beautiful Lilies. Lilies remind me of spring and with the thought of warmer weather soon to come, i wanted to create some cheery florals. 


I cut 6 large, 6 medium and four small from florals 12 and colored them with Fossilized Amber Distress Ink. I cut the leaves from Florals 1, and colored them with Bundled Sage. 


I also cut out three hearts from the Stitched Hearts and lightly inked the edges. I cut two sets of the Blooming Branches and cut them apart tucking them in around my florals to add more dimension.

The smaller florals i also colored with Bundled Sage, layering them together and using yellow stamens in the centers. 


Using Stamens from Dress My Craft i used them in the center, using my hot glue gun to secure them. To get that beautiful frosted look i used Diamond Dust along with Rock Candy Crackle, which dreis clear and allows the frost to shine through.

I hope you like my card and my take on lilies using Florals 12, i hope you give these florals a try. 
Looking forward to seeing you again, until next time, Happy Scrapping!


Cardmaking Joset Designs Scrapbooking Sidekick Essentials Uncategorized

Fun with the New Beaver

February 11, 2022

Karen here today. I’m sharing both a card and a Sidekick-sized scrapbook layout I made with one of Joset’s new critters, the Beaver! He’s super sweet, and I thought he would make a great embellishment for my scrapbook page for a day out in the garden with my guy and his dog. He also is, of course, a great embellishment for those cards!

First up is the card I made. I used 90 lb Soft Finish Cardstock to cut the pieces for the Beaver and colored them up with Distress Ink in Antique Linen and Vintage Photo. The eyes and nose are colored with Copic Markers. I used a birthday sentiment from the Life is Better on the Farm Collection and cut it out with a Planner Label die. I thought the G45 paper was perfect with that sweet Beaver.

On the “back” of my Sidekick sized scrapbook page, I used the Beaver again to decorate my page. The base of this page is cut with Sidekick Essentials 4 and the scalloped overlay is Sidekick Essentials 12. The plants I used to embellish this page are also in Sidekick Essentials 12.

The Beaver on my scrapbook page was cut mostly with Kraft cardstock (the eyes are done in White Soft Finish Cardstock), but I colored it with the same Distress Inks. I usually lay the pieces out as I would be gluing them together and then divide them up by color. I used 101mm Double Sided Adhesive on the back of the pieces on top so I can make putting it together easier.

On the front of the page is a pic of my guy and his dog. I used lettering from Planner Essentials 23 and 37. The shovel and the clippers are from Sidekick Essentials 12 and are colored with Copic markers. I added a Fitted Heart to the top. My guy and his dog are two of my favorites!

Thank you for stopping by today and checking out my projects.

Craftily yours, Karen

Supplies from Elizabeth Craft Designs

Other Supplies

Distress Inks, Copic Markers, Patterned, Shiny Green and Kraft Cardstock, Black Ink, Lace, Twine

Fantasy Flowers Paper Flowers Planner Essentials Sidekick Essentials

You Have my Heart

February 3, 2022

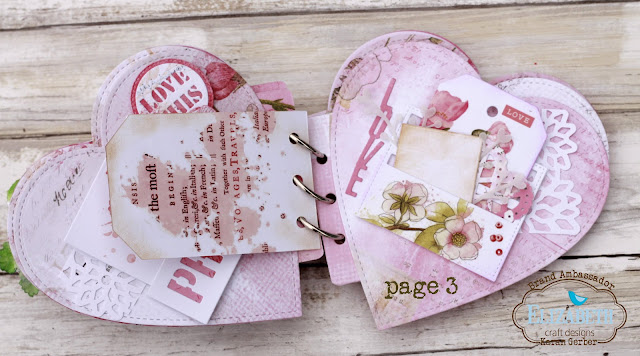
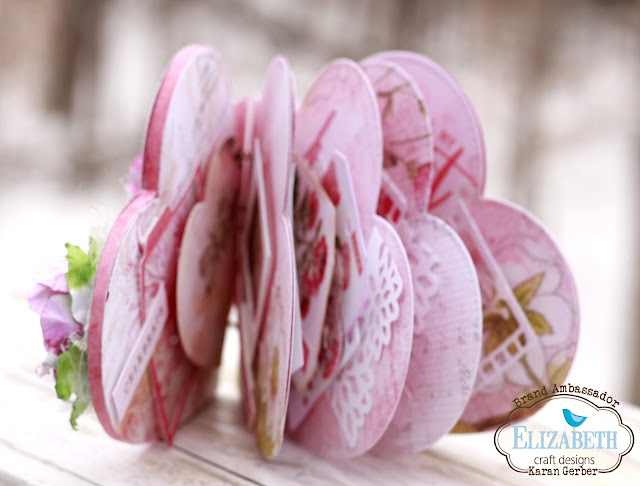
Hello Friends, welcome back, it is Karan Gerber on the blog today to share my first project for February. With Valentines coming soon, I had an idea to create a mini album from the Heart Shaped Dies.

I used Florals 4 on the Cover, coloring them with Picked Raspberry and Mowed Lawn Distress Inks. Here are some details of the mini album I created.

I created a shaker box on the front cover using acetate under that fist paper layer and then adding two layers of foam tape. The side of it actually looks like one of those heart shaped candy boxes you see. 

Inside front cover and first page. Here I used Planner Filmstrip (1656) and die cut the smaller frames from that set and die cut a heart. The sentiments are from the paper pack. 
To get the pages to work in an album, I die cut the page connector from Sidekick Essentials 16 and attached it to the back of each of the pages. 

For page 2 and 3 I used Planner Essentials 3 and cut down the photo frame to suit the size of the page. The tag is from Planner Essentials 4 which I basically used as an insert here.

Page 3 and reverse of the tag. Here I used Planner Essentials 2 adding some rubons to the slide in die for the tags.

For page 4 and 5 I used the Planner Film Strip.

Page 6 and 7 which are the last pages of this cute little mini album. I used some heart die cuts, the filmstrip as well as the die cut “You” from Sidekick Essentials 2.

It was a fun little project to do, and I hope you give these heart dies a try to create your own little mini album. 

Happy Valentines & Happy Scrapping!

Until Next time!

Karan

Elizabeth Craft Designs Supplies Used: 

Cardmaking Joset Designs

Ink blended heart background

February 2, 2022

Hello crafty friends, it’s Summer Hills-Painter here and posting my first brand ambassador post.

Today I want to share with you an easy Valentines day card using the the Gnome die set and Fitted Heart and Scalloped Heart dies sets. Let me show you how I made it.

Instructions:
Using the Fitted heart dies, cut the largest heart out of stencil material or cardstock.

Using easily removeable tape, adhere the negative space stencil you created. Using three colors of ink, create an ombre effect by blending the inks from darkest to lightest.

using white pigment ink, stamp sentiments from the Love Sentiments stamp set to create a suttle background.

print out a sentiment and cut it out using the third largest heart die. Ink the die cut using the same three inks used on your background card.

Cut a scalloped heart from white soft finish cardstock and adhere your sentiment to it

attach the layered heart sentiment to your card base. Adhere a gnome created with the Gnome die set. Finish the card with heart sequins for an added sparkly touch.

Elizabeth Craft Designs Supplies:

Cardmaking Joset Designs

Valentine’s Gnome

January 15, 2022

Karen here today, sharing a card that would be totally appropriate for Valentine’s Day using the adorable Gnomes Dies from Elizabeth Craft Designs. This gnome is too cute!

I just love that sweet little Gnome girl. To create this card, I started by cutting an 8-1/2″x11″ sheet of 90 lb Soft Finish Cardstock in half. I folded one side to create a top fold card base. I cut the other side in half and cut the Gnome pieces. The pieces that are “on top” have 101mm Double Sided Adhesive on the back to make assembly a breeze.

I used mostly Distress Inks to color the sweet Gnome. The clothes are Blueprint Sketch and Kitsch Flamingo. The hair is Mustard Seed. I used a Copic E00 for the skin, G43 for the flower center and E53 for the flower.

I adhered the patterned cardstock as in the left-hand side of the picture above before cutting it with the Fitted Rectangles on the right-hand side. I then layered it up on a 4″x5-1/4″ piece of blue cardstock. Then I put the Gnome on the card and added some gems and a sentiment from the Bear Hugs set.

Thanks for stopping by today!

Craftily yours, Karen

Supplies from Elizabeth Craft Designs

Other Supplies

Inks, Copic markers, patterned and plain cardstocks

%d bloggers like this: