Hello my crafty friends! It’s Raquel Mason here today. I like to find multiple uses for my dies and the flower I created on this card is the perfect example of that. Let me show you how to make a multi-dimensional flower using the new Hardware 1 – Hinges dies.
1. Cut kraft cardstock 4 1/4″ x 11″ and score at 5 1/2″. Make two short score lines at 2 3/4″ on the front of the kraft cardstock as shown below. Die cut using the tag die from Tags & More 5 – Sunburst at the score line on the left side of the card front as shown below. Complete the score line after die cutting.
2. Cut a piece of orange cardstock at 4″ x 5 1/4″ and adhere to the inside of the card. Make a small pencil mark at 2 3/4″ and 1 1/4″ from each side. Place one Stand Up Helpers 3 – Hinges on the score line and die cut.* Repeat for the other pencil mark. See photo below.
*Remember – you MUST use the metal adaptor plate when die cutting Shimmer Sheetz. Inside your machine’s standard cutting sandwich place the following in this order: Metal plate, Shimmer Sheetz, die with the cutting side facing DOWN toward the metal plate.
3. Die cut the following pieces as shown below:
From blue cardstock: (1) tag at 2 1/4″ x 4″, (2) corner adornments, (1) strip of small circles at 1/4″ x 4 1/4″
From Peridot Shimmer Sheetz: (2) leaves from Daisy die*
From orange cardstock: (1) circle reinforcement
From Orange Iris Shimmer Sheetz: (6) Hardware 1 – Hinges embossed with Flower Mosaic Embossing Folder*
4. To assemble the flower, bend each Hardware piece in half so the holes line up. Place all Hardware pieces through a brad, poke a hole in the middle of the blue tag, put the brad through the tag and bend the prongs on the reverse side. Adhere the leaves under the flower petals.
5. Adhere the blue tag to the card front. Adhere orange circle reinforcement, thread silver cord through the hole and tie a bow.
6. Adhere corner adornments and blue strip of small circles on the inside of the card.
7. Apply silver Thinking of You Peel-Off above the blue strip of small circles.
8. Apply silver Ribbon Butterfly Peel-Off to the front right side of the card.
I hope you have enjoyed this tutorial and feel inspired to try it out yourself.
Hello everyone, it’s Joset here and I’m exited to show you this little photo booklet that I created using the Tags & More 8 – Lattice die set. This is an easy project but so much fun! I picked the Lattice set as I really like the design but you can create a booklet like this using any of the other Tags & More die sets. I decorated my booklet using some of Elizabeth Craft Designs’ Flower dies. Let me show you how I created this project.
We’re first going to create the 4 pages of our booklet. Each page has a different size so when the booklet is closed, the lattice pattern on each page nicely overlaps.
1. Using the main tag shape die from Tags & More 8 – Lattice, cut one tag from blue patterned paper 6″ long. For information on how to cut a tag using one of the Tags & More dies, watch the video by Els van de Burgt below.
2. Position Lattice decorative overlay die over the tag so the hole in the overlay lines up with the hole in the tag. Run this through your die cutting machine.
3. Using the 4 hole die, cut holes at the bottom of the tag.
4. Cut 4 reinforcements from green cardstock and adhere around the holes from the tag. The picture below shows the finished tag and the dies used to create the tag.
We’re now going to create the rest of the tags that will finally form the 4 pages of your booklet.
5. Cut one basic tag from blue cardstock the same size as the tag cut in step 1. Cut the 4 holes using the 4 hole die.
6. Now cut 6 more tags: 1 tag with lattice pattern 7.5″ long from green patterned paper and 1 basic tag the same size from light green cardstock without lattice pattern. 1 tag with lattice pattern 9″ long from blue patterned paper and 1 basic tag the same size from blue cardstock without pattern. 1 tag with lattice pattern 10.5″ long from green patterned paper and 1 basic tag the same size from light green cardstock without pattern. Cut the 4 holes at the bottom of each tag. In total I cut 8 different tags in 4 different sizes. See photo below.
7. Adhere each tag with lattice pattern on top of matching basic tag. You will now have your 4 pages for your booklet. See photo below.
8. Stack pages and thread ribbon through each of the 4 holes.
And here comes the fun part…decorating your booklet!
9. I decorated the front of my booklet using the new Victorian Flower Set 1 and Victorian Flower Overlay Set 2. Cut solid flowers from Australian Opal Gemstone Shimmer Sheetz. Cut flower overlays from cream cardstock backed with Transparent Double Sided Tape Sheet. Remove release sheet and cover adhesive with Antique Silver Silk Microfine Glitter. Cut 2 flower centers from Green Iridescent Shimmer Sheetz.
Remember – you MUST use the metal adaptor plate when die cutting Shimmer Sheetz. Inside your machine’s standard cutting sandwich place the following in this order: Metal plate, Shimmer Sheetz, die with the cutting side facing DOWN toward the metal plate.
10. Assemble flowers and adhere to front of booklet. Cut 2 Flourish with Flowers from light green cardstock and adhere as shown.
11. Adhere a piece of Australian Opal Gemstone Shimmer Sheetz to a piece of Trandparent Double Sided Tape Sheet the same size. Cut small squares using Lattice decorative overlay die. Place a few squares back in the die cut squares at the top of each tag.
12. Decorate the inside of your booklet as you like. Adhere pieces of cardstock where you can add photos once your booklet is finished. Cut triangle corners using the corner die included in Tags & More 8 – Lattice. Optional: Add gold Glitter Border Peel-offs around cardstock squares. Decorate the pages as shown in the photos above and below, or as you prefer.
The square border on the right is cut using the border die included in Tags & More 8 – Lattice.
Add more corners if you like. Corners above are cut from Australian Opal Gemstone Shimmer Sheetz.
I decorated one of the pages with an embellishment cut with the Flourish with Flowers die (also used on the front cover).
Use Victorian Overlay Set 2 to create a beautiful decorative flower. Cut from cardstock backed with a piece of Transparent Double Sided Tape Sheet. Cover adhesive with Soft Teal Silk Microfine Glitter.
On the last page I created a little pocket for little memories. I cut 2 basic tags using Tags & More 1 – Lace. To create the words “Memories” I used the new Alphabet 1 Caps. Put your cardstock on adhesive first before die cutting as this makes it easier to adhere the letters. TIP: To get the word “Memories” on the right spot, first stick your letters on a piece of leftover backing paper. You can position your paper with the letters just above or below where you want your word. Place the letters one by one in the correct spot.
This was such a fun project to create and I can not wait to start putting some pictures in my little booklet. I hope you enjoyed this tutorial and you feel inspired to create a memory booklet too using the versatile Tags & More die sets.
Created by Mary Prasad for the ECD Susan Tierney-Cockburn Design Team
Hello again! It’s Mary here. I made this card for my sister’s birthday. It’s so cold in Michigan in January that I thought I would send a little spring to her in the form of beautiful, colorful flowers. For this card I used a collection of ECD dies including some of Susan Tierney-Cockburn’s beautiful flower designs.
Making the Card:
1. Cut a piece of 8 1/2″ x 11″ black cardstock in half so you have two 5 1/2″ x 8 1/2″ pieces. Fold one in half to form a card measuring 4 1/4″ x 5 1/2″. Place the main tag die of the Tags & More 3 – Leaves at the top of the cardstock making sure that the left side fold is inside the die line – you do not want to cut it. Die cut, then trim the other side to be straight with the tag die cut line.
2. Die cut leaves on the top front of the card using the decorative overlay die. Die cut a piece of green vellum with the main tag die and trim to fit inside the card behind the leaf holes. Die cut the flower hole decorator from red cardstock and paint with Distress Crackle Paint, Rock Candy. Adhere to the inside hole as shown.
3. Adhere black cardstock and red cardstock to Transparent Double-Sided Adhesive and die cut 4 copies of Happy Birthday from black cardstock and one copy from red. Adhere the black copies in a stack to form thick words. Add Distress Crackle Paint, Rock Candy to the red copy and let it dry. Adhere to the top of the black stack.
4. Die cut 3 daisies and 2 chrysanthemums from white velum, one rose from pink vellum (plus extra petals for a bud), one rose from red vellum, and leaves from green vellum. Color the chrysanthemums layers with alcohol markers in yellow and orange (I used Copics: Y18, Y38, YR04) – yellow for the larger, orange for the smaller. Add some pink (R83) to the pink petals (leave the top edge uncolored). Add green (G46) to leaves. Shape petals. Assemble flowers. To make the bud, roll one of the larger pink petals for a center, glue, then add a few petals around this. Die cut one of the calyx (star-type shape) from Garden Patch 1 3/8″ & Mini Daffodils and glue around the base of the bud – you may have to remove one or two sections in order for it to fit well.
5. Using a small brush, paint Distress Crackle Paint, Rock Candy over the flowers and leaves and let it dry. Add Yellow Stickles to the center of the daisies. Add Orange Peel Stickles to the center of the chrysanthemums. Once they dry, add Glossy Accents to the centers over the Stickles to give them dimension.
6. Cut 3 copies of kraft cardstock 3″ x 3 1/2″. Adhere one piece to the inside of the card as shown above. Distress and ink the edges of the second copy using an ink blending tool and adhere to the front of the card. Crimp another piece and rip at a diagonal as shown below and ink the edges. Add light molding paste in places as desired. While wet, sprinkle a small amount of Cool Diamond Silk Microfine Glitter in places to give a subtle shimmer. Adhere to the front of the card.
7. Cut one strip of kraft cardstock 1/2″ by 3 1/4″ (may need to trim slightly for fold). Adhere to the inside of the card as shown above.
8. Tie a bow from jute. Adhere Happy Birthday, flowers, bow, and black gems as shown below. Tie a double bow of twine at the top of the card.
Thank you for taking the time to see how I made my beautiful tag card!
It’s Frances here today. A few weeks ago I created a stand up card using the Tags & More 8 – Lattice die set for Els at CHA. I thought this fun card needed a tutorial! When I was looking at the Clip Board Topper included in the die set, I kept seeing a baby’s bottle. Of course I just had to create a baby card …. and baby girl cards seem to be the order of the day at ECD right now :).
Here is how I created my card:
1. Cut a piece of cream cardstock 4 1/4″ x 11″. Score at 2 3/4″ and 5 1/2″. Fold along score lines as shown above. Lightly score at 8 1/4″ but do not fold.
2. Position the Congratulations Stand Up Helper die so that the bottom of the die is lined up along the 8 1/4″ score line created in step 1. Die cut, remove excess cardstock from sentiment and fold upwards.
3. Place a piece of Transparent Double-Sided Adhesive to pink cardstock that will be large enough to fit the Congratulations Stand Up Helper die. Die cut so that the adhesive is on the bottom, trim along the bottom edge of the word and adhere on top of the Congratulations on the cream card. See photo below.
4. Cut a piece of cream cardstock 4 1/4″ x 2 5/8″ and adhere to the panel behind the Congratulations to hide the opening.
5. Cut a piece of cream cardstock and a piece of pink designer paper 4 1/2″ x 6″. Line up the main tag die from the Tags & More 8 – Lattice at the top of the cream cardstock and die cut. Snip off the excess cardstock around the top of the die and then use your trimmer to trim off both sides to make them even with the top part of the die. Trim tag shape so it is 5 1/2″ long.
6. Repeat the process above but this time with the pink designer paper. Once you have your tag, place the decorative overlay die from the same die set at the top so the hole in the overlay lines up with the hole in the tag and also lines up with the tag shape of the card and then die cut.
7. Adhere the pink designer paper tag to the cream tag. Die cut a square reinforcement from pink cardstock and adhere it around the hole on the top of the tag. See photo below. You’ll see the reinforcement just poking above and underneath the pink bow.
8. Use a pink Copic marker to color the Silver Borders Assorted Peel-Off Stickers then add them around the border of the tag. Apply Transparent Double-Sided Adhesive to the 2 1/2″ panel on the folded stand up card we created in step 1 and attach the tag to this panel so that the bottom of the tag lines up with the bottom of this panel.
9. Fold the card so that the card is closed and trim off the top of the folded card using the top of the tag as a guide. When the card is closed it should look like the tagged shaped card as shown above.
10. Cut a piece of designer paper 4 1/4″ x 2 1/4″. Adhere this to the panel in front of the Congratulations Stand Up Helper word. Use the lattice border die included in the Tags & More 8 – Lattice die set, die cut and adhere to borders from pink card. (Tip: Add some Transparent Double-Sided Adhesive to the back of the pink card before die cutting the border). Add the pink borders to the designer paper as shown above. Add Pink/Silver Glitter Dots to the border as shown above.
11. Add Transparent Double-Sided Adhesive to the back of a piece of cream cardstock large enough to fit the It’s A Boy/Girl Die. Die cut words. Position “It’s A Girl” to the card as shown above.
12. Using the Clipboard Topper die from the Tags & More 8 – Lattice die set, die cut one clipboard topper from pink cardstock and one from kraft cardstock. (Note: The clipboard die has a hole in the top. For this hole not to cut, first die cut two dots from chipboard using the same die. Then place the dots in the hole on the die to cover the hole. Use a pice of tape to keep the dots in place. When you now use your die, it won’t cut the hole). Cut the bottom part of the pink clipboard topper and adhere to kraft clipboard topper as shown above. Ink edges of topper with pink. Add Pink/Silver Glitter Dots as shown below.
13. Cut a piece of cream cardstock 2 1/8″ x 2 3/8″. Trim off the bottom corners of the cardstock at a slight angle and the top corners at a bigger angle as shown above. Ink edges with pink. Adhere the top of the bottle to the cream cardstock.
14. Add Transparent Double-Sided Adhesive to the back of pink cardstock large enough to die cut the letters BABY. Adhere the letters to the baby’s bottle. Adhere bottle to the front of the tag using foam tape.
15. Tie a bow using pink ribbon and attach over the tag hole.
Thanks for stopping by today! I hope you have enjoyed my tutorial.
Hi, it’s Candy! This card was inspired by photos that Els, the owner of Elizabeth Craft Designs, posts on her Facebook page. She lives in Colorado where she enjoys spectacular wildlife from the comfort of her home. One of her frequent visitors is a little fox, who has been known to peek in her glass doors. So, I thought it would be fun to create an interactive card where Dutch the Fox can surprise the recipient. Here’s how:
1. Cut black cardstock 4.25″ x 11″. Score and fold at 5.5″ to make the card base.
2. Cut orange cardstock 4″ x 5.25″. Emboss the orange cardstock using the Fleur de Lis Embossing Folder. Lightly ink the edges and embossed part of the cardstock and adhere to card base.
3. Die cut the letters to spell “Surprise” from Alphabet 1 – Caps die and adhere to the top right side of the card.
4. Cut the wood-grain patterned paper, black cardstock and patterned paper for the inside of the door 2.5″ x 4.5″ and ink the edges except for the black cardstock. Die cut each piece with the Tags & More 5 – Sunburst die. (Use the die that creates the outline of the door at the top).
5. Die cut the wood-grain patterned paper a second time using the sunburst decorative overlay die at the top. Adhere the wood-grain paper to the black cardstock. Die cut the black corners from the Tags & More 5 – Sunburst die set and adhere to the bottom corners as shown. Stack the small circles that were cut out when die cutting the tags in order to create the door knob.
6. Cut a pair of Hinges from black cardstock. Adhere one end to the backside of the green patterned paper. Lay the door on top and wrap the hinges around and adhere to the front side of the door. Adhere the back of the green patterned paper to the card front.
7. Die cut Dutch the Fox from orange, black and white cardstock. Assemble and place inside the door on top of the green patterned paper.
There you have it! Thank you for stopping by to check out our furry friend!
Hello everyone! It’s Els here today with my latest YouTube video. It’s an introduction to the Tags & More dies that Elizabeth Craft Designs released at the CHA (Craft and Hobby Assosiation) show in January. Lots of samples as well as an overview of all 8 sets in all 3 sizes!
Created by Joset van de Burgt using Tags & More 7 – Vine
Created by Susan Tierney-Cockburn using Tags & More 7 – Vine
Created by Anita Izendoorn using Tags & More 8 – Lattice
Created by Angela Beavers using Tags & More 1 – Lace
Welcome to Susan’s Garden…I’m Susan Tierney-Cockburn with Elizabeth Craft Designs and I want to share with you a card using the Peony from my new line, Garden Notes. The Peony is one of my most beloved flower because 46 years ago, my grandmother gifted me with a clump of peonies from her garden when I married that has been planted in the gardens of the seventeen homes we’ve lived in!
1. Cut an A6 card (6 1/4” x 4 1/2”) from Card Shoppe/Marshmallow. Cut a piece of Shimmer Sheetz/Ruby Gemstone 6” x 4 1/4”. Emboss the Shimmer Sheetz with Heartstrings Embossing Folder and sand lightly to reveal the silver hearts. Add a border of Peel-Off Lines in Silver around the edges.
2. Die cut one stem in 100# Card Shoppe/Marshmallow and one in 80# medium or dark green cardstock. Color the Marshmallow with Copic YG97 (or a green color you have.) Use a toothpick to spread a bead of glue to adhere the two stems together. Alternately, it’s easy to adhere a piece of ECD double sided adhesive sheet to each of the papers to attach the stems together, then, be able to adhere it to the top layer of the card. You can add some shading to the stem, using PanPastel Bright Yellow Green or Bright Yellow Green Shade.
3. Die cut the Peony base flower 1x, the bud 1 x, the petals 2-3x’s in your favorite color the flower comes in, the leaves 2 x’s in the same green you use for the stem and the stamen in yellow.
4. Place the base flower on the molding pad, right-side-down and shape the petals with the Loop Tool. Turn the flower over and stir the center of this piece in the center using the medium ball stylus.
5. Use a toothpick dipped in glue to apply a small amount to the the underside of the base flower and adhere to the top of the stem.
6. Place the petals on the molding pad, right-side-up, and shape each petal, using the small end of the Loop Tool. Use tweezers to pinch the stem end. Dip the stem end into the glue and start applying larger petals offsetting them around the ones on the base flower.
7. Use scissors to cut the stamen filaments in half. Use a toothpick to apply a small amount of glue to the bottom and use tweezers to roll up the stamen and seal.
8. Spread the filaments of the rolled stamen, use a toothpick to apply some glue to the top,
and then, dip into yellow Pollen. Use tweezers to hold the filament just below the Pollen edge and dip the bottom into the glue and set in place in the center of the flower.
9. Continue adding more smaller petals (as in Step #6) filling around the stamen.
10. Bud– shape the bud on the molding pad, right-side-down using the medium ball stylus.
Use a toothpick to apply a small amount of glue to the bud and adhere on the calyx of the stem. Add the two smallest petals, shaped and pinched, on top of the bud to give some dimension.
11. Optional: I made my flower in a hot pink, so I added some shading, using PanPastel’s Permanent Red Tint (pink) over the edges of the petals.
12. Leaves–you can shade the paper with Distress Ink/Crushed Olive and place them,
right-side-down, on the Leaf pad. I use the Leaf Tool to add a stem line down the center, then, turn the leaf over and add vein lines coming out from the stem. Bend the leaf in half (right-side-up) and apply PanPastel/Bright Yellow Green to this line to accentuate it. Use tweezers to pinch stem end and your thumb and index finger to press it around the end of the tweezer. Next, hold the pinch and turn the leaf over, right side facing down at a 45-degree angle over the molding pad and use the medium ball stylus to crimp the leaf edge. (Crimp–place the ball stylus down at the tip and push backward)
13. Set leaves in place on the flower.
Sentiment:
1. Die cut tag from Card Shoppe paper/Marshmallow using ECD Tags & More 4 – Flourish.
Die cut the corners and heart reinforcement in an 80# Hot Pink cardstock, or a color to coordinate with your flower.
2. Stamp a sentiment from Susan’s Garden Seeds of Thought stamps. Use a Krylon Silver Pen to edge the tag, then, add a wide pink (or the color of your choice) through the hole and finally, tie with a pink piece of twine into a bow around the ribbon.
I had such fun time creating this card to show you how easy it is with this new low-relief line–Garden Notes. I hope I’ve inspired you to try it; “the earth laughs in flowers.” Susan
Other –
Molding Pad, Leaf Pad
Pollen/Yellow
PanPastels: Bright Yellow Green or Bright Yellow Green Shade and Permanent Red Tint
Krylon Pen-Silver
1” wide ribbon (5-inches)
Twine
Beacon’s “Kids Choice
Bazzil Basic Paper–Card Shoppe/Marshmallow, 80#Medium or Dark Green and a color for the flower, edges and reinforcement for the tag.
It’s Frances here. Have you seen all the new Tags & More Dies available from Elizabeth Craft Designs? There are now 8 different Tags & More die sets covering 3 different widths,
2 1/4 inches, 3 1/4 inches and 4 1/4 inches. So whatever your needs are, we have the Tags & More set for you! For today’s project I am using the Tags & More 6 – Daisy with the new Victorian Flower die sets.
Here is how I created my card:
1. Cut a piece of designer paper 5 1/8 inches x 3 7/8 inches and layer this onto a piece of green card that is 5 3/8 inches x 4 1/16 inches. Layers these to a folded orange card which is 5 1/2 inches x 4 1/4 inches.
2. From the Tags & More 6 – Daisy die set, die cut 4 of the corner pieces from the orange card. Layer these to the green card and trim around them with scissors. Adhere the corners to each corner of the card.
3. Position the main tag die from the Tags & More 6 – Daisy onto a piece of green card which is 2 3/4 inches x 5 1/2 inches. Run through your die cutting machine. Now position decorative overlay over the tag so the hole in the overlay lines up with the hole in the tag and also lines up with the tag shape of the card. Run this through your die cutting machine.
Use your trimmer to trim down both sides of the card so the edge is level with the part of the tag which was cut by the die. Use the Spring Leaves Embossing Folder to emboss tag.
Die cut another tag from the orange card without adding the decorative layer and adhere this under the green tag. Trim tag so it measures approx 4 5/8 inches. Thread some orange hemp cord through the hole of the tag and adhere to the card as per photo.
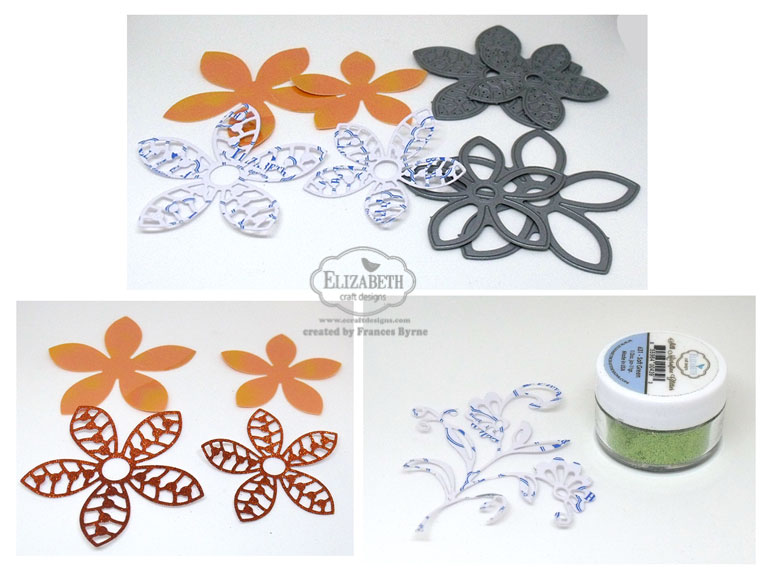
4. Use the flower dies from the Victorian Flower Set 1 to die cut a large and small flower from Orange Iridescent Shimmer Sheetz. Make sure to use the metal adaptor plate when die cutting Shimmer Sheetz.
Cut a piece of white card big enough to fit both flowers from the Victorian Flower Overlay Set 2 and cover the front of the card with a piece of Elizabeth Craft Designs Transparent Double Sided Adhesive Tape Sheet. You can find some tips on how to cut these intricate flowers in a You Tube video by Els van de Burgt. Click HERE to watch the video.
Remove the protective backing from the tape and cover the flower with Orange Silk Microfine Glitter. Remove excess glitter and polish the glittered flowers with your finger.
Layer the glittered flowers to the Shimmer Sheetz flower and then layer these together.
Die cut the large circle included in the die set and cover this with Gold Glitter Dots. Assemble Flower.
5. Cut a piece of card big enough to fit the Flourish with Flowers and apply a piece of Elizabeth Craft Designs Transparent Double Sided Adhesive Tape Sheet to the front. Die cut, remove protective backing and cover with Soft Green Silk Microfine Glitter. Remove excess glitter from flower and polish with finger.
6. Adhere Flourish with Flower to card as per photo and then add the assembled flower.
Debra here today. January marks the beginning of a busy birthday season for my family. That means I need more birthday cards! The new Tags & More 8 – Lattice is a perfect base to build a fun card featuring a colorful Dutch the Fox, a few accessories and some sparkly birthday Balloon Peel-Offs.
This card works for either boys or girls and is easy to make. The Tags & More 8 – Lattice does all the work for you!
Here’s how I made this card:
1. Fold a 51/2″ x 8 1/2″ piece of white card base in half to form a standard A2 size card base. Cut a piece of pattern paper to 4 1/4″ x 5 1/2″. Die cut the top of the folded card base and the pattern paper with the Tags & More 8 – Lattice basic tag shape die. Die cut the top of the pattern paper with the decorative overlay die from the same set. Save the negative squares from the cut. Die cut Dutch the fox, hat and mustache. Using the curvy line die from Outdoor edges, die cut a 2″ x 4 1/4″ piece of pattern paper in the middle.
2. Cover a piece of white cardstock with ECD Transparent Double Sided Adhesive sheet. Peel off liner and set aside. Add balloons peel-offs, sticky side up on the release sheet. Place adhesive covered cardstock over release sheet to transfer peel-offs. Remove liner and cover peel-offs and adhesive with Warm Diamond Silk Microfine Glitter. Polish with your finger to set the glitter and bring up the shine.
3. Color balloons with alcohol markers. I used Copic (colors YG05, V17, B93, Y06). Trim colored balloons closely. Using a black marker, color the white cut edges for a more finished look.
4. Assemble card. Adhere green tag with decorative top to card front. Place a few squares from the overlay die cut back into the top for interest. Add wavy cut pattern paper to bottom of card front. Assemble Dutch, leaving his right legs unadhered. Add mustache and hat to Dutch. Tie a piece of black twine to Dutch’s right leg to attach to the balloon peel-offs. Here’s a close up:
5. Add Dutch and balloons to card front using foam adhesive. Attach twine from Dutch’s foot to bottom of balloons. Loop yellow ribbon through tag hole of front of card only.
6. Adhere 2nd half of wavy cut pattern paper and a single colored balloon to inside of the card. Add large Happy Birthday Peel-off in black to complete the card.
I love the way this card turned out and plan to make several of them to add to my birthday stash. With the Tags & More 8 – Lattice die doing all the detail work, its quick easy and fun! Thanks for stopping by today!
Nancy Walker is back as today’s Guest Designer. She surprised us with a festive New Year’s Spiral Tag Card. Her favorite character, Chilly the Penguin was invited to the celebration and she used an interesting array of other Elizabeth Craft Designs dies, too.
New Year’s Spiral Tag Card by Nancy Walker
Thank you Joset for having me back as a guest designer today. This card combines several die sets and yes, I did bring Chilly out to let him celebrate New Year’s Eve! His natural coloring makes him a shoe-in for the tuxedo and black tie party especially when Karen Burniston’s Props Dies are enlisted.
I used Tags & More 3 – Leaves to create a building that houses the big clock from the Clock and Gears set. I chose to use the spiral mechanism and the balloon from the Spiral Circle Pull Card to animate midnight on New Year’s Eve. I hope you will enjoy today’s tutorial!
Instructions for the outside:
1. Cut light gray cardstock 8 ½” x 6 ½”. Stamp randomly with a brick or stone stamp inside and out to give a little texture to the building.
2. Score at 3 ¼” to make a card measuring 8 ½” x 3 ¼.
3. Align the round tag shape from the tag die set on top of the folded card. Allow the edge of the die to hang off the folded side. Run folded card through your machine to die cut the top section of the card, cutting both front and back of the card at the same time.
4. Cut a piece of gold cardstock 3 ¼” x 2″. Die cut round top using the same tag shape die used in step 3. Once die cut, place tag overlay die on cardstock and run through your die cutting machine again to create leaves design. Adhere tag top to top of card front and place die cut leaves and tag hole back into the die cut areas.
5. Cut the clock from light gray and remove the numbers. Cut a circle from gold cardstock for the clock backing and adhere both the clock and its backing together, placing adhesive only in areas with no openings. Add clock hands showing a couple of minutes past 12:00 and adhere so they will not move. Add a brad in the center of the clock, connecting the hands to the clock face. Adhere clock to top of card in the circle niche created in step 4.
6. Stamp and fussy cut “Party This Way” with the arrow pointing to the inside of the card.
7. Cut Chilly’s outline from black. Using the hat from Pops 1, cut one hat from black and one from gold. Trim away the brim on the gold hat to create gold hatband. Adhere to black hat, then adhere hat to the black Chilly outline. Square off his toes so he is seen from the back like he is reading the sign.
8. Cut corners from gold using the corner die from Tag & More 3 – Leaves.
Instructions for the inside:
1. Cut spiral mechanism from grey cardstock using Spiral Circle Pull card and adhere as shown. Cut and adhere balloons from scrap vellum, using bow and string from Props 2.
2. Cut Chilly and assemble as shown on front of die packaging. Add party hat and blower from Props 2 (with a little piece of feather added to the end), and one of the balloons like he is holding it. Add rhinestones to bow tie and front of his “shirt”. Adhere Chilly to the bottom left of the card. Cut two more corners from gold and adhere to the bottom of the inside of the card. See close up of Chilly.
3. Using Elizabeth Craft Design’s Transparent Adhesive Tape on the back of the gold cardstock, cut “Happy New Year”. Adhere to right side of card on the lower “wall”.
4. Add Glitter Borders in gold and silver and Glitter Dots in black and silver to resemble confetti and streamers coming down in celebration of the New Year.
5. Add balloons, party hats, and blowers with feathers on the ends to the spiral mechanism so they will all pop up when the card is opened. See close up below.
6. For complete instructions on mounting the spiral mechanism, watch Karen Burniston’s video tutorial HERE.
7. Glue a dot from the gold cardstock into the back side of the hole in the top of the card on the left side. Add a glitter dot to this, too. Add ribbons to the top of the tag card in the remaining hole on the right side of the card.
I hope you will enjoy making your own New Year’s Spiral Tag Card.
Good news! For today’s blog post I’m hosting a giveaway – a Fancy Label Accordion Card die set from Elizabeth Craft Designs. What to do? Visit my blog HERE and leave a comment. I will randomly select one lucky winner who will receive my blog candy.
Enjoy crafting with Elizabeth Craft Designs!
Nancy
SUPPLIES:
Elizabeth Craft Designs Supplies:
953 Tags & More 3 – Leaves
911 Props 1
949 Props 2
943 Happy New Year
917 Clock and Gears
916 Spiral Circle Pull Card
908 Chilly the Penguin
7018 Black Glitter Dots
7010 Silver/Gold Glitter Borders
Elizabeth Craft Designs Transparent Adhesive Tape
Other Supplies:
Light gray cardstock
Sahara Sand ink – Stampin’ Up!
Stamps from Club Scrap and Stampin’ Up!
Scraps of vellum or other translucent paper
Brad, Feathers, Ribbons, Rhinestones


![Susan tulips[1]](https://i0.wp.com/www.blog.elizabethcraftdesigns.com/wp-content/uploads/2015/02/Susan-tulips1.jpg?ssl=1)


