Browsing Category

Soft Finish Cardstock

Joset Designs Planner Essentials Soft Finish Cardstock Uncategorized

Good things

April 7, 2022

Hi all! Lisanne here, with a new blogpost for all of you.

Today I share a planner page with you with most of all new dies and stamps from the Time to Travel collection. I also used some older planner dies and dies from Joset. In this blogpost I will explain how I made this.

As base I used the Fruity Summer dies. I used blue paper from Reminiscene the book 4 and put some light yellow paper from Reminiscene the book 2 at the back. I love you combination of blue and yellow. I also adhere the reinforcements in black and kraft at the page.

Now is time to build up the page. First I made a little shaker element with Planner Essentials 42. I used paper from the Reminiscene book and put some acetate at the frame in front. I only put some double sided adhesive at the frame with some lemon shake material. Just put a reinforcement at it and a little piece of hemp cord.

I like to put things behind a tag or in this case my shaker label. So I die-cut and stamped the Film Frame, also a new dies en stamp. I also put a scallop round with a little stamping on it to. This stamp is also from the Time to Travel collection.

At the top I put two umbrella’s behind the shaker label.

The next step is making the crab with the shells. This is a dies from the sea collection from Joset. I coloured this with Distress Ink. At the list below you can see all the colours I used. At the end I put some glossy accents at the eyes from the crab.

At least I made the anchor at put the same colour hemp cord at it. And then the page is done.

I’ll hope you like the page and get some ideas.

Hope to see you soon!

Kinds regards,

Lisanne Geerdink

Elizabeth Craft Design supplies:

Other used supplies:

  • Distress Ink: Frayed Burlap, Vintage Photo, Wild Honey, Tea Dye, Dried Marigold, Black Soot, Ripe Persimmon, Carved Pumpkin, Weathered Wood
  • Versafine Clair Ink: Nocturne and Fallen Leaves
  • Acetate
  • Lemon Sprinkle Mix
Joset Designs Planner Essentials Soft Finish Cardstock Uncategorized

Happy times

March 23, 2022

Hii all! Here I am again, Lisanne. Today I’m back with a new planner page with some old and new dies from the Planner Essentials. I combined it with the cute Monkey from Joset.

First I start with the base page. I used the Rounded page and some paper from Reminiscene the book 2. The edges are coloured with Distress Ink Frayed Burlap. I die-cut the Film slide to use as frame for my page. Now I can make a stamp for my background in black.

For the next step I made some things with Distress Embossing Glaze. This will give a fantastic look.

So I gave the tab, the circle from the Sea Creatures, the rope and the helmet a rusty look. I coloured the Soft Finish Cardstock with Distress Oxide Ground Espresso, put it into Versamark and add some Distress Embossing Glaze Rustic Wilderness or Peeled Paint at it. Before I heat this I rub some powder off. Now I can heat everything and put some ink at the places who didn’t have the embossing powder. I love love love that look!

Only Distress Oxide Ground Espresso. The rope is from the rope border page.

The rope after heating the powder.

Here the rope with Distress Embossing Glaze and Distress Ink.

I adhere the circle to the page.

As you can see I adhered the Film slide to the page. I also used the sentiment ‘Special’ from the Slider page. It is a big word which I thought is perfect for this page.

I used the tentacles for this page. This gives it more of a sea look, just like the octopus is hiding behind the sentiment.

And then the cute monkey. The monkey is hanging in the rope with the helmet at his head. He is holding the sentiment. I like to build up this animals with Soft Finish Cardstock and Distress Ink.

I think this is everything what I can tell about this page. I hope you like it as much as I do.

Thank you for following along and see you soon!

Kind regards Lisanne

Elizabeth Craft Design supplies:

Other used supplies:

  • 1941 Photo Film slides
  • 1940 Sea Creatures
  • 1938 Rope Border
  • CS261 Framed
  • Versafine Clair Ink Nocturne
  • Distress Oxide Ink Ground Espresso
  • Distress Ink: Frayed Burlap, Vintage Photo, Black Soot, Tea Dye, Rustic Wilderness
  • Distress Crayon: Black Soot, Walnut Stain
  • Distress Embossing Glaze: Peeled Paint, Rustic Wilderness
  • Versamark Ink
  • Heattool
Joset Designs Soft Finish Cardstock Uncategorized

Once upon a time box

March 9, 2022

Hi all! Lisanne here again with a new box project. For this box I used a lot of dies from the Storybook Collection from Joset. I also used some other dies from Joset.

First I made a list for you with all the paper you use for the box. I worked with centimeters so pay attention here. The box is 12 cm wide and 20 high.

  • Bottom 1x – Cardstock 12 x 12 cm
  • Sides 4x – Cardstock 21 cm high x 13 cm wide
  • Lid 1x – Cardstock 14,5 x 14,5 cm
  • Bottom 1x – Design Paper 11,5 x 11,5 cm
  • Sides 6x – Design Paper 19,5 cm high x 11,5 cm wide
  • Lid 1x – Design Paper 12 x 12 cm

First I started with the sides. We need to make score lines into the paper so we have a small strip to adhere the parts. I made 2 score lines from 1 cm at 2 sides.

In the corner we need to trim a little piece, from both corners 1 cm. Like the foto above. When we adhere all the parts everthing will be fit perfectly.

Than we have one piece off the sides. In this part we want a frame so we can watch into the box. We make a line from the sides 1 cm. For the sides with the scoreline you measure from the scoreline.

Behind the piece with the window we adhere some acetate. At the solid sides we adhere design paper 19,5 cm high x 11,5 cm wide. At the outside I used the Worn Wood paper. For the Inside I made an own background with some Distress Oxide Salvaged Patina.

Then we adhere the tree sides at the bottom. I used Distress Ink Vintage Photo for all the edges. I also adhere the front side with the window, but only at the bottom. Now we can make the bottom green with a piece of paper from 11,5 x 11,5 cm. I made it green with Distress Oxide Mowed Lawn.

Now we can build up the box. First I made a hill with the Slimeline Adventure Edges. I trimmed a piece of papier 14 cm wide and make at both sides a scoreline from 1 cm. It is all up to you to decide how high the hill must be. I want the Castle from the Storybook Collection up the hill. You can make everything like you want. I coloured the Castle with Distress Oxide Ink and put there some Distress Embossing glaze at. Behind the Castle you see the Cherry Blossom Branch with some crows.

The next stamp is making some grass just as making the hill. I only did the grass a little bit shorter. In the right you can see the tree. I made a little scoreline in the tree so it gives more dimension.

Now it is time to make the characters. I made the princess and the knight. Aren’t they cute?

Here a picture to see how the box looks like from above.

At least the front side. I made a line with grass and a lot of flowers. In the left corner is a branch with also a lot of flowers. And at least the cute butterfly.

I’ll hope you like this post and get some ideas with the Storybook Collection.

Thanks for watching and reading!

Kind regards Lisanne

ECD supplies:

Other used supplies:

  • Distress Ink: Vintage Photo, Fired Brick, Wild Honey, Black Soot, Ground Espresso, Forest Moss, Mustard Seed, Brushed Corduroy, Iced Spruce, Rustic Wilderness, Seedless Preserves, Shaded Lilac
  • Distress Oxide Ink: Faded Jeans, Worn Lipstick, Tattered Rose, Seedless Preserves, Hickory Smoke, Saltwater Taffy, Fossilized Amber, Spiced Marmalade, Salvaged Patina, Mowed Lawn
  • Acetate
  • Versamark
  • Distress Embossing Glaze Walnut Stain and Hickory Smoke
Joset Designs Soft Finish Cardstock

Squirrel box

February 23, 2022

Hi everyone! I’m back with a new creation. This time I created a fun 3D box with squirrels. In the Netherlands we call this a “kijkdoos” and I believe in English it’s called a diorama if i’m correct. It’s something I use to make in school all the time and brings back so many fun memories. For this diorama I used the Squirrel and Daffodils dies from Joset’s latest release as well as some other dies from are from a previous release. Let me show you how I created this diorama!

First let’s create our box. I worked with centimeters, so keep this in mind if you’re used to inches.

Cut these pieces from strong paper:

  • 12,4 cm height x 25,8 cm wide (backside and frontside) 2 times
  • 13,4 cm height x 13,4 cm wide (tray)
  • 14,7 cm height x 14,7 cm wide (lid)

Take the ‘backside’ piece and make a crease in the papier at 1 cm and 13,4 cm.

Do this again with the piece for the frontside. Cut a piece of 10 cm x 10 cm out of both squares. So now you have a piece with two solid squares and a piece with 2 open squares. Behind the open squares I adhered some transparant sheet.

Now we need the piece of 13,4 cm x 13,4 cm to make a tray. Crease the paper from each side at 0,5 cm, and make a small tray.

At two sides on the outside you put some double sided adhesive and adhere the solid squares to it. Decorate these squares with some decorative paper on the inside. I used paper from the Reminiscence Book 2.

Now the best part, decorate the box. I started with the Folded Mushroom, so the box is a bit filled. I used Soft Finish Cardstock and Distress Ink for colouring. As you can see, I made a crease at the bottum.

The whole mushroom was a little bit to high and now I have a strip where I can add some double sided adhesive to adhere this at the box. I also made the cute Squirrel who looks behind his door.

Before I adhere the mushroom I made a chest with some nuts. The squirrel is sitting behind this chest to watch over his nuts.

At the left side there are some bushes, and who is in there with his tail?

When the mushroom is in his place, you get this view. Another squirrel came to sit down and eat his nut.

In front of the mushroom I made a path with stones. These stones are from the sea dies.

When the inside is done, you can adhere the frontside with the windows. Before I adhere the frontside I made a fence and some clouds on the inside. And then it was time to adhere the frontside to the box.

Now we can make the lid. I used a piece of papier 14,7 cm x 14,7 cm and created a crease at 1 cm from each side.

Adhere some decorative paper on top and the backside and the box is almost ready.

The last thing I did was making some daffodils and adhered these at the left en right side of the box.The photo above is made with the lid at the box. The pictures below is made without the lid so there is more light.

Hopefully you liked this post and got inspired. If you make this box, I would love to see your creation in the Elizabeth Craft Design family group.

Thank you for reading and see you soon!

Greetings Lisanne

Elizabeth Craft Design supplies:

Other used supplies:

  • Distress Ink: Ground Espresso, Gathered Twigs, Vintage Photo, Tea Dye, Tumbled Glass, Fossilized Amber, Wild Honey, Spiced Marmalade, Peeled Paint, Pumice Stone, Black Soot, Brushed Corduroy, Hickory Smoke, Rusty Hinge,
  • Foam tape
  • Talens paper pastel light, Talens paper warm colours
  • Micron pn pen black
Cardmaking Fantasy Flowers Paper Flowers Soft Finish Cardstock

Welcome to your new home

February 1, 2022

Hello everyone, Els Schutte here with my first blog post on the Elizabeth Craft Designs Blog. I’m very excited to show you the card I made for today’s post. It’s a card that would be perfect for someone who just moved into their new home of with a slight modification just a card for any occasion. Let’s get started!

Welcome to your new home card

Cut Lacy Leaves, Florals 4, Ferns, and the Berry Branch out of the Soft Finish Cardstock, then colour them in soft pink and green Inks. Shape the flowers and leaves and glue the flowers together. Put some stamens in the centre and put laquer on the big knobs and pearl drops on the small Berry branch.

Cut a piece of Soft Finish Cardstock 8 1/2 x 8 1/2 and fold in half, this is your base card. Cut another piece of the same cardstock of 8 1/4 x 4 and put this piece on 3D foam blocks and place on top of your card. Cut the door with the die from the phone Booth set, use the parts from the window as bricks. Start with placing the leaves.

Place the flowers
Place some big knops
Ad some leaves

Cut the berry Branch apart and use them on different spots in the cluster. Use some green Ink to make a shadow on the bricks. Ad a string of pearls and bow and your card is done.

I Hope you will give this card a try, it’s a nice gift if you get new neighbours or someone gets a new Home.

Elisabeth Craft Design supplies used:

Other materials: Ribbon – Pearlstring, Green-Pink Ink – pearl drops and Laquer

Joset Designs Planner Essentials Soft Finish Cardstock Uncategorized

Sunny days

January 26, 2022

Hi all! It is my turn to give you some inspiration. This time I made a planner page with the Retro Bus Kit and some dies from Joset. A lot of fun products are coming. You have probably all seen the fabulous Retro Bus Kit from Esther, it is just wow!! I’ve included a lot of pictures in the blog post as I was so happy with how the page turned out 😉 So let’s start!

I started with with making a page with Planner Essentials dies 1. I also used the Wave Pocket dies. These 2 dies are my base. I cut off the short part of the Wave Pocket. I didn’t throw this part away, but kept it. I will use this later. I made a pocket from the largest part so I can put something in there.

In this pocket I added 2 simple tags from the Reminiscene books.

I also made a label with paper from Esther’s Badass shop and some cute elements from the Planner Essntials and Retro Bus kit. Oh and the stamp for writing some notes.

Now I need the shortest part from the wave pocket. I made the Retro Bus and adhered this to the wave pocket.

I just love the small elements with the lights, flowers and wheels. For this bus I used some paper from the Reminiscence the book, metallic paper and Soft Finish Cardstock. You can make it how you want.

At the back I added a tent using dies from Joset. I thought it would be perfect for this theme.

And the suitcase and bag are perfect for this page. The suitcase is a die from the Retro Bus. The bag is from the Camping accessories.

At the page with the pocket I added the tree and farmer in safari theme. I really like to combine everything together.

And I just like the clothes from the farmer. The farmer is standing at the sentiment ‘explore’.

This picture is how you see the page when it’s closed.

And this is when the page is open.

I’m very happy with it. I hope you like this post as much as I do. Thank you so much for reading!

Kind regards

Lisanne

Elizabeth Craft Design Supplies:

Other used supplies:

  • Versafine Clair Ink: Nocturne and Fallen Leaves
  • Distress Ink: Frayed Burlap, Wild Honey, Ground Espresso, Festive Berries, Tattered Rose, Scattered Straw, Black Soot, Brushed Corduroy and Vintage Photo.
  • Hemp Cord
  • Metallic Kraft Stock Tim Holtz
  • Paint On Naturel

Joset Designs Shimmer Sheetz Silk Microfine Glitter Soft Finish Cardstock

Little Snowman

January 20, 2022

Hello everyone, Alice here. For today’s blog post I made this cute little snowman. Here in the Netherlands there is no snow yet. Hopefully it wil come.

So this time I started working with the snowman. First I made a background with WOW! embossing powder. For this I used the color Skylight (ws231x). It is a powder with some larger shimmer pieces in it. And I love glitter so really love this one! I edited the whole background with the embossing powder.

I made a frame with the Fitted Hexagons. I used the largest die in the set and cut the hexagon in the middle of the square.

I added some snowflakes around the cut out hexagon. The snowflakes are from the Classic Christmas special kit (#K007). I decided to cut them in white to keep attention in the middle. I cute off the parts of the snowflakes that were hanging over the square.

After that I made the snowman in the middle. Colored the details with distress ink. The scarf is the same color as the embossing powder in the background (Cracked Pistachio). I added some trees behind the snowman . The trees are from the Winter Scenery set (#1926)

Finally I added a sheet of kraft paper behind the card front to finish it off.

I hope I was able to give you some inspiration today. See you next time!

Alice

Elizabeth Craft Designs Supplies:

Other product:

  • embossingpowder WOW! ws231x
  • distress ink
  • kraft paper
Joset Designs Silk Microfine Glitter Soft Finish Cardstock Stamping

I am thinking of you

January 12, 2022

Hi everyone! It is Lisanne here.

I’m here with a new blogpost. Today I made a little card with the cute cat.

For the card I used the Fitted Hexagons dies. I used the 2 bigger ones for the base and the smallest one for the background. I put some Double Sided Adhesive at the Soft Finish Cardstock and made 5 small hexagons with it. Now I can add some Silk Microfine Glitter, Royal Teal. These hexagons are adhere at the bigger hexagon. As you can see I used one hexagon for half.

For now the background is oke so I can make the cat. I used Soft Finish Cardstock and different colors Distress Ink.

The cat is sitting at the hexagons, but I think it is a lot of white left so I used the fence from the Slimeline Adventure Edges. The fence is a little bit longer than the hexagons.

At least I made a fishtail with the sentiment ‘I am thinking of you’. This sentiment is made with the build you own sentiment stamp set. A great stamp set to create you own sentiment.

At least I add some Distress Ink at the edges of the fishtail and hexagons. Ohh and I almost forgot the Silk Microfine Glitter in the heart. This is the color sea glass.

This is my card with the cute cat from Joset. I hope you like this blogpost and get some ideas.

All the used supplies are here below.

Thankyou for reading and see you the next time.

Kind regards Lisanne Geerdink

Elizabeth Craft Design Supplies:

Other used supplies:

  • Distress Ink: Tattered Rose, Tea Dye, Iced Spruce, Black Soot, Walnut Stain, Hickory Smoke
  • Versafine Clair Ink Nocturne
  • Gelly Roll White
  • Micron Pen Black
Elizabeth Craft Designs General Joset Designs Planner Essentials Soft Finish Cardstock Stamping

Happy New Year! Card

December 29, 2021

Hey Crafters! Katelyn here, sharing with you my Happy New Year! Card.

To create my Happy New Year! Card, I’ve used a variety of dies and stamps from the Planner Essentials Collection and Joset Designs. You’ll want to read below as I share with you how to recreate my card at home.

Step One. Die cut a 3 3/4″ Fitted Rounded Rectangle out of a piece of dotted black or plain black cardstock. Die cut a 3 1/2″ Stitched Rounded Rectangle out of a piece of dotted cream or plain cream cardstock. Distress the edges of both rectangles.

Step Two. Die cut a 3/4″ Diagonal Stitched Fishtail out of a piece of White Soft Finish Cardstock. From the Joyful Wishes Stamp Set, you’ll need the Happy New Year sentiment. Apply Jet Black Archival Ink to the sentiment and stamp on the left hand side of the fishtail. Trim the fishtail down to 2 5/8″. Distress the edges of the fishtail.

Step Three. On a piece of White Soft Finish Cardstock, blend Wild Honey Distress Ink. Die cut the star seven times from the Planner Essentials 26 – Planner Pocket 3 – Tag & Toppers die out of the now coloured cardstock.

Step Four. From the Long & Tall Numbers Stamp Set, you’ll need the 2 and 0. Apply Jet Black Archival Ink to the 2 and stamp onto a piece of White Soft Finish Cardstock. Reapply the ink to the 2 stamp and stamp on the same piece of cardstock. Repeat the previous step with the 2. Apply Jet Black Archival Ink to the 0 stamp and stamp onto the same piece of White Soft Finish Cardstock. Fussy cut the numbers out. Ink the edges of the numbers using Black Soot Distress Ink and a blending tool with foam.

Step Five. Adhere the 3 1/2″ rectangle to the 3 3/4″ rectangle.

Step Six. Adhere the fishtail 3/8″ from the bottom and all the way to the right hand side of the 3 1/2″ rectangle.

Step Seven. Foam square the 2022 numbers above the fishtail as desired.

Step Eight. Adhere the seven stars as desired on the cardfront.

Step Nine. To finish the card, cut a cardbase out of White Soft Finish Cardstock that measures 3 3/4″ x 10″, score at 5″. Adhere the cardfront to the cardbase.

Thanks for joining me today! I hope that I’ve inspired you to create your own version of my Happy New Year! Card at home.

Katelyn

Elizabeth Craft Designs Supplies Used:

Other Supplies Used:

  • Distress Ink: Black Soot and Wild Honey
  • Blending Tool with Foam
  • Ranger Ink: Jet Black Archival Ink
  • Misc: Black or Black Dotted Cardstock and Cream or Cream Dotted Cardstock
Cardmaking Joset Designs Paper Flowers Sidekick Essentials Soft Finish Cardstock

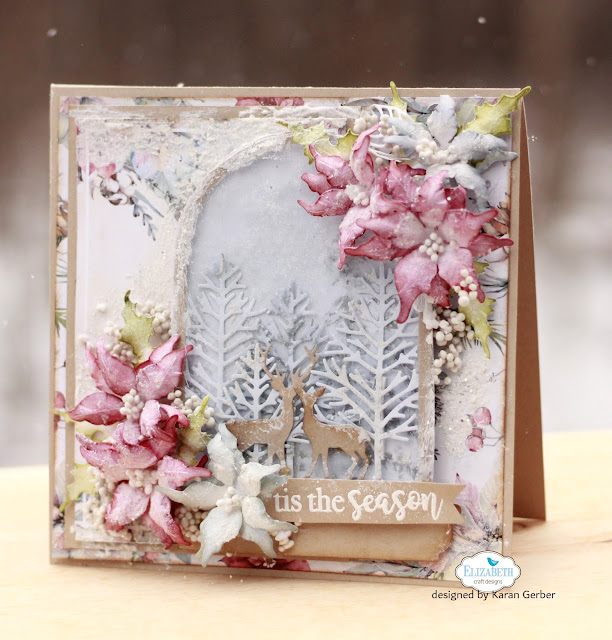
Snow Globe Shaker Card

December 22, 2021

Hi Friends and welcome to my last blog post for the year for Elizabeth Craft Designs. It was a little over a year ago when I first began my journey with Elizabeth Crafts. Creating with their florals and A5 Planner dies this past year has been so much fun. I just couldn’t close out my year without sharing one final Christmas Card. 

At this point, I am not sure what 2022 will bring with Elizabeth Craft Designs, but I hope you love my final project. 

The florals were designed using Florals 12. I know I have shared a lot of projects with these florals but Christmas to me isn’t just a day, it isn’t just a month, it’s a season. And this Season my family and I have much to be thankful for!  So with Christmas season upon us, I set out to create one last Christmas Card for 2021.

Here on St Joseph Island, we see deer all the time. They are almost sighted each day we head out for errands. I couldn’t resist creating a shaker card with Joset’s Snow Globe and those deer and trees from the Winter Scenery Set.  

To begin with, I cut out the globe on pattern paper and on craft cardstock and than traced it out on acetate so I have a full size piece for the front of the globe. I fussy cut out foam tape and taped the back trim of the die to create a shaker card. I placed glitter on the inside of the shaker.

I cut four of the trees from the Winter Scenery Die Set and cut thin strips of foam tape to adhere to the back of the trees to add some dimension to the globe. I adhered the deer from the Snow Globe Sidekick Set to the front. I just love how this looks, it creates an awesome winter scene in that globe doesn’t it? 

Die cutting out 6 large and 6 medium florals along with 6 leaves I colored and shaped them (if you are a member of the Elizabeth Crafts family Group on Facebook, I did a Live on Friday, Dec 17th and you can see just how I shaped and created those gorgeous florals here: Live Facebook with Karan. If you are not a member, be sure to become one so you can view the replay)

So getting back to my card, I stamped and heat embossed my sentiment from the Classic Christmas Sentiments set using White Embossing Powder and attached that to the bottom of the card. 

My final step was to add snow paste and I thought some Art Stones would be a nice touch and look like snow balls around the florals. 

Thank you for following me along this year with my craft shares for Elizabeth Craft Designs. Have yourself a Merry Christmas and I am praying that 2022 will see us all back to normal. Blessings for a bright, prosperous and Healthy 2022!

Yes it was snowing when I took this photo, so fitting for the style of my card Happy Scrapping and I hope to be sharing more with you in 2022!

Elizabeth Craft Designs Supplies:

%d bloggers like this: