Good morning friends and welcome back! It’s Karan Gerber here today to share a card with you designed using Florals 16 and the new Shadow Frame die.
Being the frame die is large for a card, I cut it down on the straight end of the frame and kept the angled end, the way it was, I cut a piece of pattern paper to use as the background and adhered the frame on top.
I colored the florals using Distress Inks – Picked Raspberry, Kitsch Flamingo, and a bit of Antique Linen.
Using my shaping tool, as well as the groove tool and my fingers, I shaped these to resemble Hibiscus. When we are in Florida, the Hibiscus are always in full bloom and they look so beautiful, so my idea came from that.
Thank you for dropping by today and I hope I have inspired you to give the new Florals Volume 4 a try.
Hi everyone, it’s Tina here. With Easter coming up quickly I managed to squeeze in one last Easter card. Below you will find the steps to create your own card.
Step 1 – Trim White Soft Finish to 7” x 6”, score at 3 1/2” and fold in half for a horizontal top fold card. (Mini Slimline)
Step 2 – Trim White Soft Finish to 3 1/2” x 6”. Apply Inks of your choice onto a Gel Plate. I used Distress Oxide in Broken China and Cracked Pistachio. Broken China on top and Cracked on the bottom. Place the Cardstock on top of the Inked Gel Plate. Remove the Cardstock and spray some water to create some faux clouds. Diecut Adventure Edges (cloud die) on scrap cardstock to use as a stencil. Apply Unicorn White Ink on top of the panel to create clouds.
Step 3 – Diecut Pull Tab (half circle die) to the panel created in Step 2. This will create the slit to be able to pull the tab. Diecut Pull Tab (thin rectangular die) to the panel created in Step 2, making sure to align with the panel diecut. Diecut Pull Tab (T shape die) & (rectangle with slight angles at edge die) using White Soft Finish Cardstock. Diecut Pull Tab (circle with arrow). Adhere to the top of the pull tab. When assembled the panel should look like the below photo. Adhere to the card front making sure to leave space around the pull tab mechanism.
Step 4 – Stamp Spring Sentiment using Versafine Onyx Black Ink to the right side of the card front.
Step 5 – Diecut Easter Basket (eggs, flowers and leaf stems dies) in various colors of cardstock. Adhere to card front using Kids Choice Glue.
Step 6 – Diecut Bunny various colors of Cardstock. Assemble using Kids Choice Blue. Make sure to adhere an egg to the arms of the Bunny. Adhere the Bunny to the top of the pull tab flaps.
Step 7 – Diecut Slimlne Adventure Edges using Green Cardstock. Adhere to card front using Foam Tape leaving a gap at the center where the movable egg is.
I love how it looks like the Bunny is taking an egg. Below is a link to all the products used. Thank you for stopping by and Happy Crafting!
Karen here today with a post that is all about the circles! I created a card using the Fitted and Stitched Circles and then was inspired to also create a Sidekick scrapbook page using them as well.
First up is a card using the Squirrel cut using 90 lb Soft Finish Cardstock. I cut the pieces “on top” using the 101mm Double Sided Adhesive. Isn’t he just adorable! I used a combination of Distress Inks to color him including Kitsch Flamingo, Weathered Wood, Antique Linen and Tea Dye. I added random Stitched and Fitted Circles to create a lively card layout for him and added some twine and lace. The stamp is from the Life is Better on the Farm set. The acorn is colored with Copic markers.
I then was inspired to use circles in a Sidekick page journaling some fun I had at a basketball game. The team was losing, so I started taking pictures of the fun and colorful shoes. The page base and pink overlay is Sidekick Essentials 20. The “fab” die is in Planner Essentials 43, and the lettering is from Planner Essentials 37. As always, I added some reinforcements from the Reinforcement Variety Packs 1 and 2.
On the back of the page is more shoes and more circles! My guy met the guy with the shoes that were yellow and colorful, but unfortunately, I only noticed the shoes, so I can’t tell you who it was!
Hi friends, welcome back. It is Karan Gerber here. Today I am sharing a card using florals 5 and the Birdhouse die from Joset.
I created Daisies from Florals 5 using a groove tool to add dimension to the petals. I colored using Sunflower Archival ink and used prills in the center (they are called Rippit).
The birdhouse is perfect for a card, and with snow still on the ground in my area I felt adding a bit of snow paste to the top of the house fit perfectly. To add some detail to the background I set the birdhouse on a die cut using the Stitched Circles. I love adding layers using the stitched dies.
I thought the Floral Burst background set off the daisies and love how that gold mirri mimic my handmade daisies. Thank you for dropping by and until next time, Happy Scrapping!
Karen here. Lately, I’ve been inspired creating cards to use similar colors and pieces to also scrapbook. For today’s post, I started with the adorable Bunny and made a card. Then, I just had to create a Sidekick scrapbook page.
I started by finding a card sketch on Pinterest to create this fun card with the Bunny. The Bunny is colored with Distress Inks in Tea Dye and Kitsch Flamingo. The bow is colored with Scattered Straw. The eyes and whiskers are colored with Copic C7, and the pink nose is a Copic R81. The triangles were made by using a Fitted Square die and cutting it in half and I added a couple Stitched Rounded Rectangles to the front. I added a couple Leaves and Branches die cuts at the top. With some ribbon, twine and pearls, I called this all occasion (but I’ll probably use it for Easter) card complete.
I then brought in the paper and the triangles to create this Sidekick page journaling fun times at Sacramento Rivercats games with my guy. The page base is cut from 90lb White Soft Finish Cardstock with a Sidekick Essentials 2 die. He has a cap on that is from the Hats dies. The letters are in the Planner Essentials 23 set, and I added the “cute” stamp from the Moods set (because I think my guy is awfully cute!) No page, in my opinion, is complete without reinforcements, cut here using 101mm Double Sided Adhesive and the Reinforcement Variety Packs 1 and 2.
On the back, the focus is on these pictures that include my parents and my guys daughter since we really enjoy going to the game with family and friends. I used the triangle (again cut from a Fitted Square) as a pocket and added journaling that I cut with a Fitted Rounded Square die. The …’s are also from the Moods stamps, and I added some Branches and Leaves diecuts to the triangle pocket.
Hi all! Lisanne here again with a new box project. For this box I used a lot of dies from the Storybook Collection from Joset. I also used some other dies from Joset.
First I made a list for you with all the paper you use for the box. I worked with centimeters so pay attention here. The box is 12 cm wide and 20 high.
Bottom 1x – Cardstock 12 x 12 cm
Sides 4x – Cardstock 21 cm high x 13 cm wide
Lid 1x – Cardstock 14,5 x 14,5 cm
Bottom 1x – Design Paper 11,5 x 11,5 cm
Sides 6x – Design Paper 19,5 cm high x 11,5 cm wide
Lid 1x – Design Paper 12 x 12 cm
First I started with the sides. We need to make score lines into the paper so we have a small strip to adhere the parts. I made 2 score lines from 1 cm at 2 sides.
In the corner we need to trim a little piece, from both corners 1 cm. Like the foto above. When we adhere all the parts everthing will be fit perfectly.
Than we have one piece off the sides. In this part we want a frame so we can watch into the box. We make a line from the sides 1 cm. For the sides with the scoreline you measure from the scoreline.
Behind the piece with the window we adhere some acetate. At the solid sides we adhere design paper 19,5 cm high x 11,5 cm wide. At the outside I used the Worn Wood paper. For the Inside I made an own background with some Distress Oxide Salvaged Patina.
Then we adhere the tree sides at the bottom. I used Distress Ink Vintage Photo for all the edges. I also adhere the front side with the window, but only at the bottom. Now we can make the bottom green with a piece of paper from 11,5 x 11,5 cm. I made it green with Distress Oxide Mowed Lawn.
Now we can build up the box. First I made a hill with the Slimeline Adventure Edges. I trimmed a piece of papier 14 cm wide and make at both sides a scoreline from 1 cm. It is all up to you to decide how high the hill must be. I want the Castle from the Storybook Collection up the hill. You can make everything like you want. I coloured the Castle with Distress Oxide Ink and put there some Distress Embossing glaze at. Behind the Castle you see the Cherry Blossom Branch with some crows.
The next stamp is making some grass just as making the hill. I only did the grass a little bit shorter. In the right you can see the tree. I made a little scoreline in the tree so it gives more dimension.
Now it is time to make the characters. I made the princess and the knight. Aren’t they cute?
Here a picture to see how the box looks like from above.
At least the front side. I made a line with grass and a lot of flowers. In the left corner is a branch with also a lot of flowers. And at least the cute butterfly.
I’ll hope you like this post and get some ideas with the Storybook Collection.
Hello friends and welcome! It is Karan Gerber here to share a gift box i created and i have adorned the cover with Handmade Roses using Florals 8.
Cutting out 8 sets of florals 8 and plenty of leaves, i set about coloring these with Tea Roe Archival Ink and Magenta Hue Archival Ink.
the inside of the box, i created a card, using the cutout from the top of the box which is Sidekick Essentials 5. I matted the cut out in gold mirror paper long with the sentiment from the paper collection i used.
The top of the box, i covered with Acetate and used the Floral Burst Background to do a die cut in Gold Mirri and I love how this turned out, it looks so elegant.
I hope you enjoyed my project today and until next time
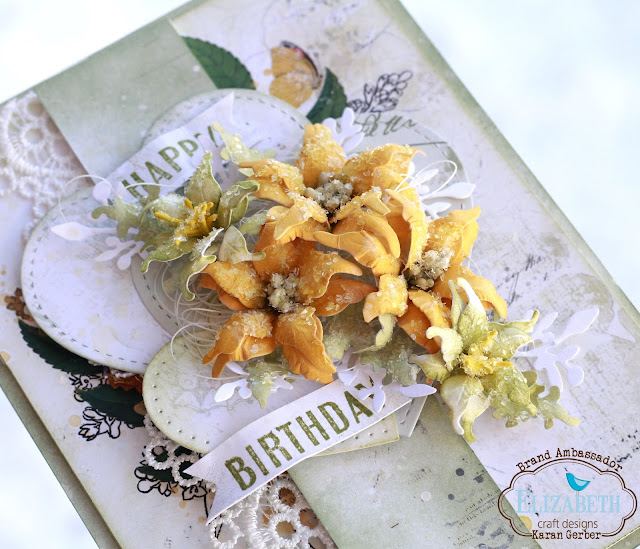
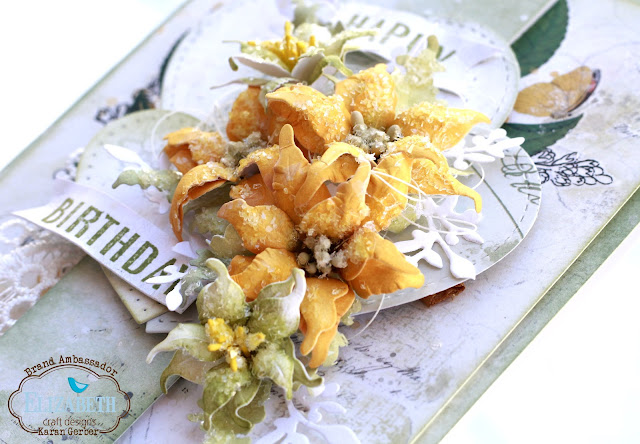
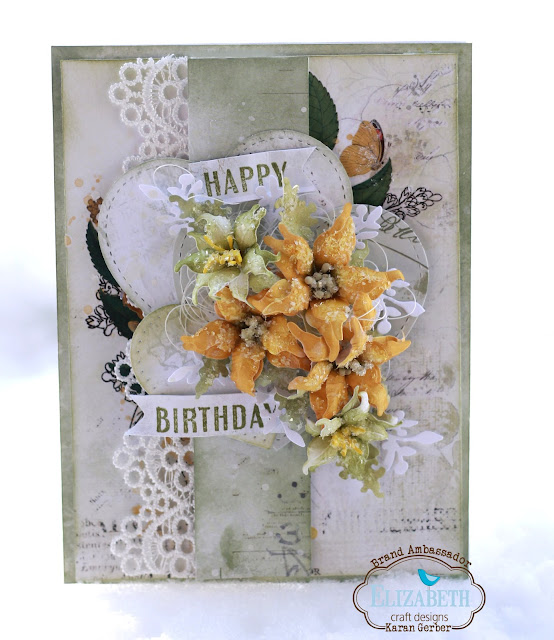
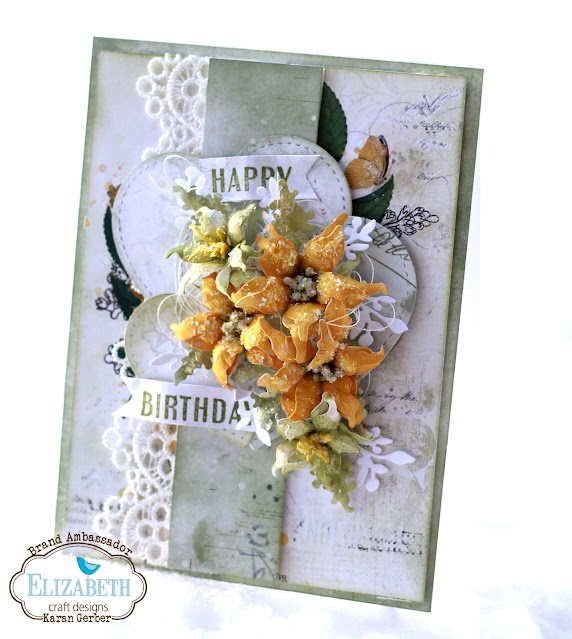
Hello Friends and welcome back. It is Karan Gerber hosting the blog today and I am sharing a card using Florals 12 to create some beautiful Lilies. Lilies remind me of spring and with the thought of warmer weather soon to come, i wanted to create some cheery florals.
I cut 6 large, 6 medium and four small from florals 12 and colored them with Fossilized Amber Distress Ink. I cut the leaves from Florals 1, and colored them with Bundled Sage.
I also cut out three hearts from the Stitched Hearts and lightly inked the edges. I cut two sets of the Blooming Branches and cut them apart tucking them in around my florals to add more dimension.
The smaller florals i also colored with Bundled Sage, layering them together and using yellow stamens in the centers.
Using Stamens from Dress My Craft i used them in the center, using my hot glue gun to secure them. To get that beautiful frosted look i used Diamond Dust along with Rock Candy Crackle, which dreis clear and allows the frost to shine through.
I hope you like my card and my take on lilies using Florals 12, i hope you give these florals a try.
Looking forward to seeing you again, until next time, Happy Scrapping!
Hi all! It is Lisanne here with a new card with the newest collection of Joset. This collection is currently only available at your local craft store and soon to come at Elizabeth Craft Designs online.
It is such a great collection with many possibilities. For this card I used the beaver, but first I started with the background.
For this blue background I used the Distress Oxide Ink ‘Salvaged Patina, Peacock Feathers and Mermaid Lagoon’. I love how the ink gives a reaction at water.
For the next step I used the Slimline Adventure Edges to make the grass border. You can use this dies in so many ways. I used both sides from the paper so it fits perfectly. The grass border is colored with Distress Oxide Ink Twisted Citron.
The Beaver set also come with 2 log dies, very matching for a beaver. I made a lot of logs so it will look like the beaver build a dam. These logs are colored with Distress Ink. And just adhere these in different ways, not straight to each other it will look more real.
Lastly I made the two beavers and some flowers from the Slimline Adventure Edges.
Aren’t they cute? Oh and I found a cute stamp with the sentiment ‘Step into the forest with me..
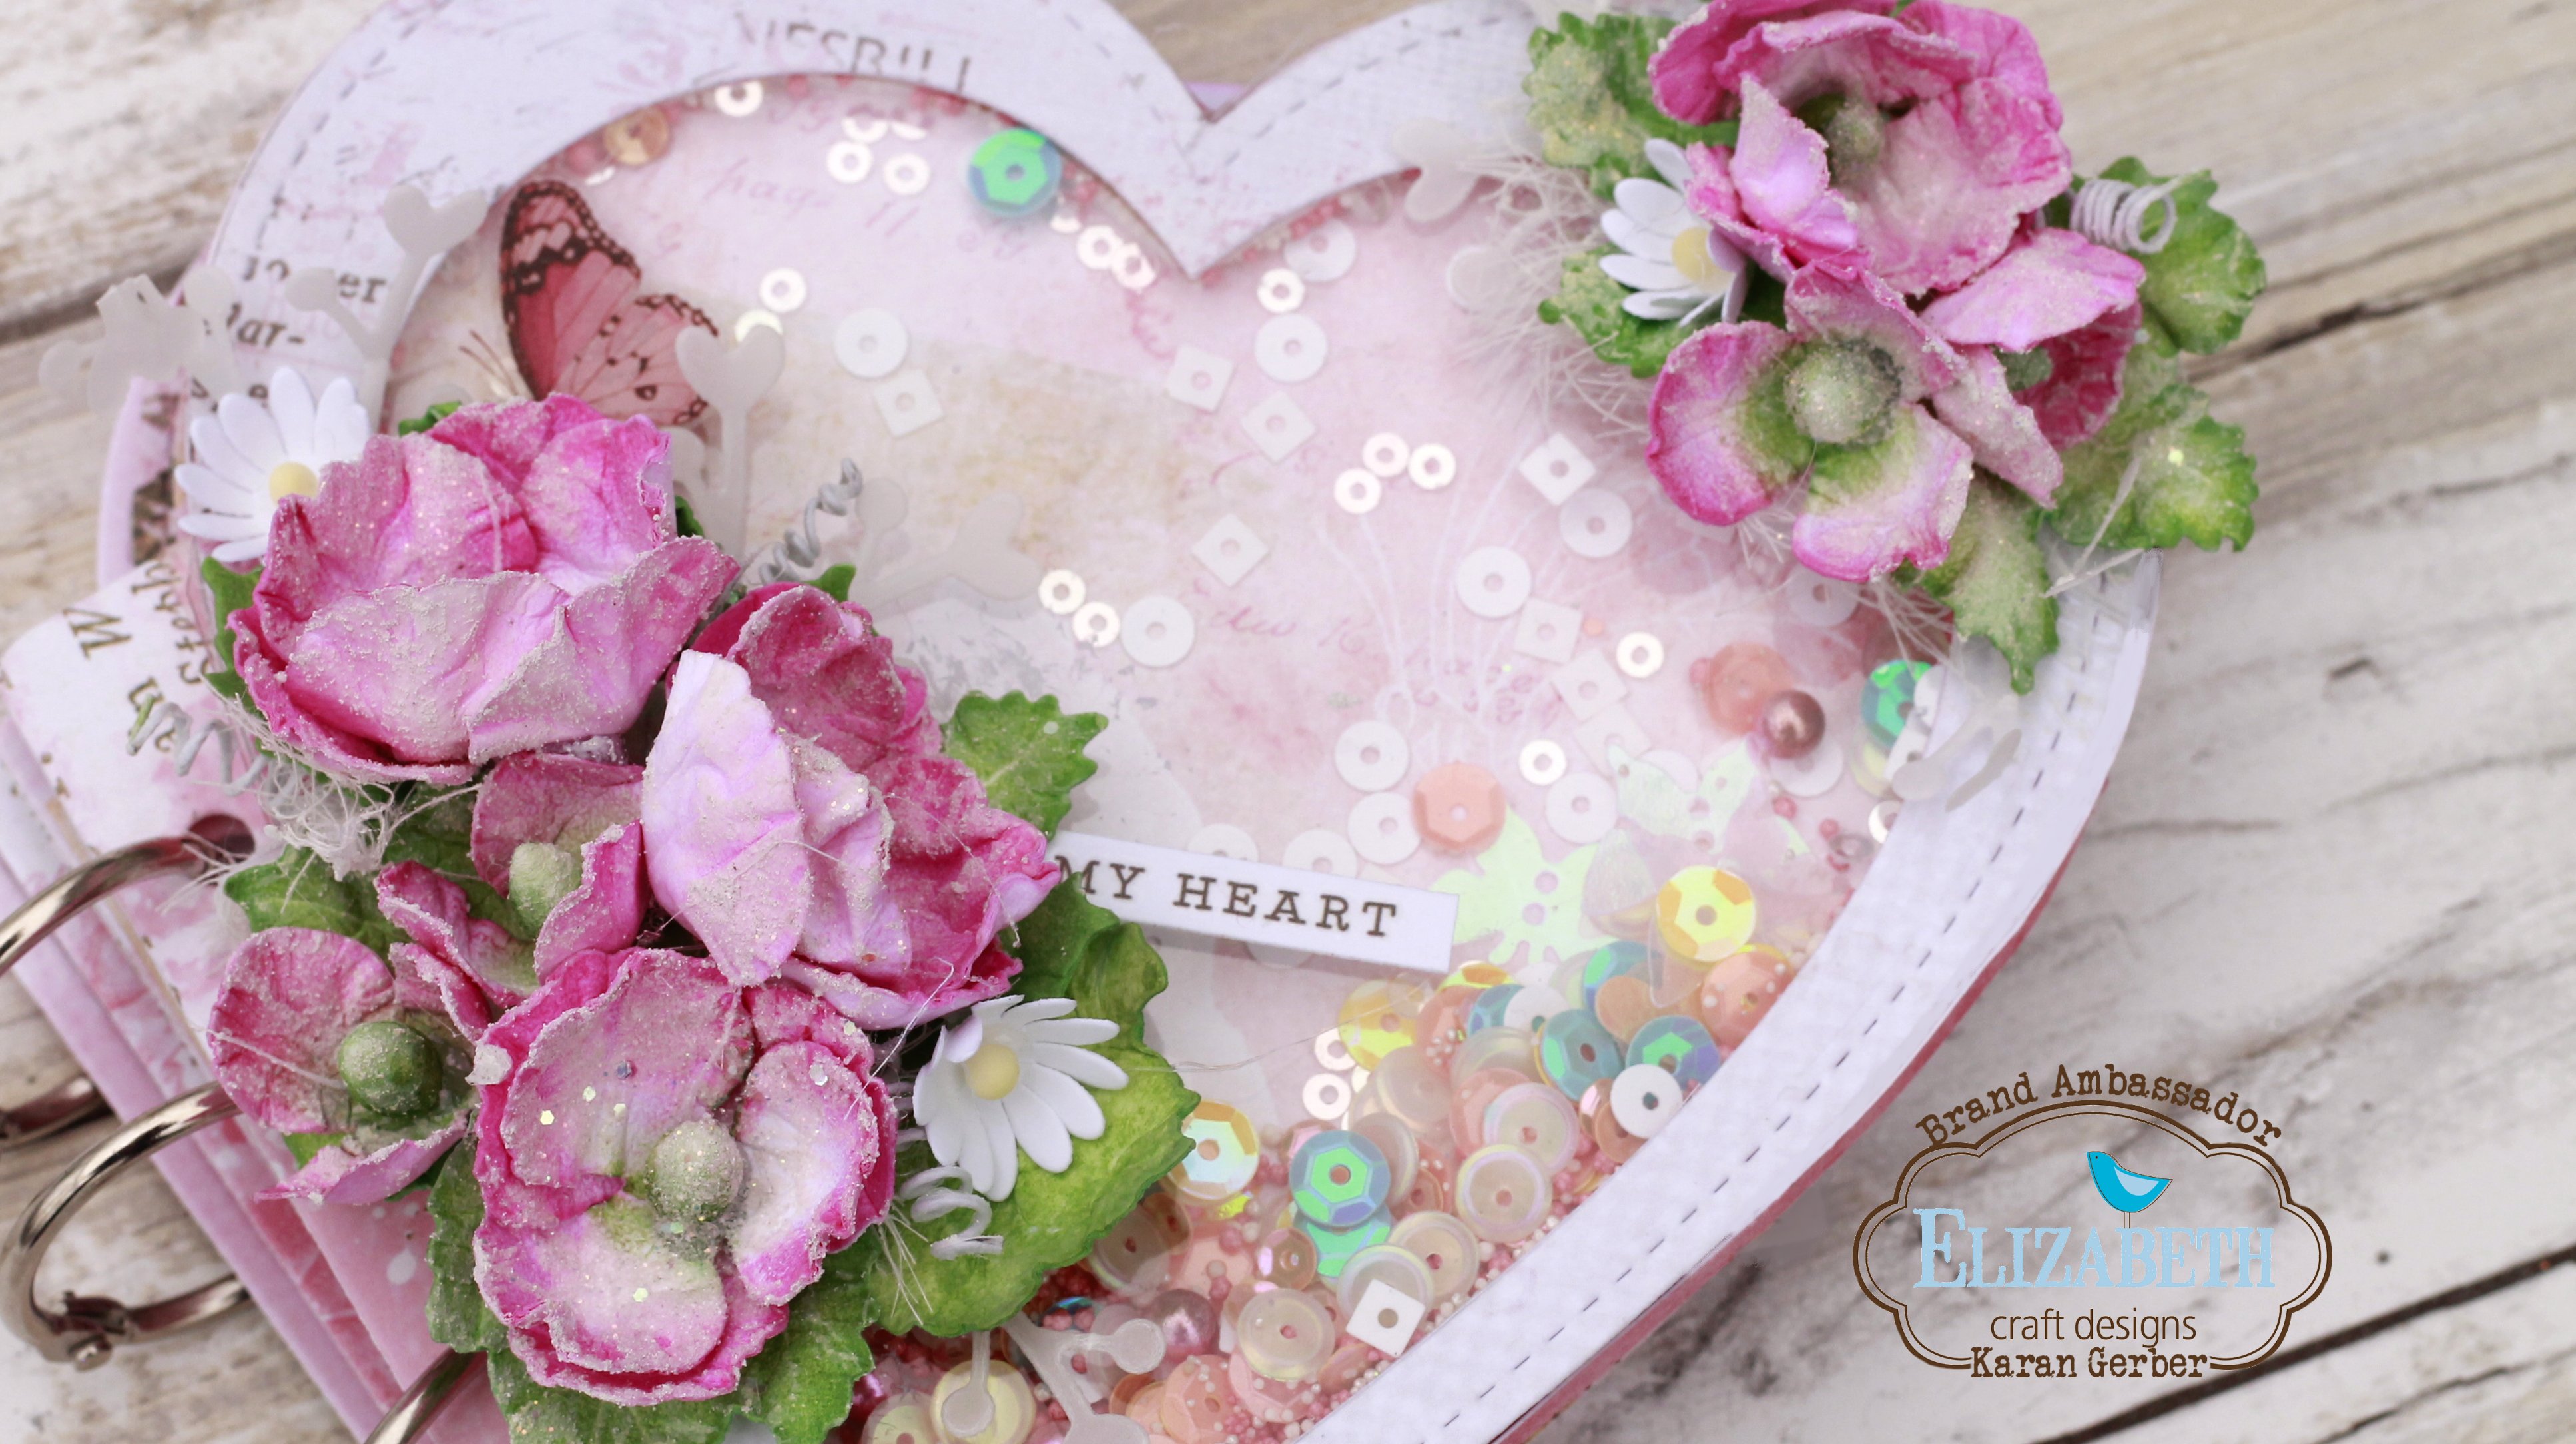
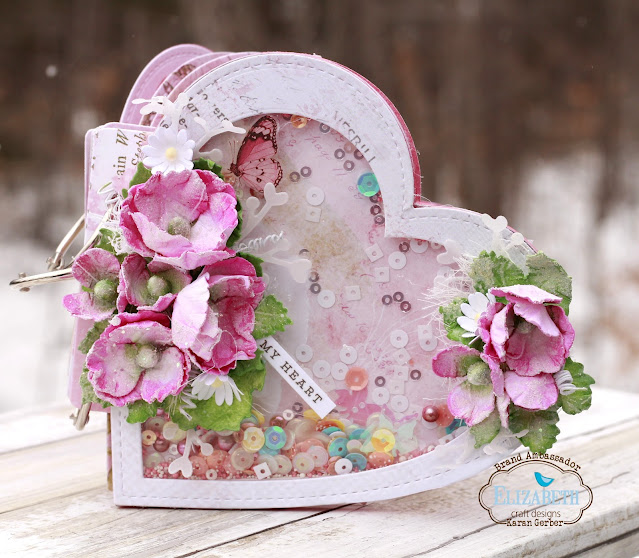
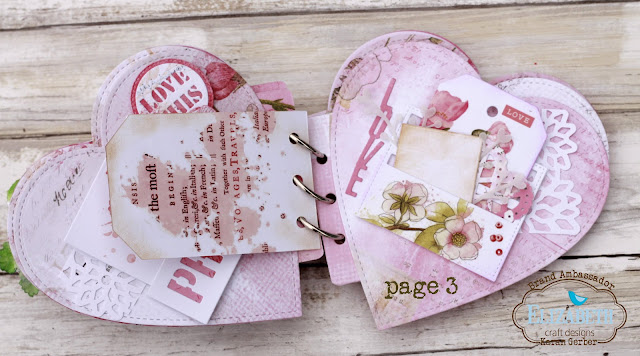
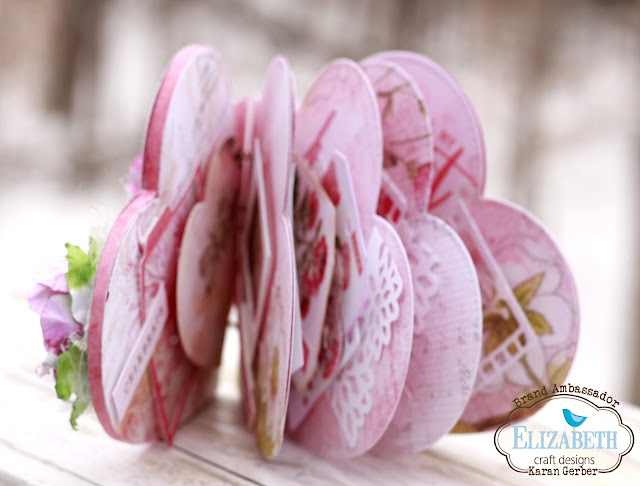
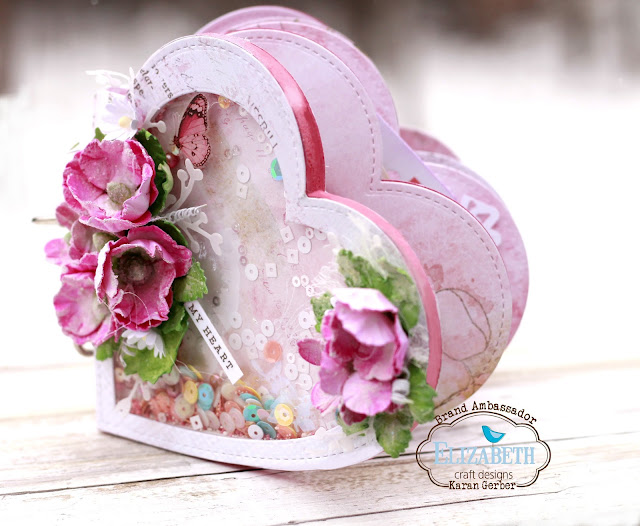
Hello Friends, welcome back, it is Karan Gerber on the blog today to share my first project for February. With Valentines coming soon, I had an idea to create a mini album from the Heart Shaped Dies.
I used Florals 4 on the Cover, coloring them with Picked Raspberry and Mowed Lawn Distress Inks. Here are some details of the mini album I created.
I created a shaker box on the front cover using acetate under that fist paper layer and then adding two layers of foam tape. The side of it actually looks like one of those heart shaped candy boxes you see.
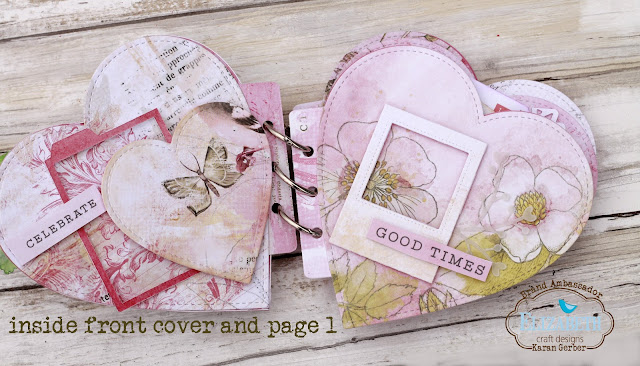
Inside front cover and first page. Here I used Planner Filmstrip (1656) and die cut the smaller frames from that set and die cut a heart. The sentiments are from the paper pack. To get the pages to work in an album, I die cut the page connector from Sidekick Essentials 16 and attached it to the back of each of the pages.
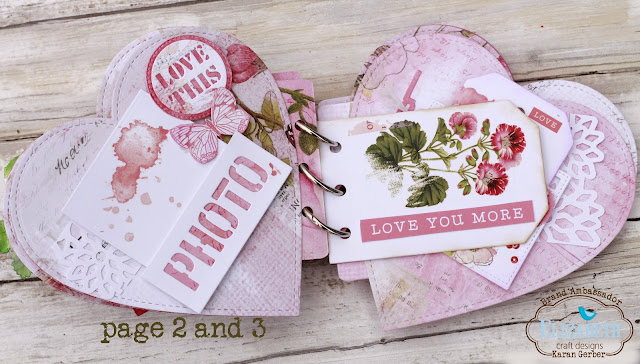
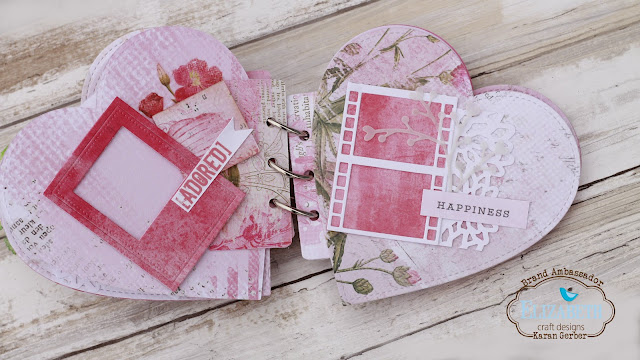
For page 2 and 3 I used Planner Essentials 3 and cut down the photo frame to suit the size of the page. The tag is from Planner Essentials 4 which I basically used as an insert here.
Page 3 and reverse of the tag. Here I used Planner Essentials 2 adding some rubons to the slide in die for the tags.
For page 4 and 5 I used the Planner Film Strip.
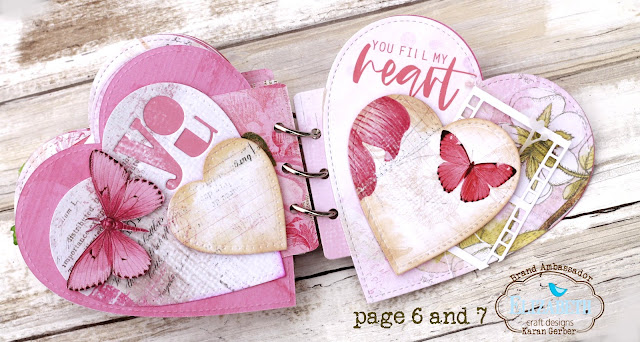
Page 6 and 7 which are the last pages of this cute little mini album. I used some heart die cuts, the filmstrip as well as the die cut “You” from Sidekick Essentials 2.
It was a fun little project to do, and I hope you give these heart dies a try to create your own little mini album.