Good morning, Karen Aicken here! For today’s post I’m sharing a project I love to make for little gifts – Wine Bottle Tags or Hangers. They dress up a bottle of wine on your dinner table and can be personalized when you are bringing a bottle of wine or cider as a hostess gift.
1. Cut heavy-weight cardstock 3-1/4″ wide and 8″ long. I used black cardstock that had been painted with metallic acrylic paint.
2. Score a line at 2-3/4″ across one of the short ends. This will be the part that fits over the wine bottle, and the top of your wine bottle tag.
3. Leading with the top edge, slip the whole strip OVER the Lorna Label centre, and UNDER the top edge. You only want to cut the very top edge. Run it through your cutting machine just til the top edge cuts, then back it out.
4. Repeat with the bottom edge.
5. Trim away the excess cardstock and you have the base of your wine bottle tag.
6. Using the scalloped circle die from the Ring Accordion die set, center it between the top edge and your score line and both the sides. Run it through your machine and set aside the little scalloped circle for another project.
7. Using the Crystal Flowers, die cut one large flower and one small circle from black cardstock.
8. Carefully adhere the largest flower from the Crystal Flowers Peel-off sheet to the die cut.
Tip: the Peel-off doesn’t fit exactly. If the center is a little skewed that’s fine – you will be covering this up.
9. Adhere one of the solid gold Peel-off flowers to black cardstock and fussy cut leaving a narrow border.
10. Use foam tape in the center, and adhere this smaller flower to the center of the large one.
11. Add a gold Peel-off circle to the black cardstock circle and adhere this over the center of the solid flower with foam tape. Set your finished flower aside.
12. Cut a 1″ wide strip of black cardstock 1″ longer than the word Peel-off you have chosen for your wine bottle hanger. This will give you 1/2″ on either side of your word. (Note: the strip in the photos is wider than 1″ to make it easier to see the technique.)
13. I have a tip to aid you in adding these larger word Peel-offs to your projects so they are straight and do not stretch! Trim the word you want to use away from the rest of the sheet.
14. Turn it face down and carefully fold the backing paper back, about 1/3 of the way up.
15. Line up the bottom of your letters onto your black cardstock strip. When you are happy with the placement, press the bottom of your letters down, then gently peel up and away the rest of the backing sheet. Press down the top of your letters and you should have it placed perfectly!
16. Now that your word Peel-off is attached, use scissors to cut ‘fish tails’ from each end. Trim the top and/or bottom of your strip as desired. You could trim your strip first, but I find I have better luck trimming after I attach the words.
17. Adhere this strip to the wine bottle tag base with foam tape as shown.
18. Adhere the layered flower with foam tape as shown.
19. Use some of the circles and rings from the Peel-off sheet to decorate the rest of your tag.
20. Hang on a bottle of wine, gourmet olive oil, or apple cider and it’s ready to go!
I’ve also made different wine bottle tags packaged in cello bags and given them as hostess gifts. Everyone seemed to love them and enjoyed using them on their own gifts and tables. I hope you liked my project and will try your hand at making some wine bottle tags, maybe getting a head start on some holiday gifts!
Hi, it’s Karen Burniston with the September Pop it Ups Designer Challenge. Each month I challenge my Designer Challenge team to use Pop it Ups dies for a specific theme. This month the challenge was to make Halloween cards and you are going to LOVE what they’ve created.
For my project and video I will teach the technique for doubling the Lorna Label Pop-up since it’s something that a lot of the designers have been doing and I get regular requests for a video tutorial showing how to do it. I added a second technique for adding a skinny box platform through the Double Lorna, allowing animation of a taller and/or heavier object (like a mummified penguin). Watch the video here:
Here are photos of the finished card, which measures 5″ wide by 5.5″ tall and will mail in an A7 envelope (5″ x 7″) for additional postage because of the bulk.
Here’s a close-up photo of my Chilly Mummy. Because of the ribbon wrapping, the arms have bulk and will naturally fall down into the “I’m going to get you!” position when the card is opened.
Here’s a side view of the card so you have a visual of all the different platforms in the double-Lorna-plus-extra-box card. The lower Lorna label, made automatically in the doubling process, acts as a floating floor and you can add horizontal slots anywhere along that floor to animate other objects, such as my tree. Use a slot/foot system to animate items all over the floor if you choose.
If you’re wondering why I didn’t simply use a slot/foot system to animate the mummy, it was only because the mummy was going to be heavy with all the bandages and especially top-heavy with the arms coming out. For that reason, I went with a full box platform instead of just a slot/foot. If you need a reminder of the video measurements:
Measure 1.75″ from the center fold of the card to place the slot die.
Use a 3/8″ x 9″ strip of cardstock, folded in half, then in half again, to create a box platform with 2.25″ sides. Trim the outer sections into small feet to make it easier to attach them through the slots.
SUPPLY LIST
Elizabeth Craft Designs Pop it Ups Dies by Karen Burniston:
Stash items, source unknown – black bat, washi tape, ribbon for bandages, spiderweb stamp
Ready for some amazing inspiration across every category of Pop it Ups dies? Sit back and let the Designer Challenge Team amaze you. If you have any questions about their projects or supplies, simply click the name to head over to their blog post where they have posted additional photos, supply lists, tips, tricks, etc.
PIVOT CARDS
Raquel Mason created this fun haunted house card using the House Pivot Card, Poppy the Owl, the All Seasons Tree and the Holiday House dies. Poppy sits atop the broom from the ECD snowman die and because the handle of the broom is attached behind the house, Poppy will “fly” when the card is opened. So clever!
Donna Wright also used the House Pivot Card with the Holiday House and All Seasons Tree, but went for a more ominous spooky feel with her black houses, Outdoor Edges silhouetting the horizon and bright glittery moon.
Donna Wright blew me away with this creation, where she created a double-House card (use the same “cut into a folded card” technique as shown in this month’s video) but then continued on with another clever technique which was to invert the folds so the double-house is a pop-up inside the card rather than a pivot. She mixed house parts from the Holiday House and the House Pivot Card to fashion her two houses and stamped and colored some cute trick-or-treaters to complete the look.
Fran Sabad also used the House Pivot Card and wanted to show that a new stamp set from Stampin’ Up! will work perfectly with this die. Make sure you click over to see her card’s interior, too.
SPIRAL CIRCLE PULL CARDS
Helen Cryer created the cutest Frankenstein card ever using the Spiral Circle Pull Card. Helen comments on her blog that this card was made easier by having all the control over card size and fold placement. The Spiral Circle Pull Card needs only a card with a fold (and the fold can be anywhere) to turn it into a z-fold flip card.
Frances Byrne also used the Spiral Circle Pull Card, but did something completely different – she created a gatefold double pull with the Clock and Gears on the first circle and the spiral inside the second circle. Check out the eyeballs on the spiral – what a great spooky idea!
Karen Aicken shows yet another look for the Spiral Circle Pull Card – leaving the spiral exposed so it is visible in the closed position. You’ll see her cute googly-eyed crows peeking out from within the spiral. Then, pull the card open and the crows will fly. How fun!
GENERAL POP-UPS
Summer Hills-Painter and I were definitely wave-lengthing on our ideas this month. She, too, created a Chilly-the-Mummy card. The pop-up die is the Lots of Pops, which comes with several platforms for decorating. She used just the shadow layer of Chilly, cut from green cardstock and wrapped with bandages from her first aid kit! I especially love the inking on her moon.
Shelly Hickox created a towering haunted house using the Holiday House die with folded paper so each section of the house would become taller. She explains this process on her blog. Shelly used the Lorna Label pop-up to animate her spooky house and fence.
Kelly Booth also created a double-Lorna card this month and decorated it to perfection using stamped and colored images and her own background inking technique. Kelly is amazing with her Copics as you can see here!
Karen Aicken used Hoppy the Frog on the Lucy Label pop-up die for a fabulous Hoppy Halloween card. This side view shows the differences between the Lucy and the Lorna pop-up dies. Lucy (used here) is a smaller label that sits very far forward into the card. The extra box platform (used for the bat) is optional.
Karen Aicken‘s next card uses the Lorna Label pop-up. You can see that the Lorna is a larger label that sits close to the back wall and atop a required box platform. In this card Karen used it to animate the Holiday House die and made a clever path using the Outdoor Edges.
Caz Counsell blew me away with her FrankenPop card, not only for the very clever and cute styling of Poppy the Owl as Frankenstein, but also for the amazing texture she created with the Damask Embossing folder for the foreground and the trees. Everything about this card is amazing!
ACCORDION ALBUMS
Shelly Hickox made a sensational 3-page Katie Label Accordion with clear pages that have been stamped with spider webs. What an amazing combination of patterns and textures. Shelly explains how she created this look on her blog post. I also have a video tutorial for adding clear pages to Accordion albums.
Raquel Mason shows off the brand new Halloween in Frame peel-off stickers, designed by Judi Kauffman to perfectly coordinate with the Katie Label Accordion die. For Raquel’s card, she used the silver peel-off stickers, plus microfine glitter and bright greens, purples and oranges. The Katie Stars Frame Edges are used on the album and she also added a string of banners across the pages using pieces from the Lots of Pops die. What fun!
Kelly Booth also used the same dies and stickers as Raquel, but chose to do a four page Katie Label Accordion with the black peel-off stickers and despite similar color choices, the two cards feel completely different. That’s the wonderful thing about die cutting, where every card is a new card, even with the same ingredients.
Frances Byrne used Poppy the Owl and the broom from the ECD snowman die for a fabulous 3-page Fancy Accordion Album. This card is fabulous – clean, crisp and loads of fun!
Fran Sabad recently injured her arm and has been crafting one-handed (and her left hand, too!) I certainly can’t tell a difference in her amazing creations, can you? Check out this 3-page Circle Accordion with fabulous pieces and parts. Fran found the perfect green bubbles for her brew.
Fran Sabad also made a 2-page Oval Accordion card with a witchy Poppy the owl and the new Oval Clouds Frame Edges. What a perfect combination of colors!
CHARACTER DIES
Karen Aicken made this wonderful card front for her haunted house card shown above. I love her styling of Poppy the Owl with shiny eyes and patterned body. She added a stamped and glittered witch hat and illustrates how perfectly the All Seasons Tree works as a branch for the Character dies.
Caz Counsell shows how perfectly the decorator dies in the Pop it Ups collection can be used for flat card fronts. Here she has used Hoppy the Frog for a wonderful witch’s brew card. Notice the cauldron’s feet – eek! Love that!
So how about it? Feeling spookily inspired to try your own version of one (or more) of these cards? One thing I can guarantee is that pop-up cards ooze fun. They’re fun to make, fun to give and most definitely fun to receive!
I’ll be back next month on October 15th for the next Designer Challenge. In October we’re doing a theme called Make it Manly where we will inspire you with card ideas suitable for the men and boys in your life using Pop it Ups dies.
This is Rita Edwards here. Today I would like to share my new nautical-themed Thank You card with you.
As always, I hope you have a nice cup of coffee or tea in your hand so you can sit back and enjoy my tutorial.
This is how you can create this fun nautical card:
1. Cut wood patterned cardstock 6″ x 12″. Score at 6″ and fold to create top fold card base.
2. Cut a piece of the same wood patterned cardstock 6″ x 6″ and adhere to the top portion of the inside of the card. Cut blue cardstock 6″ x 6″ and adhere onto the bottom portion of the inside of the card.
3. Using the Ring Accordion Card die set, position the largest accessory die 1″ from the top and 1″ from left side on the front of the card base and die cut. This cut will serve as the base of the ‘porthole’.
4. Using the Ring Accordion Card die set, trace around the outer ring edge and fussy cut the blue cardstock, create 4 large circles. Using the same die set, position the largest accessory die in the center of these large circles and die cut. These larger rings will be the outer frame of the ‘porthole’.
5. Using the Ring Accordion Card die set, position the largest accessory die inside the ring card die and die cut 4 rings, cut out center label and trim off the long side tab to create rings. These smaller rings will be the secondary frame of the ‘porthole’. Using the same ring card die, die cut clear acetate, which will be used as the window of the ‘porthole’.
The photo below will show you all of the ring cut pieces for the ‘porthole’ frame.
6. Adhere 3 of the larger rings onto the card base to create a large frame around the ‘porthole’. Adhere 2 of the smaller rings onto the larger rings to create a smaller frame around the ‘porthole’. Adhere the acetate circle die cut on top and finish with the last smaller ring die cut. Adhere 1 large ring die cut onto the inside of the card base with one smaller ring die cut on top. Place red glitter dots onto the larger ring frames to complete the ‘porthole’. Set aside.
7. Die cut 10 flags from patterned and blue papers using the rectangle flag and label dies from the Lots of Pops die set. Adhere the flags onto thin natural hemp cord. Make sure that the sting is long enough to cross the card from the left all the way to the top right corner. Set aside.
8. Have Double Sided Adhesive, Cool Diamond Silk Microfine Glitter, Fishes and Lighthouses
Peel-off stickers in Gold, white cardstock and a clean non-stick craft mat ready for this step:
Peel off the release sheet from the Double Sided Adhesive Sheet and adhere the adhesive side to white cardstock. Peel off the other release sheet and place it upside down on your craft mat
(shiny side up). Place the peel-offs upside down on the release sheet (sticky side up) and place your white cardstock with the Double Sided Adhesive Sheet applied to it on top. (This will pick up the stickers onto the adhesive.) Turn over, remove the release sheet and cover adhesive and peel-offs with Cool Diamond Silk Microfine Glitter. Polish with your finger. Brush off the excess glitter; return it to the jar for other projects.
9. Use your Copic or other alcohol markers to color the glittered peel-offs. Fussy cut around the peel-offs. Els has a wonderful video demonstrating this technique on YouTube: Silk Microfine Glitter – Coloring with Alcohol Markers
10. Adhere the flags and bell onto the card front with foam squares. Adhere the glittered fish and seaweed, as well as the gold outline bubbles (circles) on the inside of the card, making sure that one fish is centered under the porthole. (Refer to photo.). Add Glitter Dots in Red and Blue to the fish. Add Glitter Dots in Red, spaced at even intervals around the porthole, on both the inside and outside of the card.
11. Die cut Thank You from blue cardstock. Adhere to lower right corner of card front.
As always, I would like to thank you for following my tutorial and I hope that you enjoyed reading it as much as I did creating it.
– Momenta cardstock
– The Gilded Paper stack by DCWV
– Beach House paper pack by the Paper Studio
– Natural hemp cord
– Foam squares
– Tombow Mono Multi Liquid Glue
– Toothpick or a corsage pin to apply glue to hemp cord
– Copic Markers: G21, G99, R59, Y08 and 0 (colorless blender)
Hi Everyone, it’s Jackie with today’s post. I have this passion of collecting all these fine papers, especially the Asian ones. I think these papers go well with the Asian Vases and the Asian Signs Peel-offs.
Instructions:
1. Cut blue cardstock 7″x 10″ rectangle; score and fold in half to create card base.
(5″x 7″ side-fold).
2. Cut blue Asian paper 4 3/4″x 6 3/4″ and adhere to card front using double-sided adhesive. Cut blue swirl paper 4 1/2″x 6 1/2″ and adhere on top.
3. Place Asian Vase Peel-off onto turquoise patterned paper. Fill the spaces in the three flowers with the black negative pieces from the peel-off sheet. Cut out the Vase.
4. Cut one label from Blue Iris Shimmer Sheetz using the Katie Label Accordion die. Reminder: Use the Metal Adaptor Plate when die cutting Shimmer Sheetz. The cutting side of the die faces the metal plate with the Shimmer Sheetz inbetween. Emboss label using Swirly Curves folder. Highlight the pattern with black StazOn ink. (Note: There are two sides to the pattern – make sure to ink the side with the raised OUTLINES, not the raised SHAPES – Refer to the photo)
5. Adhere all pieces, including blue mesh, to card front. Use foam tape or dots for added dimension under the vase, flower branch, and label.
6. Add Asian Signs Peel-offs at the upper right to finish the card.
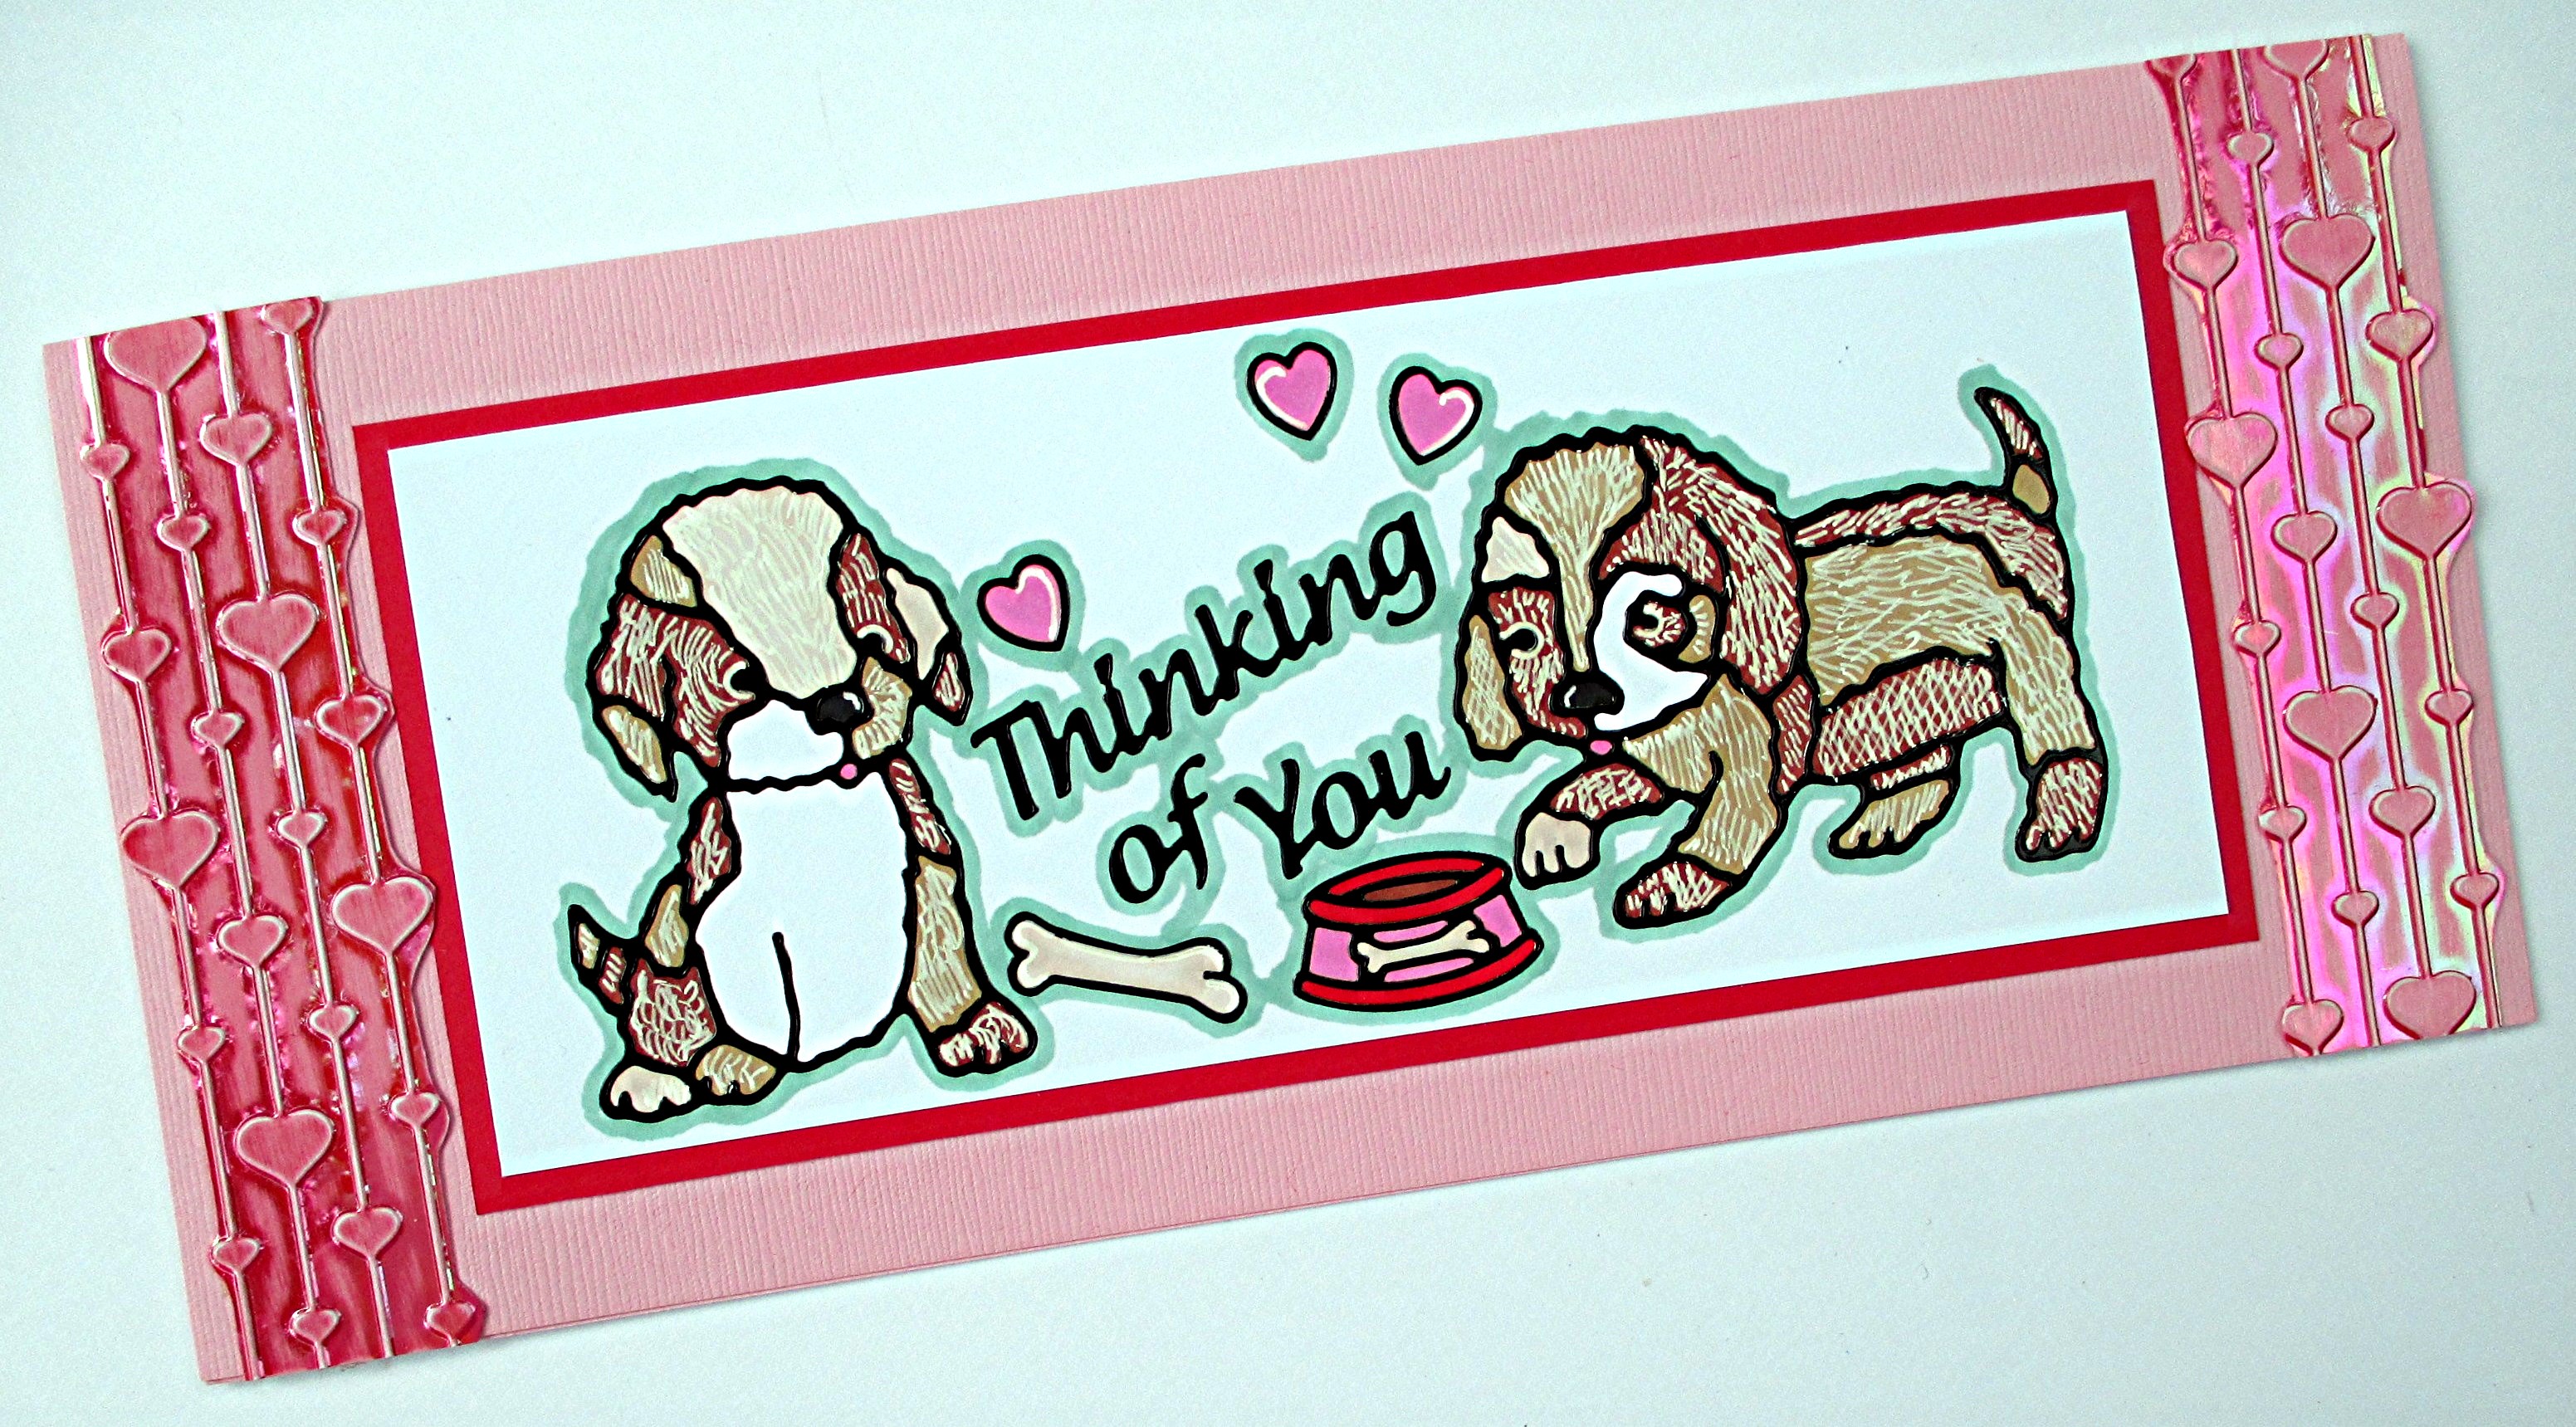
Judi Kauffman is back as today’s Guest Designer and once again she’s been making cards three at a time. This trio will tug at your heartstrings – Puppies and more puppies. Nothing could be cuter! And speaking of Heartstrings, that’s the name of the embossing folder she chose.
Thanks for inviting me to be here at the Elizabeth Craft Designs blog today, Joset. I have a soft spot for puppies, so of course I fell in love with the new Puppies Peel-offs (2584). They’re fun to color. And yes, I do seem to be making cards in batches of three lately. But there are five puppies on the peel-offs sheet so I could have made five one-pup cards instead. And I do have all of the negative shapes left for other projects so this is just the start!
Beginners: These cards are very easy and quick to make. Skip the pen doodling in step 3 and they’re even faster to finish!
INSTRUCTIONS
1. Make top-fold card bases from pink linen-finish cardstock or use purchased pre-folded cards with matching envelopes. Option: Pick a different color palette instead of pink and red.
Sizes shown: 4.25” x 5.5” and 4” x 9.25”.
2. Place the peel-offs onto smooth white cardstock, arranging them as shown or as you prefer. Puppies can face each other or sit or stand on their own. Include the bones, bowls, hearts, and a greeting, or place the greeting on a separate piece of cardstock. Use the photos for layout ideas. TIP: Substitute a different peel-off for the greeting – Happy Birthday, Congratulations,
Get Well Soon. Or hand-write, stamp, or computer-generate a greeting if you want to say something that is not available in peel-offs.
3. Color puppies, bowls, hearts, and bones. Add doodles and dots with a white pen. Cut out, leaving a simple rectangle around the puppies (like the 4” x 9.25” card) or fussy cut selected areas, allowing portions of the peel-offs to extend past the rectangle (like the A2 cards). Option: Instead of realistic colors, puppies can be silly and bold (stripes, zigzags, pink and yellow with purple spots or whatever suits the occasion and the recipients!).
4. Mat the white rectangles to solid red cardstock (or color of choice).
5. Use the Heartstrings folder to emboss two 4” x 5” pieces of Red Iris Shimmer Sheetz. Accent the left and right sides of the card front with small bands or squares of the Shimmer Sheetz or use it as a larger frame behind a puppy and a message block. Keep the scraps for other projects. Options: Lightly sand to reveal the white core of the Shimmer Sheetz and tone down a bit of the shine. Use either side of the embossed Shimmer Sheetz (one side has raised hearts and strings; the other side has the reverse – de-bossed pattern).
6. Assemble the cards. Use foam tape or dots for added dimension under the puppies and message block.
7. Get out some postage stamps and send the cards on their way! Or deliver them in person, along with a hug.
Debra back again to share a tribute to summer with you. Even though fall has officially begun, here in Texas it’s still blazing hot, sunny and green. It sure doesn’t feel like fall! My mind keeps heading back to the beach and the wonderful days of summer I am not quite ready to let go. The new Seashells Peel-Offs inspired me to take those feelings and create a card to embody sun, surf and the carefree life.
Here’s how I made this card:
1. Fold a piece of white 8 1/2 x 5 1/2 cardstock in half to form a standard A2 size base. Emboss the front half with the Mini Mosaics Embossing Folder.
2. Cut a piece of white cardstock to 3 3/4 x 5. Cut a rectangle out of the middle leaving a 1/2″ edge all around to form a frame shape. Save the middle panel, we will use that to build our seascape.
3. Using a textured embossing powder sprinkled with a little Fire Opal Silk Microfine Glitter, heat emboss the bottom third of the frame to give the look of sand.
4. Pick 5 seashells from the new Seashells Peel-Offs and place them on a page from a cast-off book or piece of sheet music. Lightly smudge with brown ink to give a vintage look and to add the illusion of some texture. Color with a clear glitter paint pen to add shimmer.
5. Roughly cut around peel-offs and adhere them to a piece of white cardstock for more stability. Then fussy cut peel-offs. *Note- using a black marker to cover the cut white edge is a great way to hide any areas that didn’t get trimmed closely enough. Just be careful not to let the marker jump to the front of your shell and leave a mark. Work slowly and you should get good results.
6. Tear strips of three shades blue cardstock- dark, medium and light, into thin uneven strips. Adhere them to the rectangle piece cut in step 2 starting with the lightest color at the top overlapping with a darker color until the whole piece is covered. Add a few random darker pieces in for more interest. Curl back some of the edges for added texture.
7. This is the completed panel. Do not trim the excess off the sides unless they stick out past the edge of the frame. The extra length on the side will cover any gaps when you adhere the panel behind the frame.
8. To assemble the card, add foam adhesive to the back of the frame. Only peel the liner off the bottom edge. Center it on the card base and adhere down the bottom edge only. Add adhesive to the back of the torn panel. Slide the panel behind the frame, center it and secure down. Peel the liner from the rest of the foam adhesive on the back of the frame and secure down.
9. To complete the card, arrange the seashells on the front. Die cut Hello from white cardstock and adhere to top of frame. Free hand cut two tiny “seagulls” from the edge of the sheet of Peel-Offs and add to the sky on the torn panel. Here is another look:
I hope my card helped you hang on to summer just a little bit longer! Thanks for stopping by. Have a great day!
This card uses one of the brand new Peel-Offs from Elizabeth Craft Designs – Seashells! I love everything related to the sea, so I was particularly happy to play with these.
1. Cut card base 4 1/4″ x 11″. Score at center and fold.
2. Cut patterned paper 4″ x 5 1/4″. Adhere to card base.
3. Adhere Double-Sided Adhesive to white cardstock.
4. Peel off protective backing and turn it over on the table in front of you with the shiny side up. Peel off the two seashells and the crab sticker as shown in the picture above and place stickers sticky side UP on protective backing. Pick up adhesive covered cardstock and turn it over onto stickers. Turn over so the cardstock is on the bottom and peel off protective backing. Stickers will now be right side up on top of adhesive.
5. Cover adhesive with Silk Microfine Glitter. Shake off excess. Burnish with finger.
6. Repeat steps 3-5 until all stickers are coated. Use Fire Opal, Orange and Forest Green Silk Microfine Glitter for the other seashells.
7. Color Cool Diamond glittered seashells and crab with Copics or other alcohol-based markers as shown in the photo above, blending from lighter to darker tones for dimension.
8. Cut out all images.
9. Adhere knotted twine fishing net to card.
10. Use dimensional foam adhesive to adhere crab and seashells to card.
11. Die cut Hello from black and white cardstock. Layer and adhere with white on top, slightly offset to allow black to show as a shadow.
The new Peel-Offs include nautical themed designs. I decided to step a little outside my box and create something different, at least for me anyway since it’s not a theme I frequent.
Making the Card
1. From the Nautical paper pack: cut a piece of red cardstock 10×7 inches. Fold in half to create a card base. Cut a piece of cream cardstock to 9 1/2 x 7 inches; fold in half. Using Lorna Label Pop Up main die, center and die cut along fold.
2. Cut piece of cream cardstock 6 1/2 x 4 1/2 inches. Cut piece of blue/cream striped cardstock
6 1/2 x 2 inches; adhere to bottom of cream cardstock. From Basic Black Shimmer Sheetz, cut a thin strip 6 1/2 inches; adhere over seam as shown.
3. Stamp compass rose on graph paper from Far and Away paper pad using Black Soot Distress Ink. Tear it out in a square. Using the blending tool, add Antique Linen Distress Ink around edges. Crumple.
4. Using main die from the Lorna Label Pop Up, die cut label from red cardstock and trim down to just the label. Find the US map in the Far and Away paper pad. Using banner die, cut flags of varying lengths as desired. Arrange and adhere to red label as shown; trim from back with scissors following label contour. Adhere a piece of cheesecloth from behind as shown.
5. Adhere Peel-Offs shown on card to watercolor paper and paint with watercolors. Fussy cut around each – cut “rope” off life preserver. Using your fingers, gently shape by rounding edges down for all but the life preserver.
6. Braid a length of blue/white twine to about 9 or 10 inches. Use half to tie a nautical knot. Die cut a banner from Lorna Label Pop Up set from cream cardstock; set a red eyelet at each end of banner and thread ends of twine as shown, adhering and trimming ends behind banner.
7. Arrange and adhere pieces to front of card as shown, using dimensional tape for label, shells and banner.
8. From blue cardstock, die cut label from Lorna Label Pop Up and emboss with stitching; sand lightly to show stitches. Adhere to center of pop up.
9. Cut 6 copies of Hello word from black cardstock. Glue each layer on top of the other to create a thick stack. Add Glossy Accents to top layer. Set aside to dry. Cut talk bubble from cream cardstock. Adhere Hello to talk bubble.
10. Using the other half of the braided twine, glue behind handles of life preserver.
11. Color some of the transparent Glitter Dots in matching blue with alcohol marker (optional). Adhere to pop up as shown.
12. Adhere pop up to inside of card. Adhere everything to pop up as shown using dimensional tape.
It’s no trick – you’re in for a treat with Guest Designer Judi Kauffman’s Halloween Card Trio!
She used Peel-offs she designed for Elizabeth Craft Designs – Halloween in Frame Peel-offs 2585 in Gold and she sneaked in some leftovers from an accordion card, too.
Thank you for inviting me to be today’s Guest Designer, Joset. I love everything about Halloween: Candy, costumes, and – drum roll, please – CARDS! If you are an experienced card maker, scroll through the project photos and create your own versions. If you are a beginner, I hope my very thorough (but lengthy) instructions will ensure your success.
Halloween in Frame Peel-offs can be used in a variety of ways and they are available in Gold
(my choice today), Silver and Black. They match Karen Burniston’s Katie Label Accordion Card die (see the card shown below for inspiration) or you can use them for side-fold cards like the tall trio featured today.
Stretch the sheet by using the “extras” – broom, candy corn kernels, mouse, negative shapes left over from the witch’s hat and the small spider – on treat bags, place cards, or on more cards.
INSTRUCTIONS:
1. Place Halloween Peel-offs (including the negative pieces from the witch’s hat) onto white cardstock and color with alcohol-based markers or medium of choice. Tip: For the extra hat, use orange or another bright color for the hatband but color all the way around the hat shape with black marker.
2. Cut out the Peel-offs.
3. Cut a 3” x 12” vertical strip from the right hand side of the 12” x 12” Somewhere in Time “Elegance” paper. Cut the strip into three 4” pieces.
Secret Design Strategy: This is NOT a Halloween theme paper! We’ll hide the hot air balloon and sewing pattern under the Halloween in Frame Peel-offs in step 6.
4. Mat these three rectangles onto orange cardstock leaving a narrow border.
5. Double-mat Howl at the Moon and Beware cardstock stickers onto black and orange cardstock. Single-mat You Bewitch Me cardstock sticker onto orange cardstock.
6. Complete the card fronts. Use the photos as a reference for the layouts. IMPORTANT: Be sure to position the Spider, Witch and Jack O’ Lantern onto the patterned paper rectangles precisely as spelled out below:
*WITCHY CARD – Notice the position of the faux stitching and the ivy tendril on the Witchy card. (This was originally the top third of the paper strip.)
*SPIDER CARD – Notice the position of the faux stitching and tiny bit of ivy on the Spider card. (This was originally the middle third of the paper strip, but it has been turned upside down so the lighter area is at the right and the ivy is at the bottom.)
*JACK O’ LANTERN CARD – Notice the position of the faux stitching and two shades of brown on the Jack O’ Lantern card.
(This was originally the bottom third of the paper strip.)
7. Add foam dots or tape under the large label-shaped Peel-offs, candy corn, mouse, broom, and extra hat. Use double-sided adhesive to adhere the patterned paper rectangles.
8. Final details:
*WITCHY CARD – Add the extra hat, the mouse, two rows of Lines Dots Peel-offs, four Velvet Adhesive stars (leftovers from the Katie Stars Frame Edges used on the 3-panel Katie Label Accordion Card shown earlier for inspiration), the black spider peel-off (an extra from the sheet used for the Accordion card), and the matted cardstock sticker.
*SPIDER CARD – Add 8mm wiggle eyes (use GemTac glue), two extra candy corn kernels, four rows of Lines Dots Peel-offs, the gold spider from the Halloween in Frame Peel-offs sheet, and the matted cardstock sticker.
*JACK O’ LANTERN CARD – Add the extra broom, one candy corn kernel, four rows of Lines Dots Peel-offs, three Velvet Adhesive stars (leftovers from the Katie Stars Frame Edges used on the 3-panel Katie Label Accordion Card shown earlier for inspiration), and the matted cardstock sticker.
9. Options:
*Color on Silk Microfine Glitter for extra sparkle.
*Change to a different layout and card size, for example, square, 5” x 7”, accordion, or standard A2 measuring 4 1/4” x 5 1/2”.
ProMarkers (Letraset); ColorMates Smooth & Silky 90# cardstock in White (WorldWin Papers); Somewhere in Time Collection 12 x 12 #16401410 Elegance (BoBunny); Pre-made 4” x 9 1/4” cards with matching envelopes (Bazzill Basics Paper); An Eerie Tale Collection Cardstock Stickers (Graphic 45); 8mm wiggle eyes; foam dots or tape; GemTac Glue to attach wiggle eyes (Beacon Adhesives); Orange and black cardstock
Hi crafty friends, it’s Raquel here today. I wanted to make a fall theme card with lots of texture, so I used burlap ribbon, peel-offs and Velvet Adhesive Sheets to create this project. I loved discovering and learning a new way to use Velvet Adhesive Sheets! Let me show you how it works.
1. Cut tan cardstock at 5.5 x 8.5. Score at 4.25 and fold in half for a standard A2 size card base.
2. Cut Bronze Shimmer Sheetz at 4 x 5. Emboss using the Trendy Tiles 1 embossing folder and lightly sand with a sanding block. To alter the sanded and embossed Shimmer Sheetz, pounce Blending Solution, Currant & Meadow Alcohol Ink onto Shimmer Sheetz and swipe the White StazOn pad over the top of the Shimmer Sheetz. Tip: To avoid getting any alcohol ink onto the white ink pad, use an applicator tool instead of the pad to apply the color.
3. Die cut the words Thank You three times from white cardstock and once from White Velvet Adhesive Sheet. Layer and glue the four pieces on top of each other, ending with the Velvet on top. Use markers to create an ombre (blended color) effect. Start with the darkest color at the bottom and blend to the lightest color at the top. Tip: It’s very easy to color on Velvet Adhesive Sheets, and it’s so pretty too!
4. Cut a length of burlap ribbon to 5.25 and staple to Shimmer Sheetz.
5. Use fine-point tweezers to remove Pumpkins Peel-off and place it sticky side up on a clean craft sheet on your work table. Cut a piece of White Velvet Adhesive large enough to fit the Peel-Off. Place Velvet Adhesive Sheet (Velvet side down) on top of the Peel-Off. The Peel-off will lift onto the Velvet.
6. Color with Tombow Dual Brush Markers. Use the blender pen to blend the colors. Set aside to dry. Cut out images. (Drying time depends on climate and how heavily the color is applied.)
7. Assemble card as shown. For added dimension, use foam tape behind the pumpkins.
8. To decorate a coordinating envelope: Cut a piece of Sticker Transfer Sheet large enough to fit the negative pieces leftover from the Pumpkins. Place Sticker Transfer Sheet on top of negative pieces and burnish with a bone folder or the bowl of a spoon. Slowly lift up the Sticker Transfer Sheet to make sure all pieces have been lifted. If not keep burnishing. Move the Transfer sheet to the lower left side of the envelope and burnish again to release the pieces onto the envelope.
I hope you have enjoyed this tutorial and feel inspired to try it yourself.


![Frances1_KBDCwitchingwm_thumb[2]](https://i0.wp.com/www.blog.elizabethcraftdesigns.com/wp-content/uploads/2014/09/Frances1_KBDCwitchingwm_thumb2.jpg?ssl=1)
![Frances2_KBDCwitching2wm_thumb[3]](https://i0.wp.com/www.blog.elizabethcraftdesigns.com/wp-content/uploads/2014/09/Frances2_KBDCwitching2wm_thumb3.jpg?ssl=1)
![Frances3_KBDCwitching3wm_thumb[3]](https://i1.wp.com/www.blog.elizabethcraftdesigns.com/wp-content/uploads/2014/09/Frances3_KBDCwitching3wm_thumb3.jpg?ssl=1)


![Halloween-B[1]](https://i2.wp.com/www.blog.elizabethcraftdesigns.com/wp-content/uploads/2014/09/Halloween-B1-e1410209598524.jpg?ssl=1)


